SlideShare ist ein Scribd-Unternehmen logo
1 von 52
1

INSTALLATION

Step 1- Use the installation CD provided to you by CDTECH or run through the setup
you downloaded from the internet.


Step 2- The Setup wizard opens. Click Next to proceed.
2

Step 3- Select a path for the setup files by clicking Browse. A shortcut is created for you
on your Desktop.
     Everyone- installs the software for everyone using the system.
     Just me- installs the software only for you i.e., the user currently logged in.


Step 4- Click Next to confirm and start installation.
3

Step 5- Advance Broadcaster is now being installed.


Step 6- A desktop shortcut for Advance Broadcaster is created.
4

CONNECTING YOUR MOBILE PHONE/MOBILE PHONES TO YOUR
SYSTEM

Three ways of connecting your mobile to your system:
   1. Data cable
   2. Bluetooth USB Dongle
   3. Blue Soleil software

Step 1- In Sending SMS tab, select the port in which the mobile is connected to the
system from the port list.
Finding the port number
    • Select Add Modem to find out the port number in case of data cable and
        Bluetooth connectivity. The heading Standard Modem over Bluetooth link
        indicates the port number in case of Bluetooth.
    • Select Show Bluetooth Devices to show the mobile numbers connected through
        Bluetooth.
5

Step 2- Click Connect to establish the connection. Disconnect button will disconnect the
established connection. Refresh button closes the application and reopens it.

Once connected a Green flag appears along with a “Connected” message.


Step 3- The port in which the mobile/mobiles is connected appears in the box.
6

SAVING SMS MESSAGES

Step 1- Click on SMS Storage icon in the Sending SMS tab. In the Store SMS window
enter the message to be stored.
    • Title- Give a heading to the message you wish to store
    • Message- The contents of the message to be stored.


Step 2- Click Save to save the entered message.
7

Step 3- Other options:
        Delete- will delete the selected message.
        Back- will close the window to go back to the main window.
8

CREATING GROUPS

   •   Groups help organize your recipients. Groups can be created in the following
       ways:
          o Manually typing mobile numbers. (Page 9)
          o Importing numbers from saved documents.(Page 10)

Click Add Groups icon in the Sending SMS tab. Add Group Numbers window
appears.
9

Creating groups by manually typing numbers in Add Group Numbers window

Step 1- Beside Group Name enter the name of the group. In the database panel seen,
   • Name- Enter the name of the recipient.
   • Mobile No- Enter the mobile number of the recipient.


Step 2- Press Save and the numbers and names entered are saved in the group you
created.
    • Clear button will clear the window temporarily.
    • Back will refresh the creation by going back to the main window
10

Creating groups by importing numbers into Add Group Numbers window

Step 1- Click on the Import icon in the Add Group Numbers window. A File Selection
dialogue box appears.


Step 2- Click Browse to select the path of the file to be imported. An Open dialogue box
appears.
11

Step 3- Click Next to proceed.
   • If the file uploaded is a notepad document then Text File Importer window
        opens.
   • If the file uploaded is an excel document then Import Wizard opens.
12

Step 4- Importing a notepad document

If the file uploaded is a notepad document then Text File Importer window opens.
     • Row Separator- Select the mode of separation between two consecutive rows in
         the notepad document.
     • Column Separator- Select the mode of separation between two consecutive
         columns in the notepad document.
     • Name Column Index- The column number for the recipient name in the
         notepad document.
     • Mobile No Index- The column number for the recipient mobile number in the
         notepad document.

Assume the notepad is saved as follows:

<Name1> (column separator) <Mobilenumber1> (row separator) <Name2> (column
separator) <Mobile number2>

Here the names of the recipients are stored first followed by their mobile numbers.
Therefore “Name Column Index” is 1 and “Mobile No Index” is 2.

Ex: If the notepad document is saved as
        Name1 (space) 9789978952
        Name2 (space) 9789978981
   • Then row separator is ENTER and column separator is SPACE.
   • Name Column Index is 1 and Mobile No Index is 2.

Click OK to import the numbers from the notepad document.
13

Step 4- Importing an excel document

In case of excel documents an Import Wizard opens.
    • Table Name- Select the name of the table that contains the required names and
        mobile numbers here.
    • Name- Select the column that contains the names of the recipients
    • Mobile No- Select the column that contains the mobile numbers of the recipients.

Click OK to import the numbers.


Step 5- All numbers imported will appear in the database panel as shown.
14

Step 6-
   • Beside Group Name give any name to the group.
   • Press Save and the group with the imported numbers are created.


A message appears confirming the creation of that group.
   • Clear button will clear the window temporarily.
   • Back will refresh the creation by going back to the main window.
15

EDITING CREATED GROUPS

Step 1
   • On Sending SMS tab click the Add Groups button.
   • The Add Group Numbers window appears.
   • Select the group name you wish to edit from Group Name list.


Step 2
   •   The entries of that group appear.
   •   Edit the group manually.
   •   To delete an entry select the entry and click Delete
   •   Editing can also be done by using the Import icon (to import different documents
       for the selected group)
Press Save to save the changes made.
16

DELETING CREATED GROUPS

Step 1
   • On Sending SMS tab click the Add Groups button.
   • The Add Group Numbers window appears.
   • Select the group name you wish to delete from Group Name list.


Step 2- Press Delete and the group will be deleted.
17

SENDING BULK SMS

Sending SMS tab is in charge of your bulk SMS operations.
Before starting bulk SMS ensure that a mobile is connected to the system and that the
flag shows in Green. (See Pg 4 to know how to connect mobile with system)


Recipient list for bulk SMS

Recipient list for bulk SMS can be created in three ways:

   1. Adding numbers manually (Pg 18)
   2. Importing numbers from groups (Pg 19)
   3. Importing numbers from saved documents (notepad or excel) (Pg 20)
18

Recipient list for bulk SMS by adding numbers manually

          On Sending SMS tab the database panel provided can be edited to store
           numbers for recipient list

          Under Name enter the recipients’ names and Under Mobile number enter
           the recipients’ mobile numbers.
19

Recipient list for bulk SMS by importing entries from saved groups

Step 1- Beside Group Name select the name of the created group that should come into
the recipient list. (See Pg 8 to know how to create groups)


Step 2- The entries of that group appear in the panel.
20

Importing documents to create recipient list

Import icon is used for the import operation

Step 1- Click on Import icon. A File Selection dialogue box appears. Click Browse to
select the saved document that you wish to upload. Click Open to upload the document.


Step 2 - Click Next to proceed.
   • If the file uploaded is a notepad document then Text File Importer window
        opens.
   • If the file uploaded is an excel document then Import Wizard opens.
21


Step 4- Importing a notepad document

If the file uploaded is a notepad document then Text File Importer window opens.
     • Row Separator- Select the mode of separation between two consecutive rows in
         the notepad document.
     • Column Separator- Select the mode of separation between two consecutive
         columns in the notepad document.
     • Name Column Index- The column number for the recipient name in the
         notepad document.
     • Mobile No Index- The column number for the recipient mobile number in the
         notepad document.

Assume the notepad is saved as follows:

<Name1> (column separator) <Mobilenumber1> (row separator) <Name2> (column
separator) <Mobile number2>

Here the names of the recipients are stored first followed by their mobile numbers.
Therefore “Name Column Index” is 1 and “Mobile No Index” is 2.

Ex: If the notepad document is saved as
        Name1 (space) 9789978952
        Name2 (space) 9789978981
   • Then row separator is ENTER and column separator is SPACE.
   • Name Column Index is 1 and Mobile No Index is 2.

Click OK to import the numbers from the notepad document.
22

Step 4- Importing an excel document

In case of excel documents an Import Wizard opens.
    • Table Name- Select the name of the table that contains the required names and
        mobile numbers here.
    • Name- Select the column that contains the names of the recipients
    • Mobile No- Select the column that contains the mobile numbers of the recipients.

Click OK to import the numbers.
23


Step 5- All numbers imported will appear in the database panel as shown.


Options to verify the recipient list

    Remove Duplicate icon removes repeated entries present in the list.
    Remove Blocked Numbers removes blocked numbers that may have
     accidentally occurred.
    Validation icon checks the recipient list for invalid characters like “!, @,#,a, b, c,
     d” etc
    Clear clears the recipient list panel and the message entered.
    Delete removes the select entry from the recipient list.
24

Entering message for Bulk SMS

    Enter the SMS message to be sent in the message panel seen on Sending SMS
     tab.
    To use a saved message from SMS Storage select from Message list. (See Pg 6 to
     know how to save SMS messages.)
    Symbol list contains various symbols that can be added in your message.
    Smiley list gives a list of expressions that can be added in your message.
    Character count of the entered message is also displayed.


Sending Bulk SMS

    Once the mobile phone is connected, SMS message entered and recipient list
     added, bulk SMS operation is ready to start.
    Checking Flash SMS will send flash SMS that can’t be saved by the recipient.
    Click Send to start sending bulk SMS to the recipients added in the recipient list.
25

Complete current bulk SMS Status

   1. Once Send is pressed, Stop and Pause buttons are automatically highlighted.
   2. The current status of bulk SMS appears at right as shown.
   3. Once SMS is sent to all recipients a message “Sending Finished” appears.
   4. Sending Finished message is given when either
          a. All messages are sent successfully
          b. You pressed Stop halfway through the bulk SMS operation.
   5. Click Clear to clear the reports produced.
   6. Mobile numbers that received your bulk SMS message are indicated individually.
       Total: total number of recipients to who bulk SMS operation was started.
       Failed: number of SMS that did not reach the recipients
       Sent: number of SMS that was sent successfully.
       Pending: number of SMS that are pending/still have not been sent because
          you many have stopped or paused the operation.
26

Stop/Pause options

    To stop or pause current bulk SMS operation press Stop, Pause buttons seen on
     the Sending SMS tab.
    The exact mobile number at which bulk SMS sending is paused will be
     highlighted in green. This also means mobile number highlighted in green has
     not received your message. This feature is not available in case Stop is pressed.
    But Reports window has exact and detailed reports of mobile numbers pending.
     Therefore bulk SMS can be resumed anytime from that window.
    Paused bulk SMS can be resumed by pressing Resume even if Clear button is
     pressed by mistake.
    Resume button is highlighted only if Pause button is pressed. To resume bulk
     SMS sending after Stop button is pressed go to the Report tab.(more on Pg 34)
    The pending numbers are shown in the SMS status window. Pending indicates
     the number of bulk SMS pending because you pressed Stop/Pause.
    If Pause button is pressed, fresh bulk SMS operation will not be started until
     Advance Broadcaster has finished sending the paused SMS messages.
27

DYNAMIC MESSAGES

    Dynamic message tab lets you send dynamic messages.
    This tab filters your Excel/Access database documents based on certain conditions
     before extracting the recipient details from them.

Step 1- On Dynamic Message tab fill in the following details.

   •   Select Server- Here select MS Access or Excel for loading access and excel
       documents respectively.
   •   User Name- Enter the name of the user currently logged into the system. Leave
       the box empty in case of single user systems.
   •   Password- Enter the password used to open the database. Leave the box empty if
       the database has no password.
   •   Database Name- Click on the icon and upload the required MS Excel or MS
       Access database.
   •   Select Table- Here select the sheet number (in case of MS Excel document) or
       table name (in case of MS Access document)
28

Step 2- Once the document is loaded the names and mobile numbers of the recipients can
be viewed in the panel seen at the bottom.


Step 3- Click View to view the names and mobile numbers. The number of entries
present is also provided as shown
29

Extracting entries based on conditions

1. Extracting mobile numbers based on Date values saved in your document

    Beside Date Column select the column of your document that carries date values.
     (Extraction will be done based on the values saved in this column.)
    Select from date and to date you require from “From” and “To” lists.

    Ex: If you want mobile numbers between 1st and 30th of June then set them as
     From and To dates. Only dates falling within this time period in the Date
     Column is considered and only those names and mobile numbers are extracted.
30

2. Extracting mobile numbers based on any value saved in your document

 Beside Column select any column of the saved document. Extraction will now be
  done based on entries saved in this column.

 Beside Value1 enter a value from the Column selected. You can extract entries
  (names and mobile numbers) greater than this value (“Greater than Value”
  option) or extract entries less than this value (“Less than” option) or extract only
  that value (“Equal” option)

 Ex: Serial number, name, mobile number are the columns in your excel/access
  document. And you want all mobile numbers beyond the 36th mobile number then
  set Value1 as 35 and choose Greater than Value option.
 Now only the names and mobile numbers beyond Serial number 36 are extracted.
31

Viewing dynamically extracted numbers

    Select Check Date Conditions to extract entries based on the date conditions you
     set.
    Select Check Value Conditions to extract entries based on the value conditions
     you set.

Click View to view the names and mobile numbers extracted based on these conditions.
32

Sending Dynamic SMS messages

Enter the bulk SMS message you wish to send in the message panel.
Click Send to start sending that SMS message to the recipients seen in the recipient list.

Other options:

    Stop- stops sending bulk SMS to the recipients. Stopped numbers can be viewed
      in the Reports tab.
    Pause- pauses send operation. Paused numbers can be viewed in the Reports tab.
    Resume- resumes the paused operation.
    Delete- deletes the selected entry/entries from the panel.
    Clear- clears the text boxes in the window temporarily.
    Export- saves the extracted names and mobile numbers shown in the panel as a
      separate document.
    Stopped and Paused mobile numbers for dynamic messages can be seen on
      Reports tab. (See Pg 34 to know more)
Sending Finished message indicates all dynamic messages have been sent.
33

Current bulk SMS status for dynamic messages is seen on Sending SMS tab.
34

REPORTS WINDOW

     Reports on normal and dynamic bulk SMS can be viewed on Report tab. (See pg
      27 to know about dynamic messages)
     Reports regarding scheduler bulk SMS can be viewed on Schedule Report tab.
     Reports and Schedule Report tab operations are exactly the same- only
      difference is Schedule Report shows reports relating to the scheduler.
     First section shows sent bulk SMS.
     Second section shows failed and pending bulk SMS.

1. Reports on Sent Bulk SMS (normal & dynamic)

     On Reports tab, select From date and To date to set the time/date period between
      which you want the sent SMS reports. Click Search to view the reports for the
      selected time period.
     Click View All to view all reports saved so far. Check Dynamic to view the
      dynamic messages successfully sent during that time period.


.
     To view normal messages report alone, uncheck Dynamic & click View/View
      All.
35

Report Options

    Save: Saves the sent SMS reports into a separate document.
    Clear: Clears the reports temporarily.
    Remove: Deletes reports permanently.
36

2. Reports on Failed Bulk SMS (normal & dynamic)

           On Reports tab, select From date and To date to set the time/date period
            between which you want the failed SMS reports.
           Click View to view the reports for that time period.
           Click View All to view all failed/pending reports so far.
           Check Dynamic to view the dynamic messages failed during that time
            period.


.
     To view normal messages report alone, uncheck Dynamic and click View/View
      All.
37

Report Options

    Resume: Resumes SMS sending to the pending numbers between the selected
     time period.
    Resume All: Resumes SMS sending to all pending/failed numbers saved in the
     report so far.
    Clear All: Clears the reports permanently.
    Save Pending: Saves the pending list into a separate document.
38

SINGLE SMS

   To send single SMS messages in case of urgency or emergency use Emergency
    SMS panel on the Sending SMS tab.
   Single SMS message gets first priority irrespective of the numbers set for bulk
    SMS operation.
   Enter the mobile number in the text box.
   Check Flash SMS to send a flash SMS message. These messages can’t be saved
    by the recipient.
   Send button sends the SMS. Clear clears the text boxes (mobile number and
    message entered.)
39

BLOCKED NUMBERS LIST

Blocked list contains mobile numbers you do not wish to communicate with.
Blocked Numbers panel seen on the Sending SMS tab creates block lists.
Enter the mobile number you wish to block in the text box seen and click Add.
Now that mobile number is blocked.


To unblock select the number you wish to unblock and click Remove.
40

CREATING SCHEDULES

The Scheduler tab is in charge of managing schedules.

Step 1
   • Schedule Name- give a name to your schedule
   • Start Time- Select the time/date at which the schedule should start from the list.
        o Date- select the date from the calendar that appears.
        o Time- Manually edit the time in the format hours: minutes: seconds AM/
            PM
   • End Time- Select the time/date at which the schedule should stop.
        o Date- select the date from the calendar that appears.
        o Time- Manually edit the time in the format hours: minutes: seconds AM/
            PM.


Step 2- Enter the message for the schedule. A saved message can be selected from the
Message list. (See Pg 6 to know how to save SMS messages)
41


Recipient list for scheduler

Recipient list is added to the schedule by either
   a. Selecting names and numbers from a created group. (Pg 41)
   b. Typing the recipient list manually.(Pg 42)
   c. Importing names and numbers from a saved document.(Pg 43)

Creating recipient list to the schedule from a group

Step 1- Beside Group Name select the group you wish to add to the recipient list.
Automatically the entries of the group appear in the window. (See Pg 8 to know how to
create groups)

Other options:
           a. Add Groups- The icon lets you create groups. (See Pg 8 to know how to
               create groups)
           b. Validation- validates the list loaded. That is, removes alphabetical chars
               etc occurring accidentally in the list.
           c. Remove Blocked Number- removes the mobile numbers you added in the
               Block list.
           d. Remove Duplicate- removes duplicate entries or repeated entries
               appearing in the list.
42


Creating recipient list to the schedule by manual typing

Under Name and Mobile No headings type the required names and mobile numbers
manually.


Creating recipient list by importing from saved documents

Names and mobile numbers can be added to the schedule from saved excel/access
documents. Click Import button to import documents (See Pg 20-22 to know about
importing.)
43


Saving the schedule

    Flash SMS- Check Flash SMS option if you wish to send flash SMS. These
     messages can’t be saved by the recipient.
    Press Save and the schedule is saved.
    Other Options:
        o Export- saves the recipient list into a separate document.
        o Delete- deletes the selected entries from the recipient list.
        o Clear- Clears the window temporarily.
        o Stop- stops an ongoing schedule.


Viewing saved schedules

To view saved schedules select the schedule name from the Schedule Name list. Details
of the schedule now appear in the box.
View All displays all schedules saved so far.
44


Editing a saved schedule

    To edit a saved schedule select the schedule you wish to edit from the Schedule
     Name list and click Edit. Now the details of the schedule appear in the window.
    Edit the details to be changed and click Save.
    Now the schedule is updated.


Deleting saved schedules

Select the schedule you wish to delete from the Schedule Name list and click Delete.
The schedule is now removed.
45


AUTO GENERATE NUMBERS FOR ANY STATE AND SERVICE PROVIDER

   •   Click on Generate Number tab to automatically generate mobile numbers.
   •   Mobile numbers are generated according to state/city and service provider.

Step 1- Fill out the form from the list provided.

    Country code- Enter the country code here. Ex: 91
    State Name- Select the name of the state for which numbers are to be generated.
    Provider- Select the service provider belonging to the mobile number series.
    Starting No- 4 digits. Select the first four digits of the first number in the series.
    Mobile No- 6 digits. Enter the last 6 digits of the first number in the series.
    Operator-
        o Increment: will add the number in the Number Add By list and then
            generate the series
        o Decrement: will subtract the number in the Number Add By list and then
            generate the series.
    Number of Count- The number of numbers to be generated.
46


Step 2- Click Generate and the mobile numbers are generated.
Options:
1. Add Country Code- will add the country code and then generate the numbers
2. Generate with Existing list- will join the numbers currently generated to the list
   you already generated in this panel.
3. Add to Recipient- This button will add the numbers to the recipient list seen in the
   Sending SMS window.
4. Clear- will clear the numbers generated
5. Export- will save the numbers generated into a separate document.
47


Saving the numbers generated as a group

Step 3- To save the numbers generated as a group ex: Andhra numbers, Kerala numbers
etc… Enter the name you wish to give the group in the text box and click Save Group.


Adding a new state for auto generation

Step 1- To add a new state for auto generation enter the name of the state beside State
Name and click Add.
48


Step 2- The state now added will appear in the list.


Creating entry for a new state

When a state name is added the starting numbers and service providers for that new state
must also be created. Click on the Generate Number tab.
In the section provided at the bottom
    • State Name: Enter the name of the state you wish to add
49


   •   Provider: Select the service provider you wish to add for the state
   •   Starting No: Enter the starting number for the state and service provider entered.

Click Add and the entry will be added in the database panel shown.
Delete button will delete the selected entry.


VIEWING LOG DETAILS

    Log details contain information regarding the working of the application. It can be
     useful to detect errors.
    On Log tab select From date and To date- the time period between which you
     wish to view the log.
50

    Click Refresh to view the log details between the selected time periods.
    Click Save to save the log as a separate document.
    Click Delete to delete the log details


DEVICE INFORMATION

    Device Information tab gives details about the mobile connected to the system.
    Select the port number for the mobile and that mobile’s info is displayed.


BACK UP

Back Up tab allows back up of important data used in Advance Broadcaster

Step 1-
51

    Beside Select BackUp Folder click and select any path for the backup files.
     Backup files are usually stored in C or D drives.
    Make New Folder- creates a new folder for your backup files.
    Click OK.


Step 2- Click Backup to create the backup folder.


Step 3- Backup files created are listed in the panel. Click Restore to create up-to-date
backup of the backup file shown in that path.
52

Weitere ähnliche Inhalte

Was ist angesagt?

Was ist angesagt? (8)

Windows Basic
Windows BasicWindows Basic
Windows Basic
 
Disk Management (DM)
Disk Management (DM)Disk Management (DM)
Disk Management (DM)
 
Disk management
Disk managementDisk management
Disk management
 
Introduction to windows
Introduction to windowsIntroduction to windows
Introduction to windows
 
Windows operating system
Windows operating systemWindows operating system
Windows operating system
 
How To Clean Install Windows 10 - awesomehowto.com
How To Clean Install Windows 10 - awesomehowto.comHow To Clean Install Windows 10 - awesomehowto.com
How To Clean Install Windows 10 - awesomehowto.com
 
Win7setup
Win7setupWin7setup
Win7setup
 
Tech fest
Tech festTech fest
Tech fest
 

Andere mochten auch

Andere mochten auch (14)

Formulario De Registro De Boleta De Ventay Mantenimiento De Cliente
Formulario De Registro De Boleta De Ventay Mantenimiento De ClienteFormulario De Registro De Boleta De Ventay Mantenimiento De Cliente
Formulario De Registro De Boleta De Ventay Mantenimiento De Cliente
 
Slides para o Dia mundial de oração
Slides para o Dia mundial de oraçãoSlides para o Dia mundial de oração
Slides para o Dia mundial de oração
 
Formulario Para Agregar Cliente
Formulario Para Agregar ClienteFormulario Para Agregar Cliente
Formulario Para Agregar Cliente
 
Dia mundial de oração 2016
Dia mundial de oração 2016Dia mundial de oração 2016
Dia mundial de oração 2016
 
CDTECH
CDTECHCDTECH
CDTECH
 
Physical appearance
Physical appearancePhysical appearance
Physical appearance
 
Ppt para summer school
Ppt para summer schoolPpt para summer school
Ppt para summer school
 
reSearch Magazine Issue 4
reSearch Magazine Issue 4reSearch Magazine Issue 4
reSearch Magazine Issue 4
 
Memoriabetulo2011
Memoriabetulo2011Memoriabetulo2011
Memoriabetulo2011
 
Sm Ster Manual
Sm Ster ManualSm Ster Manual
Sm Ster Manual
 
In Out Ads
In Out AdsIn Out Ads
In Out Ads
 
Totos
TotosTotos
Totos
 
Lounge Affair by Carine Sanchez
Lounge Affair by Carine SanchezLounge Affair by Carine Sanchez
Lounge Affair by Carine Sanchez
 
Etica I Investigació
Etica I InvestigacióEtica I Investigació
Etica I Investigació
 

Ähnlich wie CDTECH

Components of a computer system
Components of a computer systemComponents of a computer system
Components of a computer systemIBRAHIM MUAZU
 
Empowerment Technology by Glezille Lora & Lorena Mastal
Empowerment Technology by Glezille Lora & Lorena MastalEmpowerment Technology by Glezille Lora & Lorena Mastal
Empowerment Technology by Glezille Lora & Lorena MastalPadsromel
 
Camp TEACH Troubleshooting Tips
Camp TEACH Troubleshooting TipsCamp TEACH Troubleshooting Tips
Camp TEACH Troubleshooting TipsDonia Teagle
 
Microsoft Word 2010
Microsoft Word 2010Microsoft Word 2010
Microsoft Word 2010Razif Rahman
 
Scan to Folder Easy Setup Guide.pdf
Scan to Folder Easy Setup Guide.pdfScan to Folder Easy Setup Guide.pdf
Scan to Folder Easy Setup Guide.pdfMaricoRiverConservat
 
Happy Birthday from Neonway
Happy Birthday from NeonwayHappy Birthday from Neonway
Happy Birthday from NeonwayNeonway
 
Microsoft Outlook Training by Fahad.pptx
Microsoft Outlook Training by Fahad.pptxMicrosoft Outlook Training by Fahad.pptx
Microsoft Outlook Training by Fahad.pptxFahad Khan
 
Window xp by nishant raghav
Window xp by nishant raghavWindow xp by nishant raghav
Window xp by nishant raghavNishant Raghav
 
Advance word-processing-skills final
Advance word-processing-skills finalAdvance word-processing-skills final
Advance word-processing-skills finalmelaniebitar
 
training materials.ppt
training materials.ppttraining materials.ppt
training materials.pptWakumaTeshome
 
data entry operations for class 12th chapter vise presentation
 data entry operations  for class 12th chapter vise presentation data entry operations  for class 12th chapter vise presentation
data entry operations for class 12th chapter vise presentationgopeshkhandelwal7
 
Tip and tricks for IBM Notes Mail - JUMP Session
Tip and tricks for IBM Notes Mail - JUMP SessionTip and tricks for IBM Notes Mail - JUMP Session
Tip and tricks for IBM Notes Mail - JUMP SessionRanjit Rai
 

Ähnlich wie CDTECH (20)

Bpos sop
Bpos sopBpos sop
Bpos sop
 
Computer terms
Computer termsComputer terms
Computer terms
 
Computer terms
Computer termsComputer terms
Computer terms
 
Components of a computer system
Components of a computer systemComponents of a computer system
Components of a computer system
 
Pro user-guide
Pro user-guidePro user-guide
Pro user-guide
 
Empowerment Technology by Glezille Lora & Lorena Mastal
Empowerment Technology by Glezille Lora & Lorena MastalEmpowerment Technology by Glezille Lora & Lorena Mastal
Empowerment Technology by Glezille Lora & Lorena Mastal
 
Larra belle ict
Larra belle ictLarra belle ict
Larra belle ict
 
1121.pdf
1121.pdf1121.pdf
1121.pdf
 
Camp TEACH Troubleshooting Tips
Camp TEACH Troubleshooting TipsCamp TEACH Troubleshooting Tips
Camp TEACH Troubleshooting Tips
 
Microsoft Word 2010
Microsoft Word 2010Microsoft Word 2010
Microsoft Word 2010
 
Office outlook tutorial
Office outlook tutorialOffice outlook tutorial
Office outlook tutorial
 
Scan to Folder Easy Setup Guide.pdf
Scan to Folder Easy Setup Guide.pdfScan to Folder Easy Setup Guide.pdf
Scan to Folder Easy Setup Guide.pdf
 
Happy Birthday from Neonway
Happy Birthday from NeonwayHappy Birthday from Neonway
Happy Birthday from Neonway
 
Microsoft Outlook Training by Fahad.pptx
Microsoft Outlook Training by Fahad.pptxMicrosoft Outlook Training by Fahad.pptx
Microsoft Outlook Training by Fahad.pptx
 
Window xp by nishant raghav
Window xp by nishant raghavWindow xp by nishant raghav
Window xp by nishant raghav
 
Advance word-processing-skills final
Advance word-processing-skills finalAdvance word-processing-skills final
Advance word-processing-skills final
 
training materials.ppt
training materials.ppttraining materials.ppt
training materials.ppt
 
data entry operations for class 12th chapter vise presentation
 data entry operations  for class 12th chapter vise presentation data entry operations  for class 12th chapter vise presentation
data entry operations for class 12th chapter vise presentation
 
Family Tree Explorer 9 Premium Manual
Family Tree Explorer 9 Premium ManualFamily Tree Explorer 9 Premium Manual
Family Tree Explorer 9 Premium Manual
 
Tip and tricks for IBM Notes Mail - JUMP Session
Tip and tricks for IBM Notes Mail - JUMP SessionTip and tricks for IBM Notes Mail - JUMP Session
Tip and tricks for IBM Notes Mail - JUMP Session
 

Kürzlich hochgeladen

International Business Environments and Operations 16th Global Edition test b...
International Business Environments and Operations 16th Global Edition test b...International Business Environments and Operations 16th Global Edition test b...
International Business Environments and Operations 16th Global Edition test b...ssuserf63bd7
 
Annual General Meeting Presentation Slides
Annual General Meeting Presentation SlidesAnnual General Meeting Presentation Slides
Annual General Meeting Presentation SlidesKeppelCorporation
 
Investment in The Coconut Industry by Nancy Cheruiyot
Investment in The Coconut Industry by Nancy CheruiyotInvestment in The Coconut Industry by Nancy Cheruiyot
Investment in The Coconut Industry by Nancy Cheruiyotictsugar
 
Independent Call Girls Andheri Nightlaila 9967584737
Independent Call Girls Andheri Nightlaila 9967584737Independent Call Girls Andheri Nightlaila 9967584737
Independent Call Girls Andheri Nightlaila 9967584737Riya Pathan
 
The-Ethical-issues-ghhhhhhhhjof-Byjus.pptx
The-Ethical-issues-ghhhhhhhhjof-Byjus.pptxThe-Ethical-issues-ghhhhhhhhjof-Byjus.pptx
The-Ethical-issues-ghhhhhhhhjof-Byjus.pptxmbikashkanyari
 
8447779800, Low rate Call girls in Tughlakabad Delhi NCR
8447779800, Low rate Call girls in Tughlakabad Delhi NCR8447779800, Low rate Call girls in Tughlakabad Delhi NCR
8447779800, Low rate Call girls in Tughlakabad Delhi NCRashishs7044
 
Call Girls Contact Number Andheri 9920874524
Call Girls Contact Number Andheri 9920874524Call Girls Contact Number Andheri 9920874524
Call Girls Contact Number Andheri 9920874524najka9823
 
Chapter 9 PPT 4th edition.pdf internal audit
Chapter 9 PPT 4th edition.pdf internal auditChapter 9 PPT 4th edition.pdf internal audit
Chapter 9 PPT 4th edition.pdf internal auditNhtLNguyn9
 
Market Sizes Sample Report - 2024 Edition
Market Sizes Sample Report - 2024 EditionMarket Sizes Sample Report - 2024 Edition
Market Sizes Sample Report - 2024 EditionMintel Group
 
Entrepreneurship lessons in Philippines
Entrepreneurship lessons in  PhilippinesEntrepreneurship lessons in  Philippines
Entrepreneurship lessons in PhilippinesDavidSamuel525586
 
8447779800, Low rate Call girls in New Ashok Nagar Delhi NCR
8447779800, Low rate Call girls in New Ashok Nagar Delhi NCR8447779800, Low rate Call girls in New Ashok Nagar Delhi NCR
8447779800, Low rate Call girls in New Ashok Nagar Delhi NCRashishs7044
 
Appkodes Tinder Clone Script with Customisable Solutions.pptx
Appkodes Tinder Clone Script with Customisable Solutions.pptxAppkodes Tinder Clone Script with Customisable Solutions.pptx
Appkodes Tinder Clone Script with Customisable Solutions.pptxappkodes
 
Financial-Statement-Analysis-of-Coca-cola-Company.pptx
Financial-Statement-Analysis-of-Coca-cola-Company.pptxFinancial-Statement-Analysis-of-Coca-cola-Company.pptx
Financial-Statement-Analysis-of-Coca-cola-Company.pptxsaniyaimamuddin
 
PB Project 1: Exploring Your Personal Brand
PB Project 1: Exploring Your Personal BrandPB Project 1: Exploring Your Personal Brand
PB Project 1: Exploring Your Personal BrandSharisaBethune
 
Cyber Security Training in Office Environment
Cyber Security Training in Office EnvironmentCyber Security Training in Office Environment
Cyber Security Training in Office Environmentelijahj01012
 
Church Building Grants To Assist With New Construction, Additions, And Restor...
Church Building Grants To Assist With New Construction, Additions, And Restor...Church Building Grants To Assist With New Construction, Additions, And Restor...
Church Building Grants To Assist With New Construction, Additions, And Restor...Americas Got Grants
 
8447779800, Low rate Call girls in Kotla Mubarakpur Delhi NCR
8447779800, Low rate Call girls in Kotla Mubarakpur Delhi NCR8447779800, Low rate Call girls in Kotla Mubarakpur Delhi NCR
8447779800, Low rate Call girls in Kotla Mubarakpur Delhi NCRashishs7044
 
Memorándum de Entendimiento (MoU) entre Codelco y SQM
Memorándum de Entendimiento (MoU) entre Codelco y SQMMemorándum de Entendimiento (MoU) entre Codelco y SQM
Memorándum de Entendimiento (MoU) entre Codelco y SQMVoces Mineras
 

Kürzlich hochgeladen (20)

International Business Environments and Operations 16th Global Edition test b...
International Business Environments and Operations 16th Global Edition test b...International Business Environments and Operations 16th Global Edition test b...
International Business Environments and Operations 16th Global Edition test b...
 
Annual General Meeting Presentation Slides
Annual General Meeting Presentation SlidesAnnual General Meeting Presentation Slides
Annual General Meeting Presentation Slides
 
Investment in The Coconut Industry by Nancy Cheruiyot
Investment in The Coconut Industry by Nancy CheruiyotInvestment in The Coconut Industry by Nancy Cheruiyot
Investment in The Coconut Industry by Nancy Cheruiyot
 
Independent Call Girls Andheri Nightlaila 9967584737
Independent Call Girls Andheri Nightlaila 9967584737Independent Call Girls Andheri Nightlaila 9967584737
Independent Call Girls Andheri Nightlaila 9967584737
 
Japan IT Week 2024 Brochure by 47Billion (English)
Japan IT Week 2024 Brochure by 47Billion (English)Japan IT Week 2024 Brochure by 47Billion (English)
Japan IT Week 2024 Brochure by 47Billion (English)
 
The-Ethical-issues-ghhhhhhhhjof-Byjus.pptx
The-Ethical-issues-ghhhhhhhhjof-Byjus.pptxThe-Ethical-issues-ghhhhhhhhjof-Byjus.pptx
The-Ethical-issues-ghhhhhhhhjof-Byjus.pptx
 
8447779800, Low rate Call girls in Tughlakabad Delhi NCR
8447779800, Low rate Call girls in Tughlakabad Delhi NCR8447779800, Low rate Call girls in Tughlakabad Delhi NCR
8447779800, Low rate Call girls in Tughlakabad Delhi NCR
 
Call Girls Contact Number Andheri 9920874524
Call Girls Contact Number Andheri 9920874524Call Girls Contact Number Andheri 9920874524
Call Girls Contact Number Andheri 9920874524
 
Chapter 9 PPT 4th edition.pdf internal audit
Chapter 9 PPT 4th edition.pdf internal auditChapter 9 PPT 4th edition.pdf internal audit
Chapter 9 PPT 4th edition.pdf internal audit
 
Market Sizes Sample Report - 2024 Edition
Market Sizes Sample Report - 2024 EditionMarket Sizes Sample Report - 2024 Edition
Market Sizes Sample Report - 2024 Edition
 
Entrepreneurship lessons in Philippines
Entrepreneurship lessons in  PhilippinesEntrepreneurship lessons in  Philippines
Entrepreneurship lessons in Philippines
 
8447779800, Low rate Call girls in New Ashok Nagar Delhi NCR
8447779800, Low rate Call girls in New Ashok Nagar Delhi NCR8447779800, Low rate Call girls in New Ashok Nagar Delhi NCR
8447779800, Low rate Call girls in New Ashok Nagar Delhi NCR
 
Appkodes Tinder Clone Script with Customisable Solutions.pptx
Appkodes Tinder Clone Script with Customisable Solutions.pptxAppkodes Tinder Clone Script with Customisable Solutions.pptx
Appkodes Tinder Clone Script with Customisable Solutions.pptx
 
Financial-Statement-Analysis-of-Coca-cola-Company.pptx
Financial-Statement-Analysis-of-Coca-cola-Company.pptxFinancial-Statement-Analysis-of-Coca-cola-Company.pptx
Financial-Statement-Analysis-of-Coca-cola-Company.pptx
 
PB Project 1: Exploring Your Personal Brand
PB Project 1: Exploring Your Personal BrandPB Project 1: Exploring Your Personal Brand
PB Project 1: Exploring Your Personal Brand
 
Cyber Security Training in Office Environment
Cyber Security Training in Office EnvironmentCyber Security Training in Office Environment
Cyber Security Training in Office Environment
 
Church Building Grants To Assist With New Construction, Additions, And Restor...
Church Building Grants To Assist With New Construction, Additions, And Restor...Church Building Grants To Assist With New Construction, Additions, And Restor...
Church Building Grants To Assist With New Construction, Additions, And Restor...
 
8447779800, Low rate Call girls in Kotla Mubarakpur Delhi NCR
8447779800, Low rate Call girls in Kotla Mubarakpur Delhi NCR8447779800, Low rate Call girls in Kotla Mubarakpur Delhi NCR
8447779800, Low rate Call girls in Kotla Mubarakpur Delhi NCR
 
Enjoy ➥8448380779▻ Call Girls In Sector 18 Noida Escorts Delhi NCR
Enjoy ➥8448380779▻ Call Girls In Sector 18 Noida Escorts Delhi NCREnjoy ➥8448380779▻ Call Girls In Sector 18 Noida Escorts Delhi NCR
Enjoy ➥8448380779▻ Call Girls In Sector 18 Noida Escorts Delhi NCR
 
Memorándum de Entendimiento (MoU) entre Codelco y SQM
Memorándum de Entendimiento (MoU) entre Codelco y SQMMemorándum de Entendimiento (MoU) entre Codelco y SQM
Memorándum de Entendimiento (MoU) entre Codelco y SQM
 

CDTECH

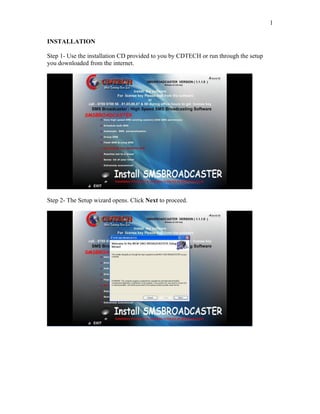
  • 1. 1 INSTALLATION Step 1- Use the installation CD provided to you by CDTECH or run through the setup you downloaded from the internet. Step 2- The Setup wizard opens. Click Next to proceed.
  • 2. 2 Step 3- Select a path for the setup files by clicking Browse. A shortcut is created for you on your Desktop.  Everyone- installs the software for everyone using the system.  Just me- installs the software only for you i.e., the user currently logged in. Step 4- Click Next to confirm and start installation.
  • 3. 3 Step 5- Advance Broadcaster is now being installed. Step 6- A desktop shortcut for Advance Broadcaster is created.
  • 4. 4 CONNECTING YOUR MOBILE PHONE/MOBILE PHONES TO YOUR SYSTEM Three ways of connecting your mobile to your system: 1. Data cable 2. Bluetooth USB Dongle 3. Blue Soleil software Step 1- In Sending SMS tab, select the port in which the mobile is connected to the system from the port list. Finding the port number • Select Add Modem to find out the port number in case of data cable and Bluetooth connectivity. The heading Standard Modem over Bluetooth link indicates the port number in case of Bluetooth. • Select Show Bluetooth Devices to show the mobile numbers connected through Bluetooth.
  • 5. 5 Step 2- Click Connect to establish the connection. Disconnect button will disconnect the established connection. Refresh button closes the application and reopens it. Once connected a Green flag appears along with a “Connected” message. Step 3- The port in which the mobile/mobiles is connected appears in the box.
  • 6. 6 SAVING SMS MESSAGES Step 1- Click on SMS Storage icon in the Sending SMS tab. In the Store SMS window enter the message to be stored. • Title- Give a heading to the message you wish to store • Message- The contents of the message to be stored. Step 2- Click Save to save the entered message.
  • 7. 7 Step 3- Other options: Delete- will delete the selected message. Back- will close the window to go back to the main window.
  • 8. 8 CREATING GROUPS • Groups help organize your recipients. Groups can be created in the following ways: o Manually typing mobile numbers. (Page 9) o Importing numbers from saved documents.(Page 10) Click Add Groups icon in the Sending SMS tab. Add Group Numbers window appears.
  • 9. 9 Creating groups by manually typing numbers in Add Group Numbers window Step 1- Beside Group Name enter the name of the group. In the database panel seen, • Name- Enter the name of the recipient. • Mobile No- Enter the mobile number of the recipient. Step 2- Press Save and the numbers and names entered are saved in the group you created. • Clear button will clear the window temporarily. • Back will refresh the creation by going back to the main window
  • 10. 10 Creating groups by importing numbers into Add Group Numbers window Step 1- Click on the Import icon in the Add Group Numbers window. A File Selection dialogue box appears. Step 2- Click Browse to select the path of the file to be imported. An Open dialogue box appears.
  • 11. 11 Step 3- Click Next to proceed. • If the file uploaded is a notepad document then Text File Importer window opens. • If the file uploaded is an excel document then Import Wizard opens.
  • 12. 12 Step 4- Importing a notepad document If the file uploaded is a notepad document then Text File Importer window opens. • Row Separator- Select the mode of separation between two consecutive rows in the notepad document. • Column Separator- Select the mode of separation between two consecutive columns in the notepad document. • Name Column Index- The column number for the recipient name in the notepad document. • Mobile No Index- The column number for the recipient mobile number in the notepad document. Assume the notepad is saved as follows: <Name1> (column separator) <Mobilenumber1> (row separator) <Name2> (column separator) <Mobile number2> Here the names of the recipients are stored first followed by their mobile numbers. Therefore “Name Column Index” is 1 and “Mobile No Index” is 2. Ex: If the notepad document is saved as Name1 (space) 9789978952 Name2 (space) 9789978981 • Then row separator is ENTER and column separator is SPACE. • Name Column Index is 1 and Mobile No Index is 2. Click OK to import the numbers from the notepad document.
  • 13. 13 Step 4- Importing an excel document In case of excel documents an Import Wizard opens. • Table Name- Select the name of the table that contains the required names and mobile numbers here. • Name- Select the column that contains the names of the recipients • Mobile No- Select the column that contains the mobile numbers of the recipients. Click OK to import the numbers. Step 5- All numbers imported will appear in the database panel as shown.
  • 14. 14 Step 6- • Beside Group Name give any name to the group. • Press Save and the group with the imported numbers are created. A message appears confirming the creation of that group. • Clear button will clear the window temporarily. • Back will refresh the creation by going back to the main window.
  • 15. 15 EDITING CREATED GROUPS Step 1 • On Sending SMS tab click the Add Groups button. • The Add Group Numbers window appears. • Select the group name you wish to edit from Group Name list. Step 2 • The entries of that group appear. • Edit the group manually. • To delete an entry select the entry and click Delete • Editing can also be done by using the Import icon (to import different documents for the selected group) Press Save to save the changes made.
  • 16. 16 DELETING CREATED GROUPS Step 1 • On Sending SMS tab click the Add Groups button. • The Add Group Numbers window appears. • Select the group name you wish to delete from Group Name list. Step 2- Press Delete and the group will be deleted.
  • 17. 17 SENDING BULK SMS Sending SMS tab is in charge of your bulk SMS operations. Before starting bulk SMS ensure that a mobile is connected to the system and that the flag shows in Green. (See Pg 4 to know how to connect mobile with system) Recipient list for bulk SMS Recipient list for bulk SMS can be created in three ways: 1. Adding numbers manually (Pg 18) 2. Importing numbers from groups (Pg 19) 3. Importing numbers from saved documents (notepad or excel) (Pg 20)
  • 18. 18 Recipient list for bulk SMS by adding numbers manually  On Sending SMS tab the database panel provided can be edited to store numbers for recipient list  Under Name enter the recipients’ names and Under Mobile number enter the recipients’ mobile numbers.
  • 19. 19 Recipient list for bulk SMS by importing entries from saved groups Step 1- Beside Group Name select the name of the created group that should come into the recipient list. (See Pg 8 to know how to create groups) Step 2- The entries of that group appear in the panel.
  • 20. 20 Importing documents to create recipient list Import icon is used for the import operation Step 1- Click on Import icon. A File Selection dialogue box appears. Click Browse to select the saved document that you wish to upload. Click Open to upload the document. Step 2 - Click Next to proceed. • If the file uploaded is a notepad document then Text File Importer window opens. • If the file uploaded is an excel document then Import Wizard opens.
  • 21. 21 Step 4- Importing a notepad document If the file uploaded is a notepad document then Text File Importer window opens. • Row Separator- Select the mode of separation between two consecutive rows in the notepad document. • Column Separator- Select the mode of separation between two consecutive columns in the notepad document. • Name Column Index- The column number for the recipient name in the notepad document. • Mobile No Index- The column number for the recipient mobile number in the notepad document. Assume the notepad is saved as follows: <Name1> (column separator) <Mobilenumber1> (row separator) <Name2> (column separator) <Mobile number2> Here the names of the recipients are stored first followed by their mobile numbers. Therefore “Name Column Index” is 1 and “Mobile No Index” is 2. Ex: If the notepad document is saved as Name1 (space) 9789978952 Name2 (space) 9789978981 • Then row separator is ENTER and column separator is SPACE. • Name Column Index is 1 and Mobile No Index is 2. Click OK to import the numbers from the notepad document.
  • 22. 22 Step 4- Importing an excel document In case of excel documents an Import Wizard opens. • Table Name- Select the name of the table that contains the required names and mobile numbers here. • Name- Select the column that contains the names of the recipients • Mobile No- Select the column that contains the mobile numbers of the recipients. Click OK to import the numbers.
  • 23. 23 Step 5- All numbers imported will appear in the database panel as shown. Options to verify the recipient list  Remove Duplicate icon removes repeated entries present in the list.  Remove Blocked Numbers removes blocked numbers that may have accidentally occurred.  Validation icon checks the recipient list for invalid characters like “!, @,#,a, b, c, d” etc  Clear clears the recipient list panel and the message entered.  Delete removes the select entry from the recipient list.
  • 24. 24 Entering message for Bulk SMS  Enter the SMS message to be sent in the message panel seen on Sending SMS tab.  To use a saved message from SMS Storage select from Message list. (See Pg 6 to know how to save SMS messages.)  Symbol list contains various symbols that can be added in your message.  Smiley list gives a list of expressions that can be added in your message.  Character count of the entered message is also displayed. Sending Bulk SMS  Once the mobile phone is connected, SMS message entered and recipient list added, bulk SMS operation is ready to start.  Checking Flash SMS will send flash SMS that can’t be saved by the recipient.  Click Send to start sending bulk SMS to the recipients added in the recipient list.
  • 25. 25 Complete current bulk SMS Status 1. Once Send is pressed, Stop and Pause buttons are automatically highlighted. 2. The current status of bulk SMS appears at right as shown. 3. Once SMS is sent to all recipients a message “Sending Finished” appears. 4. Sending Finished message is given when either a. All messages are sent successfully b. You pressed Stop halfway through the bulk SMS operation. 5. Click Clear to clear the reports produced. 6. Mobile numbers that received your bulk SMS message are indicated individually.  Total: total number of recipients to who bulk SMS operation was started.  Failed: number of SMS that did not reach the recipients  Sent: number of SMS that was sent successfully.  Pending: number of SMS that are pending/still have not been sent because you many have stopped or paused the operation.
  • 26. 26 Stop/Pause options  To stop or pause current bulk SMS operation press Stop, Pause buttons seen on the Sending SMS tab.  The exact mobile number at which bulk SMS sending is paused will be highlighted in green. This also means mobile number highlighted in green has not received your message. This feature is not available in case Stop is pressed.  But Reports window has exact and detailed reports of mobile numbers pending. Therefore bulk SMS can be resumed anytime from that window.  Paused bulk SMS can be resumed by pressing Resume even if Clear button is pressed by mistake.  Resume button is highlighted only if Pause button is pressed. To resume bulk SMS sending after Stop button is pressed go to the Report tab.(more on Pg 34)  The pending numbers are shown in the SMS status window. Pending indicates the number of bulk SMS pending because you pressed Stop/Pause.  If Pause button is pressed, fresh bulk SMS operation will not be started until Advance Broadcaster has finished sending the paused SMS messages.
  • 27. 27 DYNAMIC MESSAGES  Dynamic message tab lets you send dynamic messages.  This tab filters your Excel/Access database documents based on certain conditions before extracting the recipient details from them. Step 1- On Dynamic Message tab fill in the following details. • Select Server- Here select MS Access or Excel for loading access and excel documents respectively. • User Name- Enter the name of the user currently logged into the system. Leave the box empty in case of single user systems. • Password- Enter the password used to open the database. Leave the box empty if the database has no password. • Database Name- Click on the icon and upload the required MS Excel or MS Access database. • Select Table- Here select the sheet number (in case of MS Excel document) or table name (in case of MS Access document)
  • 28. 28 Step 2- Once the document is loaded the names and mobile numbers of the recipients can be viewed in the panel seen at the bottom. Step 3- Click View to view the names and mobile numbers. The number of entries present is also provided as shown
  • 29. 29 Extracting entries based on conditions 1. Extracting mobile numbers based on Date values saved in your document  Beside Date Column select the column of your document that carries date values. (Extraction will be done based on the values saved in this column.)  Select from date and to date you require from “From” and “To” lists.  Ex: If you want mobile numbers between 1st and 30th of June then set them as From and To dates. Only dates falling within this time period in the Date Column is considered and only those names and mobile numbers are extracted.
  • 30. 30 2. Extracting mobile numbers based on any value saved in your document  Beside Column select any column of the saved document. Extraction will now be done based on entries saved in this column.  Beside Value1 enter a value from the Column selected. You can extract entries (names and mobile numbers) greater than this value (“Greater than Value” option) or extract entries less than this value (“Less than” option) or extract only that value (“Equal” option)  Ex: Serial number, name, mobile number are the columns in your excel/access document. And you want all mobile numbers beyond the 36th mobile number then set Value1 as 35 and choose Greater than Value option.  Now only the names and mobile numbers beyond Serial number 36 are extracted.
  • 31. 31 Viewing dynamically extracted numbers  Select Check Date Conditions to extract entries based on the date conditions you set.  Select Check Value Conditions to extract entries based on the value conditions you set. Click View to view the names and mobile numbers extracted based on these conditions.
  • 32. 32 Sending Dynamic SMS messages Enter the bulk SMS message you wish to send in the message panel. Click Send to start sending that SMS message to the recipients seen in the recipient list. Other options:  Stop- stops sending bulk SMS to the recipients. Stopped numbers can be viewed in the Reports tab.  Pause- pauses send operation. Paused numbers can be viewed in the Reports tab.  Resume- resumes the paused operation.  Delete- deletes the selected entry/entries from the panel.  Clear- clears the text boxes in the window temporarily.  Export- saves the extracted names and mobile numbers shown in the panel as a separate document.  Stopped and Paused mobile numbers for dynamic messages can be seen on Reports tab. (See Pg 34 to know more) Sending Finished message indicates all dynamic messages have been sent.
  • 33. 33 Current bulk SMS status for dynamic messages is seen on Sending SMS tab.
  • 34. 34 REPORTS WINDOW  Reports on normal and dynamic bulk SMS can be viewed on Report tab. (See pg 27 to know about dynamic messages)  Reports regarding scheduler bulk SMS can be viewed on Schedule Report tab.  Reports and Schedule Report tab operations are exactly the same- only difference is Schedule Report shows reports relating to the scheduler.  First section shows sent bulk SMS.  Second section shows failed and pending bulk SMS. 1. Reports on Sent Bulk SMS (normal & dynamic)  On Reports tab, select From date and To date to set the time/date period between which you want the sent SMS reports. Click Search to view the reports for the selected time period.  Click View All to view all reports saved so far. Check Dynamic to view the dynamic messages successfully sent during that time period. .  To view normal messages report alone, uncheck Dynamic & click View/View All.
  • 35. 35 Report Options  Save: Saves the sent SMS reports into a separate document.  Clear: Clears the reports temporarily.  Remove: Deletes reports permanently.
  • 36. 36 2. Reports on Failed Bulk SMS (normal & dynamic)  On Reports tab, select From date and To date to set the time/date period between which you want the failed SMS reports.  Click View to view the reports for that time period.  Click View All to view all failed/pending reports so far.  Check Dynamic to view the dynamic messages failed during that time period. .  To view normal messages report alone, uncheck Dynamic and click View/View All.
  • 37. 37 Report Options  Resume: Resumes SMS sending to the pending numbers between the selected time period.  Resume All: Resumes SMS sending to all pending/failed numbers saved in the report so far.  Clear All: Clears the reports permanently.  Save Pending: Saves the pending list into a separate document.
  • 38. 38 SINGLE SMS  To send single SMS messages in case of urgency or emergency use Emergency SMS panel on the Sending SMS tab.  Single SMS message gets first priority irrespective of the numbers set for bulk SMS operation.  Enter the mobile number in the text box.  Check Flash SMS to send a flash SMS message. These messages can’t be saved by the recipient.  Send button sends the SMS. Clear clears the text boxes (mobile number and message entered.)
  • 39. 39 BLOCKED NUMBERS LIST Blocked list contains mobile numbers you do not wish to communicate with. Blocked Numbers panel seen on the Sending SMS tab creates block lists. Enter the mobile number you wish to block in the text box seen and click Add. Now that mobile number is blocked. To unblock select the number you wish to unblock and click Remove.
  • 40. 40 CREATING SCHEDULES The Scheduler tab is in charge of managing schedules. Step 1 • Schedule Name- give a name to your schedule • Start Time- Select the time/date at which the schedule should start from the list. o Date- select the date from the calendar that appears. o Time- Manually edit the time in the format hours: minutes: seconds AM/ PM • End Time- Select the time/date at which the schedule should stop. o Date- select the date from the calendar that appears. o Time- Manually edit the time in the format hours: minutes: seconds AM/ PM. Step 2- Enter the message for the schedule. A saved message can be selected from the Message list. (See Pg 6 to know how to save SMS messages)
  • 41. 41 Recipient list for scheduler Recipient list is added to the schedule by either a. Selecting names and numbers from a created group. (Pg 41) b. Typing the recipient list manually.(Pg 42) c. Importing names and numbers from a saved document.(Pg 43) Creating recipient list to the schedule from a group Step 1- Beside Group Name select the group you wish to add to the recipient list. Automatically the entries of the group appear in the window. (See Pg 8 to know how to create groups) Other options: a. Add Groups- The icon lets you create groups. (See Pg 8 to know how to create groups) b. Validation- validates the list loaded. That is, removes alphabetical chars etc occurring accidentally in the list. c. Remove Blocked Number- removes the mobile numbers you added in the Block list. d. Remove Duplicate- removes duplicate entries or repeated entries appearing in the list.
  • 42. 42 Creating recipient list to the schedule by manual typing Under Name and Mobile No headings type the required names and mobile numbers manually. Creating recipient list by importing from saved documents Names and mobile numbers can be added to the schedule from saved excel/access documents. Click Import button to import documents (See Pg 20-22 to know about importing.)
  • 43. 43 Saving the schedule  Flash SMS- Check Flash SMS option if you wish to send flash SMS. These messages can’t be saved by the recipient.  Press Save and the schedule is saved.  Other Options: o Export- saves the recipient list into a separate document. o Delete- deletes the selected entries from the recipient list. o Clear- Clears the window temporarily. o Stop- stops an ongoing schedule. Viewing saved schedules To view saved schedules select the schedule name from the Schedule Name list. Details of the schedule now appear in the box. View All displays all schedules saved so far.
  • 44. 44 Editing a saved schedule  To edit a saved schedule select the schedule you wish to edit from the Schedule Name list and click Edit. Now the details of the schedule appear in the window.  Edit the details to be changed and click Save.  Now the schedule is updated. Deleting saved schedules Select the schedule you wish to delete from the Schedule Name list and click Delete. The schedule is now removed.
  • 45. 45 AUTO GENERATE NUMBERS FOR ANY STATE AND SERVICE PROVIDER • Click on Generate Number tab to automatically generate mobile numbers. • Mobile numbers are generated according to state/city and service provider. Step 1- Fill out the form from the list provided.  Country code- Enter the country code here. Ex: 91  State Name- Select the name of the state for which numbers are to be generated.  Provider- Select the service provider belonging to the mobile number series.  Starting No- 4 digits. Select the first four digits of the first number in the series.  Mobile No- 6 digits. Enter the last 6 digits of the first number in the series.  Operator- o Increment: will add the number in the Number Add By list and then generate the series o Decrement: will subtract the number in the Number Add By list and then generate the series.  Number of Count- The number of numbers to be generated.
  • 46. 46 Step 2- Click Generate and the mobile numbers are generated. Options: 1. Add Country Code- will add the country code and then generate the numbers 2. Generate with Existing list- will join the numbers currently generated to the list you already generated in this panel. 3. Add to Recipient- This button will add the numbers to the recipient list seen in the Sending SMS window. 4. Clear- will clear the numbers generated 5. Export- will save the numbers generated into a separate document.
  • 47. 47 Saving the numbers generated as a group Step 3- To save the numbers generated as a group ex: Andhra numbers, Kerala numbers etc… Enter the name you wish to give the group in the text box and click Save Group. Adding a new state for auto generation Step 1- To add a new state for auto generation enter the name of the state beside State Name and click Add.
  • 48. 48 Step 2- The state now added will appear in the list. Creating entry for a new state When a state name is added the starting numbers and service providers for that new state must also be created. Click on the Generate Number tab. In the section provided at the bottom • State Name: Enter the name of the state you wish to add
  • 49. 49 • Provider: Select the service provider you wish to add for the state • Starting No: Enter the starting number for the state and service provider entered. Click Add and the entry will be added in the database panel shown. Delete button will delete the selected entry. VIEWING LOG DETAILS  Log details contain information regarding the working of the application. It can be useful to detect errors.  On Log tab select From date and To date- the time period between which you wish to view the log.
  • 50. 50  Click Refresh to view the log details between the selected time periods.  Click Save to save the log as a separate document.  Click Delete to delete the log details DEVICE INFORMATION  Device Information tab gives details about the mobile connected to the system.  Select the port number for the mobile and that mobile’s info is displayed. BACK UP Back Up tab allows back up of important data used in Advance Broadcaster Step 1-
  • 51. 51  Beside Select BackUp Folder click and select any path for the backup files. Backup files are usually stored in C or D drives.  Make New Folder- creates a new folder for your backup files.  Click OK. Step 2- Click Backup to create the backup folder. Step 3- Backup files created are listed in the panel. Click Restore to create up-to-date backup of the backup file shown in that path.
  • 52. 52