1. Microsoft Access Tutorial: Advanced
Part 1: Create Database
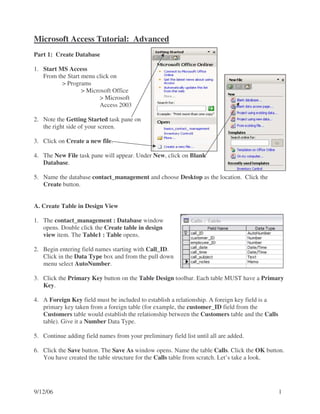
1. Start MS Access
From the Start menu click on
> Programs
> Microsoft Office
> Microsoft
Access 2003
2. Note the Getting Started task pane on
the right side of your screen.
3. Click on Create a new file.
4. The New File task pane will appear. Under New, click on Blank
Database.
5. Name the database contact_management and choose Desktop as the location. Click the
Create button.
A. Create Table in Design View
1. The contact_management : Database window
opens. Double click the Create table in design
view item. The Table1 : Table opens.
2. Begin entering field names starting with Call_ID.
Click in the Data Type box and from the pull down
menu select AutoNumber.
3. Click the Primary Key button on the Table Design toolbar. Each table MUST have a Primary
Key.
4. A Foreign Key field must be included to establish a relationship. A foreign key field is a
primary key taken from a foreign table (for example, the customer_ID field from the
Customers table would establish the relationship between the Customers table and the Calls
table). Give it a Number Data Type.
5. Continue adding field names from your preliminary field list until all are added.
6. Click the Save button. The Save As window opens. Name the table Calls. Click the OK button.
You have created the table structure for the Calls table from scratch. Let’s take a look.
9/12/06 1
2. 7. From the Table Design toolbar, select the Datasheet View icon. The table datasheet
window opens. Check your list of fields for accuracy.
8. Close the table by clicking the X in the upper right corner.
9. You now see the contact_management : Database window. Now you will create tables by
importing data from a Microsoft Excel spreadsheet.
B. Importing Data
1. Go to File > Get External Data > Import. Browse to the Microsoft Excel file provided. Under
the Files of type drop down box, select Microsoft Excel (*.xls) in order to see the file. Highlight
the file name (e.g. Contacts.xls) and click the Import button.
2. The Import Spreadsheet Wizard window will open. Both worksheets are listed. You will have
to import each worksheet individually. Select the Customers worksheet and click the Next
button.
3. Check the box for First Row Contains Column Headings. Click Next. Choose the radio
button for saving In a New Table. Click Next.
4. You can specify information about each of the fields you are importing and modify field
information in the ‘Field Options’ area.
5. Highlight the ID column and check
the box Do not import field (Skip)
which will allow Access to create an
auto-number primary key. Click Next.
6. Click the radio button Let Access add
primary key. Click Next.
7. Name the table Customers and click
Finish. The wizard will confirm the
import pathway, click OK.
8. Open the Customers table in Design View and rename the primary key Customer_ID
9. Repeat steps 1-8 for other table(s) (for example, the Employees table with a primary key
Employee_ID).
10. Click on Datasheet View to view your data and table. Now you’ve created three tables, one
from scratch and two by importing.
Part 2: Implement Relationships
1. After all the tables are created, relationships need to be implemented.
9/12/06 2
3. 2. From Tools on the menu, select the Relationships menu item.
3. The Relationships window opens. From Relationships on the menu, choose Show Table.
4. Select all tables from the Show Table window. To select all, shift click on the first entry and
then click on the last entry in the list. Click the Add button. Then click the Close button. The
tables are displayed in the Relationships window. Resize the tables so you can see all fields.
5. Select the Customer_ID (primary key) from the Customers table. Click and drag to the
Customer_ID field (foreign key)
in the Calls table. You have
created a relationship between the
2 tables by linking the primary key
in one to a foreign key in the other.
6. Select the Enforce Referential
Integrity check box. Click Create.
Referential Integrity means
records must exist in one table
because matching records
depend on them in some other
table.
7. Repeat these steps for all
relationships.
8. If it is necessary to edit a
relationship, double click on the
Relationship arrow and the
One customer, many calls.
Edit Relationships window will
open. One employee, many calls,
many customers.
9. Close the Relationships window.
Part 3: Creating Forms and Modifying Queries and Reports
A. Creating and Modifying Forms
1. Creating Forms
Forms allow you to enter records into your tables.
• Choose the Forms button from the left hand
column.
• Double click on Create form by using wizard.
9/12/06 3
4. • Select Table: Calls from the Tables/Queries dropdown menu.
• Choose the >> button to select all the fields. Click Next.
• Select the Layout for the form. If you click on each one, a preview is displayed. Choose
Columnar. Click Next.
• Select Style: Standard. Click Next.
• Click Next again and name the form Calls Entry Form.
• Click Finish, form will display.
2. Modifying Forms
Combo Box: Typing in Values to Present a Pick List of Subjects
• In Design View, you can add radio buttons, pull down menus and input masks.
• Notice the Toolbox. Be sure the wizard icon is selected.
• If it is not displayed, click on the Toolbox icon on the toolbar.
• The Toolbox contains options that allow you to change the way data is entered. If you prefer
data entry to be by selection rather than typing, you must create a Combo Box for that field.
• To create a combo box, click on the Combo Box icon in the Toolbox.
• Click once in an open area inside the form. The Combo
Box Wizard will open. Select the radio button “I will
type in the values that I want.” Click Next.
• Click Next. Type in three values: Request, Complaint,
Compliment. Click Next.
• Choose the radio button “Store that value in this field”
and select call_subject. Click Next. Type in ‘Subject’ as
the field label for the Combo Box. Click Finish.
9/12/06 4
5. • The new Combo Box and Label will display on your form.
• To replace, select the old field label and field name (the actual name of the field in the table)
and hit Delete. Highlight the new Combo Box and Label and drag to original location. To
adjust position, click and drag.
Combo Box: Values from Table Lists Customer’s Name Instead of ID#
• To create a combo box, click on the Combo Box icon in the Toolbox.
• Click once in an open area inside the form. The Combo Box Wizard will open. Select the
radio button “I want the combo box to look up the values in a table or query.” Click Next.
• Notice that the radio button for Tables is selected. Highlight Table: Customers. Click Next.
• Sort by NameLast_cust
• Move over NameLast_cust and NameFirst_cust. Click Next.
• Make sure the Hide Key Column box is checked. Click Next.
• Select “Store that value in this field” and choose Customer_ID. Click Next.
• Label the combo box Customer. Click Finish. Replace old Customer_ID label and entry
box with new Customer combo box.
• Follow the same steps to replace the Employee_ID label and entry box with a new
Employee combo box.
• You will need to change the tab order. Choose View > Tab Order. Follow the instructions.
• Go to Form View to see the changes.
Input Mask
• Input masks (field template) can be used to
format data and provide some control over what
values can be entered. This helps enforce data
integrity.
• Right click on Call Date and go to Properties.
• Click the Data tab. Place your cursor in the
Input Mask row, then click on the ellipses (…).
The Input Mask Wizard will open. Highlight
the Data Look desired (for example, Short
Date). To see how the Input Mask looks, click
in the Try It box. Click Next.
9/12/06 5
6. • The Input Mask Wizard will allow you to substitute a placeholder character from a
dropdown list, if desired. Click Next. Click Finish.
3. Adding Records Using Forms
• Use the form to enter 3 calls. This will allow us to test the referential integrity of the
database later in the class.
B. Modifying Queries and Reports
1. Modifying Queries
Creating queries was covered in the MS
Access Basic class. The Basics handout has
more detailed instructions.
• Choose the Queries button from the left
hand column.
• Double click on Create query by using wizard and create a calls query by using all fields
from all three tables.
• In Design View, you can add or delete
fields from the query by dragging and
dropping. Field will be added in front
of cursor position.
• If you include a field but decide later
not to show it, just uncheck the Show
checkbox.
• You can enter your search Criteria in
the Criteria textbox of the appropriate
column. Or, you can enter a search
criteria prompt in brackets, such as
[Enter Last Name:]. Save query as
Last Name Query.
• Be aware that MS Access provides an expression builder to help with complicated queries.
Right click in the criteria column and choose Build to use the Expression Builder. For
example, to query calls made today, enter =Date( ). Look for examples in Help: Examples
of Filter Criteria
2. Modifying Reports
Reports were covered in the MS Access Basics class; refer to the handout for instructions on
how to create.
9/12/06 6
7. • Choose the Reports button from the left hand
column.
• Double click on Create report by using
wizard and create a report of your
choice.
• In Design View, you can modify title,
labels, and footers. Notice there are five
areas:
o Report Header
o Page Header
o Detail
o Page Footer
o Report Footer
• Report Header provides the title of the
report. To change the title, click within the text box and modify with the keyboard.
• Page Header lists the field labels. Click within the text box to modify field name. To
reposition the label, select it and then use arrow keys to adjust.
o Note that when you adjust label placement in Page Header, you need to also match
the adjustment in Detail.
• Detail controls the size and spacing of the fields in which data are displayed. To modify
position or width, use the same procedures mentioned in Page Header bullet.
• Footers are used to place information at the bottom of the page or report such as page
number, dates, and sums. For example, =Now( ) inserts the current date.
C. Setting Up Functions with Queries and Reports to Create a Count Query and Report
1. Create the Function Column in a Query
• Choose the Queries button from the left hand column
• Double click on Create query by using
wizard and create a “count” query
9/12/06 7
8. • Choose Table: Customers
• Select the first eight fields. Click Next.
• Click Next again. Name it Count Query.
Click Finish.
• Go to Design View
• Click the Totals icon on the toolbar
• Select Insert > Column
• In the new column, choose Customer_ID
from the pull down menu
• Change the Total row to Count by
selecting from the pull-down menu.
• Right click anywhere on the new column and choose Properties
• On Caption line type Count. Close Field Properties window.
• Click to run the query
• Each row will be counted as 1 in the Count column. Save changes. Close the Count Query.
2. Run the Function in a Report
• Choose the Reports button from the left hand column
• Click on Create report by using wizard
• Choose Query: Count Query. Select all fields. Click Next.
• Choose grouping, if needed. Click Next.
• Sort by NameLast_cust. Click Next.
• Choose Landscape. Click Next.
• Choose Corporate. Click Next.
• Name it Count Report. Click Finish.
9/12/06 8
9. • Go to Design View.
• Drag down the line below Report Footer
• Locate the Toolbox
• Click once on Textbox
• Place mouse in expanded Report Footer area. Click once.
• Rename the label by typing Count over it
• Type the function over the word Unbound
• =Sum(CountOfCustomer_ID)
• Click on Layout View
Part 4: Test Your Database
1. In the contact_management : Database window, double click on a table (for example, the
Employees table).
2. To test referential integrity, attempt to delete a record. Highlight a record by clicking on the
selected row. Either right click on the row and choose Delete Record, or use the Delete Record
icon on the top tool bar. You should not be allowed to delete because of referential integrity.
Part 5: Conclusion
1. With What You Know Now, You Can:
• Design and create simple databases using MS Access
• Design, create and modify MS Access forms, queries and reports.
2. Assignment – doing this takes practice!
• Design and create a database that you can use at work or home.
• Design, create and modify MS Access forms, queries and reports and check to be sure that
the results are accurate based on the data you put into your database.
5. Consultations Available
• Complex databases require the expertise of a professional database designer. UUHSC Data
Resource Center also provides consultations. Please see their website:
http://uuhsc.utah.edu/drc/summary.htm
• If you need assistance determining the level of expertise you need for your database, you
may set up a consultation with any of the course instructors.
• Call or email us if you have any questions.
9/12/06 9