SlideShare ist ein Scribd-Unternehmen logo
1 von 24
Downloaden Sie, um offline zu lesen
Operation and Installation Manual


                    Commercial Double Core Heat and Energy
                              Recovery Systems
                                                   5 Speed Electronics
                                         Lifestyle MAX Digital Control included


                                                                                                Models
                                                                                                500DCS
                                                                                                500REV DCS
                                                                                                500ERV


                                              New Auto Dehumidistat Function
                   prevents unwanted use of the dehumidistat when outdoor temperatures exceed 15°C (59°F).

                                     INSTALLER: Leave this manual for the homeowner


Installation and wiring to be in accordance with
CEC, NEC and local electrical codes.
Important: Read and save these instructions.


                                                                                                             69-500DCS
                                                                                                                  1210
Table of Contents                                                                                         Max Series Electronics

Max Series Electronics..................................................................2                Max Series HRVs (Heat Recovery Ventilators) and ERVs (Energy
Select the Correct HRV/ERV to Match your Climate ..................3                                     Recovery Ventilators) contain fully featured 5 Speed electronics to
ERV Questions and Answers ........................................................4                      provide complete ventilation control.
Technical Data - Model 500DCS ..................................................5                        The Lifestyle MAX Digital Control (included with each unit)
Technical Data - Model 500REVDCS ..........................................6                             should be mounted in an central location of the building.
Technical Data - Model 500ERV..................................................7                         Electronic features include:
Controlling your HRV/ERV                                                                                 • 5 Speed Operation on each mode
Select the Mode that’s Right for You                                                                     • 2 user selectable operational modes to provide
Glossary.........................................................................................8
                                                                                                                 - Continuous Ventilation
The Lifestyle MAX Digital Control (Included Wall Control)
How the Dehumidistat Works                                                                                       - 20 Minutes ON, 40 Minutes OFF
How to Synchronize the Humidity Setting ...................................9                             • Humidity Control through dehumidistat
The Lifestyle MAX Programmable Control (Optional)..............10                                        • Automatic Dehumidistat Disable
Optional Timers ..........................................................................11             • Built-in Relay for interfacing to an Air Handler/Furnace
Location of the HRV/ERV for Mounting ...................................12
The Ductwork System
Outside Weatherhoods ................................................................13
Stale Air Return System
Fresh Air Supply System                                                                                                           CAUTION
Adjustable Grilles........................................................................14
The Integrated HVAC System ....................................................15
                                                                                                         Before installation, careful consideration must be

Drain Connection ........................................................................16
                                                                                                         given to how this system will operate if connected

Installation of the Main Control ..................................................17
                                                                                                         to any other piece of mechanical equipment, i.e. a

Installation and Operation 20/40/60/ Minute Timers
                                                                                                         forced air furnace or air handler, operating at a
Installation of Mechanical Timers...............................................18                       higher static. After installation, the compatibility of
Interlocking the HRV/ERV to an Airhandler/Furnace Blower                                                 the two pieces of equipment must be confirmed, by
Dry Contacts................................................................................19           measuring the air flows of the HRV/ERV, by using
Balancing the HRV .....................................................................20                the balancing procedure found in this manual.
Service and Maintenance .......................................................21-22                     NEVER install a ventilator in a situation where its
Wiring Diagram ..........................................................................23              normal operation, lack of operation or partial
                                                                                                         failure may result in the backdrafting or improper
                                                                                                         functioning of vented combustion equipment.


             IMPORTANT -

                                                                                                                      ATTENTION
       PLEASE READ THIS MANUAL
        BEFORE INSTALLING UNIT.
                                            NOTE                                                          Do not apply electrical power to
 Due to ongoing research and product development,                                                         the unit until installation has been
 specifications, ratings and dimensions are subject to
 change without notice.                                                                                   fully completed (including low
                                                                                                          voltage control wiring).


                                                                         LEAVE WITH UNIT
    TO BE COMPLETED BY CONTRACTOR AFTER INSTALLATION
    Installing Contractor _________________________________________Telephone / Contact _____________________

    Serial Number______________________________________________Installation Date ________________________

    Model _________________________________________________________________________________________

                                                                                                     2
Select the Correct HRV/ERV to Match your Climate

HRV                                                                          ERV
A Heat Recovery Ventilator (HRV) is designed to provide fresh air            An Energy Recovery Ventilator (ERV) is designed to provide fresh
into a building while exhausting an equal amount of stale air.               air into a building while exhausting an equal amount of stale air.
During the winter months, the incoming cold fresh air is warmed by           An ERV is designed for use in warm humid areas with heavy air
utilizing the heat recovered from the stale air before it is exhausted       conditioning use. The ERV will transfer both sensible and latent
to the outdoors. During summer months, when the indoor space is              heat from the incoming fresh air to the outgoing stale air thereby
air conditioned, the Heat Recovery Ventilator will help in cooling           reducing the load (due to ventilation) on the air conditioning
the incoming fresh air with the stale air that is being exhausted.           system.
                                                                             ERVs are not suitable for climates where the temperature drops
                                                                             below -4°C (25°F) for more than five days.


                                                                         3
ERV Questions and Answers


What is the difference between an HRV                                      What's the difference between this type of core
and an ERV?                                                                and a rotary type?
The core in an HRV (Heat Recovery Ventilator) transfers heat               Here's a list of characteristics of the fixed plate core.
from one air stream to the other. This is called sensible heat. The        1. No rotating parts, so maintenance is easy and the unit lasts a
term ERV (Energy Recovery Ventilator) is usually used to                      long time.
describe a unit with an enthalpic core that transfers moisture as
well as heat from one air stream to the other. This (moisture              2. It is very flexible in terms of installation.
transfer) is called latent heat.                                           3. The core can easily be changed.
                                                                           4. Because the supply and exhaust air streams are
                                                                              completely separate, there is very little cross leakage of any
Enthalpic - what does it mean?
Enthalpy is the term used to describe the energy content of air.
This energy is a combination of the sensible and latent heat.                 dust or germs.
Therefore, a core which transfers energy is called an enthalpic            Can the core become clogged with dust?
core.                                                                      Because the surface of the core is a turbulent flow area, dust sticks
                                                                           to it easily; however, because the inside of the element is a laminar
                                                                           flow area, virtually no dust sticks to it.
Is an ERV better than an HRV?
NOT NECESSARILY! In cold climates such as most of North
America, an HRV works better than an ERV. This is because the              What is the maintenance?
air inside the home during the winter months will be more humid            About once a year you should either rinse the ERV core with warm
than the outside air. An ERV would transfer the latent heat                water or use a vacuum cleaner to remove dust from the core's
(humidity) from the exhaust air back into the incoming airstream.          surface.
This will aggravate moisture problems in the home and encourage
the growth of mold and mildew. If the air in the home is too dry for       Is an air filter needed?
comfort, an ERV will not help. A humidifier should be used to              To prevent clogging of the core, an air filter should always be
increase the humidity to a comfortable level.                              installed on the supply and exhaust sides of the core.
                                                                           How much ventilation do I need?
                                                                           During seasons when your windows and doors are closed, the ERV
Where do you use an ERV instead of an HRV?
An ERV is recommended for warm, humid areas with heavy air
conditioning use. As there is no defrost in an ERV it is not               should operate continuously when the dwelling is occupied, and
recommended for areas where the temperature drops below -4°C               either continuously or intermittently when not occupied.
(25°F) for more than five days.                                            For most installations the ERV will normally be set to operate
                                                                           continuously on low speed with the option of going to high speed
Why transfer moisture in the summer                                        as the need arises. For example; if you are entertaining and there is
(cooling season)?                                                          a large number of people present (some may be smoking), the unit
The enthalpic core will allow moisture to be transferred from a            should be switched to high speed.
humid air flow to a dry air flow. This property is useful in the           Your ERV may be equipped with automatic or manual switches,
cooling season if an air conditioning system is used to lower the          but all ERVs will have a manual speed control override.
indoor humidity. You will then have dry, cool air in the exhaust of
the ERV, and warm humid air in the supply stream. With these
conditions, the ERV will be able to transfer the moisture and heat
of the supply air to the exhaust air. In this way, the ERV will
                                                                                                  ATTENTION
supply to the home air which is cooler and drier than outside.
Remember that an ERV is not a dehumidifier, and on its own will
                                                                                    The ERV - Enthalpic Core is not suitable for

not take moisture out of the air.
                                                                                    climates where the outdoor temperature
                                                                                    drops below -4°C (25°F).
So why use an ERV?
A properly operating air conditioner will not only lower the
temperature in your house, but will also lower the
humidity level. This prevents an uncomfortable cold and damp                                     ATTENTION
situation. In fact, about 2/3 of the energy used by the air
conditioner system is to remove moisture. Therefore, when
                                                                                Use the HRV core for ventilating smoking rooms
ventilating in the summer, less moisture brought into the home
                                                                                regardless of the geographical location.
means less work for the air conditioner, and energy savings for
you.


                                                                       4
Model 500DCS

                                                                                                                                                             PERFORMANCE
ENGINEERING DATA                                                                                                                                     Net supply airflow in cfm (L/s) against

CORES                                                                                                                                                             external static pressure
Two modular (two section) aluminum HRV cores arranged for high efficiency cross-flow
ventilation.
                                                                                                                                             E.S.P                                                      cfm                     L/s
                                                                                                                 @ 0.1” (25 Pa)                                                                          488                 (229)
MOTORS
Two PSC, 5 speed double shafted, 120 VAC, 3.15 A motors. (6.3 A total on high speed) with                        @ 0.2” (50 Pa)                                                                          461                (217)
1/10 hp at 1625 RPM. Total of 610 watts on High speed.
                                                                                                                 @ 0.3” (75 Pa)                                                                          440                 (207)
BLOWERS
Centrifugal-type rated at 530 cfm (250 L/s) free air delivery. Each air stream has two centrifugal
blowers driven by four PSC motors.
                                                                                                                 @ 0.4” (100 Pa)                                                                         436                 (205)

FILTERS                                                                                                          @ 0.5” (125 Pa)                                                                         371                 (174)
Washable air filters in exhaust and supply air streams.
                                                                                                                 @ 0.6” (125 Pa)                                                                         326                 (153)
DEFROST
Supply bypass damper routes indoor air to defrost cores.
WEIGHT 178 lbs. (81 kg) SHIPPI G WEIGHT 203 lbs. (92 kg)
                                                                                                                 VAC @ 60HZ                                                                                                   120

CONNECTION DUCT SIZES                                                                                            WATTS / Low speed                                                                                            187
Four 14”x 8” ( 356 mm x 200 mm)                                                                                  WATTS / High speed                                                                                           610
MOUNTING
Unit to be set on support brackets hung by threaded rod-type apparatus (brackets and rods not
included).
                                                                                                                 Amp rating                                                                                                     2.9

CASE
Twenty gauge pre-painted galvanized steel (G60) for superior corrosion resistance. Insulated
with foil faced insulation duct liner where required to prevent exterior condensation. One drain
                                                                                                                                                       AIRFLOWS (Each Air Stream)
connection 1/2" (12 mm) OD.


                                                                                                                                                                                                                                            TOTAL CURRENT DRAW (AMPS) @ 120 VAC
                                                                                                                                                                                                 *5   - High Speed
                                                                                                                                                                                                 *4   - Medium High Speed


                                                                                                         AIRFLOW CFM (L/s)
                                                                                                                             600 (282)                                                           *3   - Medium Speed


The Lifestyle MAX Digital Control (99-DXPL01) is included with the unit and can be wall
CONTROLS & ELECTRONICS                                                                                                                                                                           *2   - Medium Low speed
                                                                                                                              500 (235)                                                          *1   - Low speed         - 6.3 HIGH


mounted in a central location of the home. (3 wire) 20 gauge wire (min.) 100' length
                                                                                                                                                         5
                                                                                                                                                                                                                                - 3.8 MED


Electronic features include:
                                                                                                                              400 (190)
                                                                                                                                                         4                                                                      - 3.1 LOW


• 5 Speed Operation on each mode
                                                                                                                              300 (143)                  3
                                                                                                                                                         2


• 2 user selectable operational modes: Continuous Ventilation, 20 ON/40 OFF
                                                                                                                                    200 (94)             1


• Humidity Control through dehumidistat
                                                                                                                                    100 (47)


• Adjustable Dehumidistat function built into the main wall control
• Built-in Relay for Interfacing to furnace
                                                                                                                                                        25 (.1)      50 (.2)       75 (.3)      100 (.4)         125 (.5)   150 (.6)
                                                                                                                                                      EXTERNAL STATIC PRESSURE IN PASCALS (inches W.C.)


99-LS-01       Lifestyle MAX Programmable Control - contains all the features of the Lifestyle
OPTIONAL PROGRAMMABLE CONTROL                                                                                                                        TEMPERATURE EFFECTIVENESS
               MAX Digital Control with 7/24 programmable ventilation, (3 wire) 20 gauge wire
               (min.) 100' length
                                                                                                                             EFFECTIVENESS


                                                                                                                                             100%


99-DH-01 Lifestyle Dehumidistat - Initiates high speed ventilation when the indoor
OPTIONAL ACCESSORIES

               humidity level is above the set point. (3 wire) 20 gauge wire (min.) 100' length
                                                                                                                                             90%


99-DET01 Lifestyle 20/40/60 Minute Timer - Initiates high speed ventilation for
OPTIONAL TIMERS                                                                                                                              80%


               20, 40, or 60 minutes, (3 wire) 20 gauge wire (min.) 100' length                                                                                                NOTE: Exhaust Relative Humidity (RH) at 40%


99-20M01 Lifestyle 20 Minute Timer - Initiates high speed ventilation for 20 minutes,
               (3 wire) 20 gauge wire (min.) 100’ length.
                                                                                                                                                              200           300               400             500               600
                                                                                                                                                             (94)          (143)             (190)           (235)             (282)
                                                                                                                                                                     AIRFLOW IN CFM (L/s)
WARRANTY Units carry a 15 year warranty on the heat recovery core and a 2 year
               replacement parts warranty.
                                                                                                                                        All units conform to CSA and UL standards.
                                                                   EXHAUST AIR
                 EXHAUST AIR                                      FROM BUILDING                                                                                          MOUNTING POINTS
                 TO OUTSIDE
                                                                                                                                                          5 7/8"
                                                                                                                  5 7/8"                                 (150 mm)
                                                                                                             (150 mm)
             NOTE:                                                      18 3/4"                                                               18 3/4"
             Service clearance                                                   1 1/4"                                                                1 3/8"
                                                                       (475 mm) (32 mm)                                                      (475 mm) (35 mm)
             is 30 in. (760 mm)
                                                                                                                                                                                  14"                   8"
                                                                                                14"          8"                                                                (356 mm)               (200 mm)
                                                                                             (356 mm)     (200 mm)

               SUPPLY AIR
              FROM OUTSIDE                            49"                                      28 1/4"                                                                          28 1/4"
                                   DRAIN CONNECTION (1245
                                                        mm)        SUPPLY AIR                 (717 mm)                                                                         (717 mm)
                             DEFROST                              TO BUILDING
                                         FRONT VIEW                                   INTERIOR DUCT                                                                 EXTERIOR DUCT
                                                                                          CONNECTION SIDE                                                            CONNECTION SIDE

Date: ___________________________________________                                   Contractor: ______________________________________
Tag: _____________________Qty:___________________                                   Supplier: ________________________________________
Project: _________________________________________                                  Quote#: _________________________________________
Engineer: _______________________________________                                   Submitted by: ____________________________________


                                                              info@lifebreath.com
                                                                            5
Model 500DCS-REV
ENGINEERING DATA                                                                                                                                                       PERFORMANCE
                                                                                                                                                             Net supply airflow in cfm (L/s) against
CORES
Two modular (two section) aluminum HRV cores arranged for high efficiency cross-flow                                                                                    external static pressure
ventilation.                                                                                                                                         E.S.P                                                         cfm                L/s
MOTORS
Two PSC, 5 speed double shafted, 120 VAC, 3.15 A motors. (6.3 A total on high speed) with
                                                                                                                 @ 0.1” (25 Pa)                                                                                    488              (229)

1/10 hp at 1625 RPM. Total of 610 watts on High speed.                                                           @ 0.2” (50 Pa)                                                                                    461              (217)
BLOWERS
Centrifugal-type rated at 530 cfm (250 L/s) free air delivery. Each air stream has two
                                                                                                                 @ 0.3” (75 Pa)                                                                                    440              (207)
centrifugal blowers driven by four PSC motors.                                                                   @ 0.4” (100 Pa)                                                                                   436              (205)
FILTERS
Washable air filters in exhaust and supply air streams.                                                          @ 0.5” (125 Pa)                                                                                   371              (174)
DEFROST
Supply bypass damper routes indoor air to defrost cores.
                                                                                                                 @ 0.6” (125 Pa)                                                                                   326              (153)
WEIGHT 178 lbs. (81 kg) SHIPPI G WEIGHT 203 lbs. (92 kg)                                                         VAC @ 60HZ                                                                                                          120
CONNECTION DUCT SIZES
Four ” x 8” ( 356 mm x 200 mm)                                                                                   WATTS / Low speed                                                                                                   187
MOUNTING
Unit to be set on support brackets hung by threaded rod-type apparatus (brackets and
                                                                                                                 WATTS / High speed                                                                                                  610
rods not included).                                                                                              Amp rating                                                                                                           2.9
CASE
Twenty gauge pre-painted galvanized steel (G60) for superior corrosion resistance. Insulated
with foil faced insulation duct liner where required to prevent exterior condensation.                                                                           AIRFLOWS (Each Air Stream)
One drain connection 1/2" (12 mm) OD.


                                                                                                                                                                                                                                                    TOTAL CURRENT DRAW (AMPS) @ 120 VAC
                                                                                                                                                                                                            *5   - High Speed
                                                                                                                                                                                                            *4   - Medium High Speed


                                                                                                                 AIRFLOW CFM (L/s)
                                                                                                                                     600 (282)

The Lifestyle MAX Digital Control (99-DXPL01) is included with unit and can be wall
CONTROLS & ELECTRONICS                                                                                                                                                                                      *3
                                                                                                                                                                                                            *2
                                                                                                                                                                                                                 - Medium Speed
                                                                                                                                                                                                                 - Medium Low speed


mounted in a central location of the home. (3 wire) 20 gauge wire (min.) 100' length
                                                                                                                                      500 (235)                                                             *1   - Low speed         - 6.3 HIGH
                                                                                                                                                                   5


Electronic features include:
                                                                                                                                                                                                                                        - 3.8 MED
                                                                                                                                      400 (190)
                                                                                                                                                                   4                                                                    - 3.1 LOW


• 5 Speed Operation on each mode
                                                                                                                                      300 (143)                    3


• 2 user selectable operational modes: Continuous Ventilation, 20 ON/40 OFF
                                                                                                                                                                   2
                                                                                                                                            200 (94)               1


• Humidity Control through dehumidistat                                                                                                     100 (47)


• Adjustable Dehumidistat function built into the main wall control
• Built-in Relay for Interfacing to furnace
                                                                                                                                                                 25 (.1)        50 (.2)       75 (.3)      100 (.4)      125 (.5)   150 (.6)
                                                                                                                                                               EXTERNAL STATIC PRESSURE IN PASCALS (inches W.C.)


99-LS-01       Lifestyle MAX Programmable Control - contains all the features of the
OPTIONAL PROGRAMMABLE CONTROL
                                                                                                                                                               TEMPERATURE EFFECTIVENESS
               Lifestyle MAX Digital Control with 7/24 programmable ventilation,
               (3 wire) 20 gauge wire (min.) 100' length
                                                                                                                                     EFFECTIVENESS


                                                                                                                                                     100%


99-DH-01 Lifestyle Dehumidistat - Initiates high speed ventilation when the indoor
OPTIONAL ACCESSORIES

               humidity level is above the set point. (3 wire) 20 gauge wire (min.) 100' length                                                       90%


99-DET01 Lifestyle 20/40/60 Minute Timer - Initiates high speed ventilation for
OPTIONAL TIMERS

               20, 40, or 60 minutes, (3 wire) 20 gauge wire (min.) 100' length
                                                                                                                                                      80%


99-20M01 Lifestyle 20 Minute Timer - Initiates high speed ventilation for 20 minutes,
                                                                                                                                                                                          NOTE: Exhaust Relative Humidity (RH) at 40%


               (3 wire) 20 gauge wire (min.) 100’ length.
                                                                                                                                                                        200            300               400              500           600
                                                                                                                                                                       (94)           (143)             (190)            (235)         (282)
                                                                                                                                                                                AIRFLOW IN CFM (L/s)
WARRANTY Units carry a 15 year warranty on the heat recovery core and a 2 year
               replacement parts warranty.
                                                                                                                                All units conform to CSA and UL standards.
              EXHAUST AIR                                    EXHAUST AIR
             FROM BUILDING                                   TO OUTSIDE                                                                                                       MOUNTING POINTS


                                                                                                                                                              5 7/8"
                                                                                                            5 7/8"                                           (150 mm)
                                                    NOTE:                                                  (150 mm)
                                                    Service clearance     18 3/4"                                                     18 3/4"  1 3/8"
                                                                                   1 1/4"
                                                    is 30 in. (760 mm)   (475 mm) (32 mm)                                            (475 mm) (35 mm)
                                                                                                                                                                                    14"
                                                                                                  14"         8"                                                                                           8"
                                                                                                                                                                                 (356 mm)               (200 mm)
                                                                                               (356 mm)    (200 mm)


                                           49"                                                   28 1/4"                                                                          28 1/4"
                                        (1245 mm)           SUPPLY AIR                          (717 mm)                                                                         (717 mm)
                SUPPLY AIR               DRAIN CONNECTION FROM OUTSIDE
               TO BUILDING      FRONT VIEW           DEFROST                            INTERIOR DUCT                                                              EXTERIOR DUCT
                                                                                            CONNECTION SIDE                                                             CONNECTION SIDE

Date: ___________________________________________                                           Contractor: ______________________________________
Tag: _____________________Qty:___________________                                           Supplier: ________________________________________
Project: _________________________________________                                          Quote#: _________________________________________
Engineer: _______________________________________                                           Submitted by: ____________________________________


                                                                   info@lifebreath.com

                                                                                       6
Model 500ERV
                                                                                                                                                                            PERFORMANCE
ENGINEERING DATA                                                                                                                                                  Net supply airflow in cfm (L/s) against
                                                                                                                                                                               external static pressure
CORES
One modular (two section) aluminum HRV cores and one modular (2 section) ERV core
arranged for high efficiency cross-flow ventilation.
                                                                                                                                                        E.S.P                                                           cfm               L/s
                                                                                                                                       @ 0.1” (25 Pa)                                                                   415           (195)
MOTORS
Two PSC, 5 speed double shafted, 120 VAC, 3.15 A motors. (6.3 A total on high speed) with                                              @ 0.2” (50 Pa)                                                                   392           (185)
1/10 hp at 1625 RPM. Total of 610 watts on High speed.                                                                                 @ 0.3” (75 Pa)                                                                   371           (175)
BLOWERS
Centrifugal-type rated at 530 cfm (250 L/s) free air delivery. Each air stream has two                                                 @ 0.4” (100 Pa)                                                                  344           (162)
centrifugal blowers driven by four PSC motors.
FILTERS                                                                                                                                @ 0.5” (125 Pa)                                                                  315           (149)
Washable air filters in exhaust and supply air streams.                                                                                @ 0.6” (150 Pa)                                                                 277            (131)
DEFROST
Supply bypass damper routes indoor air to defrost cores.                                                                               VAC @ 60HZ                                                                                         120
WEIGHT 178 lbs. (81 kg) SHIPPI G WEIGHT 203 lbs. (92 kg)
                                                                                                                                       WATTS / Low speed                                                                                  187
CONNECTION DUCT SIZES
Four ” x 8” ( 356 mm x 200 mm)                                                                                                         WATTS / High speed                                                                                 610
MOUNTING
Unit to be set on support brackets hung by threaded rod-type apparatus (brackets and                                                   Amp rating                                                                                         2.9
rods not included).
CASE
Twenty gauge pre-painted galvanized steel (G60) for superior corrosion resistance. Insulated                                                                      AIRFLOWS (Each Air Stream)
with foil faced insulation duct liner where required to prevent exterior condensation.


                                                                                                                                                                                                                                                     TOTAL CURRENT DRAW (AMPS) @ 120 VAC
One drain connection 1/2" (12 mm) OD.
                                                                                                                                                                                                               5 - High Speed
                                                                                                                                                                                                               *4 - Medium High Speed


                                                                                                                   AIRFLOW CFM (L/s)
                                                                                                                                        600 (282)                                                              *3 - Medium Speed
                                                                                                                                                                                                               *2 - Medium Low Speed


The Lifestyle MAX Digital Control (99-DXPL01) is included with the unit and can be wall
CONTROLS & ELECTRONICS
                                                                                                                                                                SPEED
                                                                                                                                        500 (235)                                                              *1 - Low speed             6.3 HIGH


mounted in a central location of the home. (3 wire) 20 gauge wire (min.) 100' length
                                                                                                                                                                    5                                                                     3.8 MED
                                                                                                                                        400 (190)


Electronic features include:
                                                                                                                                                                                                                                          3.1 LOW
                                                                                                                                                                    4
                                                                                                                                        300 (143)


• 5 Speed Operation on each mode
                                                                                                                                                                    3
                                                                                                                                                                    2
                                                                                                                                            200 (94)


• 2 user selectable operational modes: Continuous Ventilation, 20 ON/40 OFF
                                                                                                                                                                    1

                                                                                                                                            100 (42)

• Humidity Control through dehumidistat
• Adjustable Dehumidistat function built into the main wall control
                                                                                                                                                                   25(.1)        50(.2)           75(.3)     100(.4)     125(.5)   150(.6)


• Built-in Relay for Interfacing to furnace
                                                                                                                                                                 EXTERNAL STATIC PRESSURE IN PASCALS (in. W.C.)


                                                                                                                                                                         TOTAL EFFECTIVENESS
99-LS-01       Lifestyle MAX Programmable Control - contains all the features of the
OPTIONAL PROGRAMMABLE CONTROL

               Lifestyle MAX Digital Control with 7/24 programmable ventilation,
               (3 wire) 20 gauge wire (min.) 100' length
                                                                                                                                       EFFECTIVENESS


                                                                                                                                                       70%


99-DH-01 Lifestyle Dehumidistat - Initiates high speed ventilation when the indoor
OPTIONAL ACCESSORIES
                                                                                                                                                       60%


               humidity level is above the set point. (3 wire) 20 gauge wire (min.) 100' length

99-DET01 Lifestyle 20/40/60 Minute Timer - Initiates high speed ventilation for
OPTIONAL TIMERS                                                                                                                                        50%


               20, 40, or 60 minutes, (3 wire) 20 gauge wire (min.) 100' length
                                                                                                                                                                                            NOTE: Exhaust Relative Humidity (RH) at 40%


99-20M01 Lifestyle 20 Minute Timer - Initiates high speed ventilation for 20 minutes,
                                                                                                                                                                        200                300              400            500         282


               (3 wire) 20 gauge wire (min.) 100’ length.
                                                                                                                                                                        (94)              (143)            (190)          (235)       (600)
                                                                                                                                                                                AIRFLOW IN CFM (L/s)

WARRANTY The aluminum core has a fifteen (15) year warranty. The enthalpic core                                                        All units conform to CSA and UL standards.
               has a two (2) year replacement parts warranty. The 500ERV carries a
                                                                                                                      ERVs are not recommended for regions where the design
               two (2) year replacement parts warranty.                                                                  (   )
                                                                                                                      temperature is below 25ºF (-4ºC).
                                                                            EXHAUST AIR
                  EXHAUST AIR       ENTHALPIC CORE         ALUMINUM CORE   FROM BUILDING                                                                                                   MOUNTING POINTS
                  TO OUTSIDE
                                                                                                                                                                            5 7/8"
                                                                                                                                           5 7/8"                        (150 mm)
                                                                                                                                       (150 mm)
              NOTE:                                                              18 3/4"                                                                      18 3/4"
              Service clearance                                                           1 1/4"                                                                       1 3/8"
                                                                                (475 mm) (32 mm)                                                             (475 mm) (35 mm)
              is 30 in. (760 mm)
                                                                                                                                                                                                     14"                  8"
                                                                                                         14"                              8"
                                                                                                                                       (200 mm)                                                   (356 mm)             (200 mm)
                                                                                                      (356 mm)
                SUPPLY AIR
               FROM OUTSIDE                              49"                                            28 1/4 "                                                                                   28 1/4"
                                                      (1245 mm)            SUPPLY AIR                  (717 mm)                                                                                   (717 mm)
                              DEFROST   DRAIN CONNECTION
                                                                           TO BUILDING
                                            FRONT VIEW                                         INTERIOR DUCT                                                                     EXTERIOR DUCT
                                                                                                   CONNECTION SIDE                                                                   CONNECTION SIDE

Date: ___________________________________________                                            Contractor: ______________________________________
Tag: _____________________Qty:___________________                                            Supplier: ________________________________________
Project: _________________________________________                                           Quote#: _________________________________________
Engineer: _______________________________________                                            Submitted by: ____________________________________


                                                                     info@lifebreath.com
                                                                                         7
Controlling your HRV/ERV

Today's modern, tight buildings require fresh outdoor air to                         HOW MUCH VENTILATION DO I NEED?
maintain a healthy indoor air environment. The amount of                             During seasons when your windows and doors are closed (winter,
ventilation you require in the building will depend upon:                            and summer if air conditioned), the HRV/ERV should be set to
• the number of occupants and their activity levels,                                 operate continuously on low speed with the option of going to high
• the way the building was built.                                                    speed as the need arises. For example, if you are entertaining and
                                                                                     there is a large number of people present, the unit should be
• your personal preferences for fresh air,                                           switched temporarily to high speed.
The HRV/ERV introduces fresh air to the building while                               You may wish to use an intermittent operational mode if the
recovering energy from the air it exhausts. Specifically, an                         building is unoccupied (20 minutes ON / 40 minutes OFF).
HRV/ERV that is properly installed, operated and maintained will:
• exhaust stale, contaminated air
• recover the majority of the energy from the exhausted stale air
• use the recovered energy to preheat or precool outside air that is
  drawn into the building
• distribute the fresh air throughout the building


Selecting the Mode of Operation that’s Right for You

Your Lifebreath MAX SERIES HRV/ERV has 2 Operational                                      This Operational Mode will provide 20 minutes of ventilation
Modes and 5 speeds on each mode to adjust indoor ventilation                              each hour. You may wish to use this ventilation mode in low
levels. Experiment with the ventilation levels in the building to                         speed for low activity levels or if the building is unoccupied.
determine a suitable amount of ventilation.
I.    Continuous Ventilation Mode
      This is the most popular mode since it provides continuous
      ventilation within the building. You may, for example, select
      Continuous Ventilation at high speed for high household
      activity levels or Continuous Ventilation for lower activity
      levels.
II. 20 minutes ON, 40 minutes OFF Mode

 GOOD                             Standby (fan speed set to 0)                   Allows unit to run on demand from remote controls such as DET
                                                                                 Timer and Dehumidistat.

 BETTER                          Intermittent low speed operation 20             Provides 20 minutes air exchange and 40 minutes off.
                                 ON/40 OFF


 BEST                            Continuous low speed operation                  Ensures continuous air exchange within the building. Air is always
                                                                                 fresh and healthy.


Glossary

DEFROST MODE - to ensure reliable operation during cold weather, the                 SELF TEST - each time the HRV/ERV is powered/energized the self test
HRV/ERV will automatically cycle through its defrost mode as needed.                 function will automatically initiate. During the self test the HRV/ERV will
DEHUMIDISTAT - a control device that senses the amount of moisture                   cycle through all the speeds available (1-5), test the damper motor
in the air and activates high speed ventilation when the air moisture level in       operation and will default back to the previous operational mode and speed
the home exceeds the set point.                                                      selection. Total self test duration is approximately 90 seconds.
RESET - whenever resetting of the HRV/ERV is required, disconnect                    STA DBY MODE - the HRV/ERV is powered/energized and waiting for
power for 30 seconds. The Self Test will occur when the HRV/ERV is re                fan operation to be initiated. For example, the HRV is set a Continuous
reconnected.                                                                         Ventilation Operational Mode at Speed 0.
                                                                                     THERMISTOR - the HRV/ERV's temperature sensor which measures
                                                                                     electrical resistance in a known manner, as outdoor temperatures fluctuate.


                                                                                 8
The Lifestyle MAX Digital Control (Included Wall Control)

Part # 99-DXPL01
The Lifestyle MAX Digital Control is fully digital and allows
                                                                                                                         Instruction card

you to easily control the building’s ventilation.
Key Features
                                                                                 Fan Speed

• 5 Speed Fan setting
                                                                                 Indicator
                                                                                                                                  Humidity
• Electronic Dehumidistat
                                                                        20/40/60 Minute
                                                                        High Speed                                                Indicator

• Two Selectable Modes of Operation
                                                                        Override Button
                                                                                                                                  Increase

   20 min. On / 40 min. Off
                                                                            Mode Select                                           Button

   Continuous Ventilation
                                                                            Button
                                                                                                                                Set button

• 20 / 40 /60 High Speed override timer
                                                                                   Mode
                                                                                   Indicator

• Service/Maintenance Reminder display                                                                                           Decrease

• Backlit LCD screen is easy to read
                                                                                ON/OFF                                           Button
                                                                                Button

* Recirculation not available on all models
                                                                                                                               Service
                                                                                High Speed                                     Indicator
                                                                                Override
Setting the Control                                                             Timer
1. Press and release MODE Select Button until the FAN symbol                    Indicator

   appears on the screen. Press the SET Button.                                      Connects to 3 wire 20 gauge
2. SCROLL (using Increase/Decrease Buttons) to select desired                        low voltage wire
   fan speed (0-5). Press SET Button.                                       20/40/60 Minute High Speed Override Button
3. SCROLL to select the desired operational mode                            This function temporarily initiates high speed ventilation for 20,
   (VENT, 20/40, OFF). Press SET. (Refer to "Operational                    40 or 60 minutes. Press FAN button once for 20, twice for 40 and
   Modes" in this manual.)                                                  three times for 60 minutes.
Setting the Dehumidistat                                                    Service Indicator
Refer to "How the Dehumidistat Works" in this manual before                 After 4 months, a ‘SERVICE’ indicator will appear. Refer to
setting the Dehumidistat.                                                   "Maintenance Routine for your HRV/ERV" in this manual.
1. Press and release MODE until "RH" and a number flashes.                  To reset the service indicator:
   SCROLL to desired number. Press MODE Select Button to                    • Press and release the Increase/Decrease buttons simultaneously.
   exit.                                                                      The “SERVICE” icons will flash for 5 seconds..
2. Press MODE Select Button to return to operational features.              • Press SET within the 5 seconds and the service indicator will
                                                                              reset.


How the Dehumidistat Works

Often today's well insulated and tight buildings will have high             The average person is comfortable between 30-50% RH. The
indoor humidity levels during the heating season. Visible                   dehumidistat should be set to OFF for all seasons except the
condensation on windows indicates a high level of humidity. The             heating season. OFF is achieved by setting the dehumidistat to 80.
amount of condensation on the windows will increase as outdoor
temperatures drop.                                                           Dehumidistat Notes:
Your HRV/ERV will reduce indoor humidity levels when outdoor                 The dehumidistat function will be disabled if outdoor
air is drier than indoor air. This usually occurs during the heating         temperatures exceed 15°C (59°F) for a 24 hour period.
season when outdoor temperatures are less than 15°C (59°F).                  The dehumidistat function will be re-enabled if the unit is
Your Lifestyle MAX Digital Control or the optional Lifestyle                 unplugged for 3 minutes or if the outdoor temperature drops
MAX Programmable Control has an adjustable dehumidistat                      below 15°C (59°F) for a 24 hour period.
which can be set to achieve a further dehumidification effect from
your HRV/ERV. High speed ventilation will be initiated upon
exceeding the dehumidistat set point regardless of the mode and
                                                                            How to Synchronize the Humidity Setting
speed of operation. Once the humidity in the building is reduced,
the HRV/ERV will revert back to its previous setting.                       The Lifestyle Digital wall control has a feature that will allow it to
                                                                            be synchronized with other humidity instruments in the building.
We suggest operating the HRV/ERV for the first few days without
use of the dehumidistat function to observe if a further                    1. Turn off the control with the ON/OFF button.
dehumidification effect will be required. The dehumidistat                  2. Simultaneously press and release the ON/OFF button and the
operates in % of RH (relative humidity) with 80 being high and                  20/40/60 Minute High Speed override button.
20 being low. Set the Dehumidistat to 80% to disable. If, after a           3. Use the Increase/Decrease buttons to adjust the Humidity
few days, further dehumidification is required (the building is still           Indicator on the display screen to the number of degrees
too humid), set the humidity level to a lower amount.                           difference between your humidity measuring device. Minus is
                                                                                indicated by flashing.
                                                                            4. Press the MODE button.


                                                                        9
The Lifestyle MAX Programmable Control (Optional)

Part # 99-LS-01
The optional Lifestyle MAX Programmable Control is fully
                                                                                                                       Instruction card

digital and allows you to program when and how much fresh air
                                                                                Fan Speed
                                                                                Indicator
will be entering the building.
                                                                                                                            Date and Time


Key Features
                                                                    20/40/60 Minute
                                                                    High Speed                                                Humidity

• 24 / 7 programmable ventilation
                                                                    Override Button                                           Indicator


• 4 programmable events per day                                            Mode Select                                      Increase

• 5 Speed Fan setting
                                                                           Button                                           Button


• Electronic Dehumidistat
                                                                             Mode
                                                                             Indicator                                    Set button

• Two Selectable Modes of Operation
                                                                           ON/OFF

    20 min. On / 40 min. Off
                                                                           Button
                                                                                                                           Decrease

    Continuous Ventilation
                                                                                                                           Button
                                                                         High Speed
• 20 / 40 /60 High Speed override timer
                                                                                                                         Service
                                                                         Override Timer
                                                                                                                         Indicator

•   Service/Maintenance Reminder display
                                                                         Indicator


• Backlit LCD screen is easy to read
                                                                                                                       Daytime Event
                                                                             Connects to 3 wire 20 gauge               Program Indicator

                                                                             low voltage wire
Setting Date & Time
1. Press and release MODE Select Button until "TIME" and
   "SET" appear on the screen. Press SET Button.
2. The letter for the day of the week flashes. SCROLL (using
   Up/Down Arrows) to the correct day of the week. Press SET              Only one main control can be installed on your
   Button.                                                                system.
3. The hour and "AM" or "PM" flashes. SCROLL to the correct
   hour using the Increase or Decrease Buttons. Press SET
   button.                                                               Setting the Dehumidistat
                                                                         Refer to "How the Dehumidistat Works" in this manual before
4. The minutes will flash. SCROLL to the correct minute. Press
                                                                         setting the Dehumidistat.
   SET button to complete entry.
Programming Your Control                                                 1. Press and release the MODE Button until "RH" and a number
1. Press and release the MODE Button until "PROGRAM SET"                    flashes. SCROLL using the Increase or Decrease Buttons to
   appears. Press SET Button.                                               desired number (RH Set Point). Press the MODE Button to
2. Weekday letters (MTWTF) will flash. Press SET Button.                    exit. Refer to "How the Dehumidistat Works" in this manual
3. "WAKE" flashes. Press SET Button.                                        for a description of the functionality of the Dehumidistat.
4. "AM" or "PM" flashes. SCROLL to desired time (in 20                   2. Press the MODE Button to return to operational features.
   minute intervals). Press SET Button.
                                                                         Manually Setting the Control
5. "FAN" flashes. SCROLL to desired fan speed (0-5). Press SET           1. Press and release MODE until "MANUAL" and "RUN" are
   Button.                                                                  indicated. Press SET.
6. "OFF" flashes. SCROLL to desired operation mode (VENT,                2. SCROLL to select desired fan speed (0-5). Press SET.
   20/40, OFF). Press SET Button two times. (Refer to "Selecting
                                                                         3. Use SCROLL to select the desired operational mode
   the Best Mode of Operation" in this manual for a description
                                                                            (VENT, 20/40). Press SET.
   of operational modes.)
                                                                         4. The control will remain in the "MANUAL RUN" position until
7. "LEAVE" flashes. Repeat steps 4 to 6 to program up to 4
                                                                            you change back to "PROGRAM RUN" (refer to "Running the
   events per day.
                                                                            Programmed Setting").
8. “ARRIVE” flashes. Repeat steps 4 to 6 to program up to 4
   events per day.                                                       20/40/60 Minute High Speed Override Button
                                                                         This function temporarily initiates high speed ventilation for 20,
9. “SLEEP” flashes. Repeat steps 4 to 6 to program up to 4
                                                                         40 or 60 minutes. Press FAN button once for 20, twice for 40 and
   events per day.
                                                                         three times for 60 minutes.
10. “Weekend” letters (SS) flash. Press SET. Repeat steps 3 to 9.
                                                                         Service Indicator
Running the Programmed Setting                                           After 4 months, a ‘SERVICE’ indicator will appear. Refer to
Once the programming has been completed you must activate the            "Maintenance Routine for your HRV/ERV" in this manual.
program.
                                                                         To reset the service indicator:
• Press the MODE Button until "PROGRAM" and "RUN" are
                                                                         • Press and release the Increase/Decrease buttons simultaneously.
  indicated.
                                                                           The “SERVICE” icons will flash for 5 seconds..
                                                                         • Press SET within the 5 seconds and the service indicator will
                                                                           reset.


                                                                    10
Optional Timers


Depending on the type of HRV/ERV installation, you may have
timers in areas such as restrooms. The timer will override the
Operational Mode (regardless of the setting) and initiate high
speed ventilation. Upon completion of the timer cycle, the
HRV/ERV will return to your selected Operational Mode and
speed setting.


Lifestyle 20/40/60 Minute Timer
Part # 99-DET01
Initiates high speed ventilation for 20, 40 or 60 minutes. The
20/40/60 Minute Status Lights indicate high speed operation.
                                                                                      20/40/60 Minute
                                                                                      Status Lights
Lockout Mode is useful if you wish to disable the timer. Set
lockout by holding the Select Button for 5 seconds. Unlock by
holding for 5 seconds.
Connect to 3 wire 20 gauge low voltage wire. Mounts in a
standard 2" x 4" electrical box.                                             Select Button


Lifestyle 20 Minute Timer
Part # 99-20M01
Initiates high speed ventilation for 20 minutes. The 20 Minute
Status Light indicates high speed operation.
Lockout Mode is useful if you wish to disable the timer. Set
                                                                               20 Minute

lockout by holding the Select Button for 5 seconds. Unlock by
                                                                               Status Lights

holding for 5 seconds.
Connect to 3 wire 20 gauge low voltage wire. Mounts in a
standard 2" x 4" electrical box.

                                                                             Select Button


Lifestyle Dehumidistat
Part # 99-DH-01
Initiate high speed ventilation when the moisture level in the
home exceeds the set point on the control. Once the humidity in
the house is reduced, the HRV/ERV will revert back to its
                                                                                Dehumidistat LEDs

previous setting. The Dehumidistat should be set to OFF for all
                                                                        %       Set to the desired humidity

season except the heating season.
                                                                        80
                                                                                level. High speed ventilation
                                                                                will initiate when the indoor
Refer to "How the Dehumidistat Works" in this manual before
                                                                                moisture level exceeds the
setting the Dehumidistat.
                                                                                set point on the control.
                                                                       20


                                                                                Dehumidistat
                                                                                Adjust Button


                                                                  11
Location of the HRV/ERV for Mounting


The HRV/ERV must be located in a heated space where the                    A minimum clearance of 30 inches (76 cm) in front of the
surrounding air temperature does not fall below 60°F                       HRV/ERV is recommended to service the heat exchanger
(16°C). The unit must be mounted level (horizontal) to                     cores and the filters. The HRV/ERV may be mounted on an
obtain proper drainage of water from the heat exchange                     equipment platform providing the drain hoses are clear and
element and drip pans. The warranty will be void if these                  there is sufficient space to open the doors for servicing.
conditions are not met.
Typically, the HRV/ERV is positioned close to an outside
wall or the roof to simplify the connections and keep the
length of insulated ducting required for the fresh air intake
to a minimum.


 Saddle Installation                                                       Curb Mounted


                                                                           Curb is wood or metal                   May be anchored to
                                               Vibration Isolators         (Supplied by others)                    floor,leaving space
                                               (Supplied by others)                                                for drain connections
                                   Threaded
                                   rod and U channel                             Mount unit on wooden or metal
                                   (Supplied by others)
                                                                                 curb assembly. Unit must be raised
   Hang unit with suspended rods                                                 an adequate height for installation
                                                                                 and slope of drain lines.                       Vibration Isolators
   and "U" channel members.                                                                                                      (Supplied by others)


                                                          ATTENTION
                                   Flexible duct connectors should be installed
                                   between the HRV and the galvanized ductwork.


                                                                      12
The Ductwork System

A properly designed ducting system will allow the                    ducting one size larger than the metal equivalent. Use
HRV/ERV to operate at its maximum efficiency. (Air flow              flexible duct connectors at the HRV/ERV to avoid noise
will be restricted by undersized ducting, use of too many            transmission.
elbows, tees, bends, etc.). Always try to keep duct runs as          All duct joints must be secured with screws, rivets or duct
short and straight as possible.                                      sealant and sealed with aluminum duct tape to prevent
  OTE: Fully insulated ducting with an integral vapor                leakage.
         barrier must be used on all runs passing through
         unheated areas in order to avoid condensation
         problems and energy losses from the air steams.                             ATTENTION
All joints must be airtight, sealed and impervious to
moisture. See specification sheets for each unit for exact            Fully insulated ducting with an integral
duct sizes and location.                                              vapour barrier must be used on all runs
To minimize pressure drop and noise, galvanized metal                 passing through unheated areas in order to
ducts, properly sized, are recommended. Keep ducting as               avoid condensation problems and energy
short as possible and use a minimum of elbows and tees.               losses from the air systems.
Connecting sections and shorter runs may be flexible


Outside Weatherhoods


The weatherhoods must have built-in “bird” screen with               Ducting from the Weatherhoods
1/4 in (6.35 mm) minimum mesh to prevent birds and                   Galvanized sheet metal ducting with sufficient cross section
rodents from entering into the ductwork. Do not use smaller          with an integral single piece vapor barrier should be used to
mesh as it will be very susceptible to plugging up. Gravity          connect the HRV/ERV to the weatherhoods. All ducting
dampers at the vents must not be used as they will restrict          must meet UL Class 1 requirements.
air flow and often “seize up”. The preferred location of the         A minimum R value of insulation should be equal to
outside weatherhoods is:                                             4 (RSI 0.75)
•   no less than 10 ft. (3 m) apart from each other                  A good bead of high quality caulking (preferably acoustical
•   at least 18 in (46 cm) above snow line or ground level           sealant) and taping with a high quality aluminum foil tape is
                                                                     recommended to seal the duct to both the HRV/ERV and
•   away from sources of contaminants, such as
                                                                     the weatherhood.
    automobile exhaust fumes, gas meters, garbage cans,
    containers, etc.
• not exposed to prevailing winds
The outside perimeter of the weatherhood must be caulked
to prevent leakage into the building.
The design and size of the weatherhoods or louvers chosen
by the installer must allow for adequate free area. Water and
debris penetration of the system is minimized when the
airflow does not exceed 1000 FPM (5.08 m/s) free area
velocity.


                                                                13
Stale Air Return System

The stale air return system is used to draw air from the               Many commercial activities produce air contaminants in the
points in the building where the worst air quality problems            form of dusts, fumes, mists, vapors and gases.
occur. Balancing dampers and/or adjustable grilles are                 Contaminants should be controlled at the source so they are
recommended on all return air lines which are used during              not dispersed through the building or allowed to increase to
installation to help balance the “draw” from different areas           toxic concentration levels. The ventilator allows for
of the building.                                                       economical operation of the HVAC system while
Alternatively, the stale air may be drawn directly from the            effectively removing contaminants from the space. In
return air duct. The airhandler/furnace blower must operate            designing the exhaust portion of the system the exhaust
continuously or be interfaced with the Airhandler/Furnace              grilles are situated to remove the contaminants while not
when this system is used (refer to “Interlocking the                   allowing them to enter the breathing zone of the occupants.
HRV/ERV to an Airhandler/Furnace blower in this                        For contaminants lighter than air, grilles should be located
manual). The HRV/ERV exhaust take-off connection must                  high on the wall. If contaminants are heavier than air, a
be at least 3 ft (1 m) upstream from the HRV/ERV supply                lower placement of the grilles will be required. Information
duct if both are connected to the same duct run.                       on a contaminants specific gravity and toxicity should be
A damper located just prior to the HRV/ERV is required to              available from chemical data sheets.
balance the stale air exhausted with the fresh air supply
entering the building.
Return air suction points should be located on the opposite
side of the room from the fresh air inlet. The inlets may be
located in the ceiling or high on the walls and fitted with
inlet grilles.

Fresh Air Supply System

The fresh air supply ductwork from the HRV/ERV may be                  detectors and/or firestats in the HVAC or HRV/ERV
directly connected to the return air duct of the forced air            ductwork.
system. Check the air flow balance of the HRV/ERV with                 Because an HRV/ERV is designed to bring fresh air into the
the air handler blower both “ON” and “OFF” to determine                building, structures may require supply voltage interrupt
that it does not imbalance the HRV/ERV more than 10%.                  when smoke or flame sensors are triggered, or when a
Also, it is advisable to include a short length of flex duct or        central fire alarm system is activated.
other non-metallic connector in this hard ducted line in
                                                                       Supply air grilles may be ceiling or high wall mounted.
order to keep the HRV/ERV acoustically isolated and
                                                                       Avoid locating incoming fresh air grilles that could cause a
separately grounded (electrically) from the airhandler.
                                                                       direct draft on the occupants as the incoming air may be
It may be necessary to install a separate fresh air supply             below room temperature. A reheat duct heater can be
ductwork system if the heating is other than forced air.               installed to improve occupant comfort.
When installing an HRV/ERV, the designer and installer
should be aware of local codes that may require smoke


Adjustable Grilles


The use of balancing dampers or adjustable grilles as supply
air diffusers and air exhaust covers are recommended.
TECHGRILLES™ are round, efficient, sound absorbing
devices available in 4”, 5”, 6” and 8” (100, 125, 150,
and 200 mm) models.
Part# 99-140     4” diameter Techgrille
Part# 99-141     5” diameter Techgrille
Part# 99-142     6” diameter Techgrille
Part# 99-148     8” diameter Techgrille


                                                                  14
The Integrated HVAC System

The HRV/ERV has become an integral component of the                    In installations where it is satisfactory to provide general
HVAC system. Figure A shows an HRV/ERV unit                            exhaust from the space, the air to be exhausted may be taken
providing fresh air directly to the return air plenum of a             directly from the return air plenum to the HRV/ERV as it is
rooftop heat/cool unit.                                                drawn back to the air handler. Fresh air supplied by the
In the balanced airflow system, the HRV/ERV exhaust                    HRV/ERV is then introduced directly into the return air
removes stale room air (eg. from lunch room, storage or                plenum but at a location closer to the air handler. The air
copy area) and returns to the space an equal amount of fresh           handler would have a constant running blower to effectively
outdoor air, making the use of an economizer obsolete in               distribute the fresh air and remove the stale air. Balancing
conjunction with an HRV/ERV.                                           dampers would be located in both the HRV/ERV supply and
                                                                       exhaust ducts between the return air plenum and the
Many buildings have ceiling return air plenum as in Figure
                                                                       HRV/ERV.
B. Fresh air from the HRV/ERV can be introduced directly
into the ceiling space but this should occur near the air                OTE: At no time should the air handler T.E.S.P. on the return
handler’s intake.                                                      duct exceed that of the HRV/ERV .
The optional Lifestyle MAX Programmable Control
(Part# 99-LS-01) can set the unit to operate when the
occupancy or indoor conditions require the air exchanger.
                                                                                                     CAUTION
                                                                        When interlocking a rooftop unit with an
                 ATTENTION!                                             HRV/ERV, care must be taken to ensure the fans
                                                                        of both units operate in the correct rotation.
  These Illustrations are examples. Be sure
  to verify the duct configuration of exhaust
  and intake on the unit you are installing.
                                                                                ECONOMIZER


                                                                              ROOFTOP
                                                                                UNIT


                 STALE AIR
                                                                                                  SUPPLY DUCT
                 EXHAUST                                          RETURN AIR DUCT or
                                                                         BREATHER T
                                   HRV/ERV UNIT                                     B.D.


                                                                B.D.

               FRESH AIR                              HRV/ERV FRESH
               SUPPLY                                 AIR SUPPLY

                                                                                           STALE AIR
                                                                                           EXHAUST TO ERV


                                                                            ECONOMIZER


                                                                             ROOFTOP
                                                                               UNIT


                                         ROOF DECK


                                    CEILING RETURN AIR PLENUM                12" BREATHER
                                                                                    SPACE              SUPPLY DUCTWORK


                     STALE AIR            HRV/ERV UNIT                                     B.D.
                     EXHAUST


                                                                             B.D.

                     FRESH AIR
                                                           HRV/ERV FRESH
                     SUPPLY                                                          STALE AIR EXHAUST
                                                           AIR SUPPLY


                                                                 15
Drain Connection

Drain Connection
The HRV/ERV may produce some condensation during a
defrost cycle. This water should flow into a nearby drain, or
be taken away by a condensate pump.


                       CAUTION
   The HRV and all condensate lines must be
                                                                      DRAIN HOSE PLUMBING
   installed in a space where the temperature is
   maintained above the freezing point or freeze
   protection must be provided.                                                                  Pre-punched hole located in
                                                                                                 bottom center of HRV/ERV


The HRV/ERV cabinet has a pre-punched hole for the
                                                                                   O Ring

drain. Insert the drain spout through the hole in the drain
pan. Be sure to install the "O ring" which seals each spout
to the pan. HAND TIGHTEN the washer and lock nut                            Drain Spout

which hold the drain spout in place.
Make a loop in a length of 1/2" drain hose to construct a
P-Trap (drain hose not included). Ensure that the loop is
                                                                                                                  Zip Tie

large enough to avoid kinks and secure it with a zip tie (zip
                                                                                                                  (not included)

tie not included). Pour a cup of water into the drain pan of
the HRV/ERV after the drain connection is complete. This
                                                                                                               1/2" Drain Hose

creates a water seal that prevents odors from being drawn
                                                                         P-Trap                                (not included)

up the hose and into the fresh air supply of the HRV/ERV.
                                                                                                   To Drain or Condensate Pump


                                                                       ote: Secondary drain pan may be required to protect from
                                                                     condensate leakage.


                                                                                            CAUTION
                                                                      Drain trap and tubing MUST be below bottom of
                                                                      door with 1/4" per foot downwards slope away
                                                                      from unit.


                                                                16
LifeBreath Operation & Installation Manual max series 500 erv

Weitere ähnliche Inhalte

Ähnlich wie LifeBreath Operation & Installation Manual max series 500 erv

VRV-A-DIDVA1808B.pdf
VRV-A-DIDVA1808B.pdfVRV-A-DIDVA1808B.pdf
VRV-A-DIDVA1808B.pdfRahmanOde
 
Cataloge ge 3.control and_automation_dienhathe.com-4_01_vat300_e_title_rev_c
Cataloge ge 3.control and_automation_dienhathe.com-4_01_vat300_e_title_rev_cCataloge ge 3.control and_automation_dienhathe.com-4_01_vat300_e_title_rev_c
Cataloge ge 3.control and_automation_dienhathe.com-4_01_vat300_e_title_rev_cDien Ha The
 
Cataloge ge 3.control and_automation-01_vat300_e_title_rev_c
Cataloge ge 3.control and_automation-01_vat300_e_title_rev_cCataloge ge 3.control and_automation-01_vat300_e_title_rev_c
Cataloge ge 3.control and_automation-01_vat300_e_title_rev_cDien Ha The
 
Panelviewplusmanual
PanelviewplusmanualPanelviewplusmanual
PanelviewplusmanualVane Gimenez
 
Catalogo Cyber power
Catalogo Cyber powerCatalogo Cyber power
Catalogo Cyber powerOmar Ruiz
 
04 V4- K TSM 380V 50Hz.pdf
04 V4- K TSM 380V 50Hz.pdf04 V4- K TSM 380V 50Hz.pdf
04 V4- K TSM 380V 50Hz.pdfAirconDoctor
 
Berges acm-std
Berges acm-stdBerges acm-std
Berges acm-stdTan Ngoc
 
LG DU-37LZ30 Manual
LG DU-37LZ30 ManualLG DU-37LZ30 Manual
LG DU-37LZ30 Manualddrager
 
Panoklimasi hb32 628-735
Panoklimasi hb32 628-735Panoklimasi hb32 628-735
Panoklimasi hb32 628-735erdinc klima
 
Motorola solutions ap7131 access point installation guide wi ng 5.5 version...
Motorola solutions ap7131 access point installation guide   wi ng 5.5 version...Motorola solutions ap7131 access point installation guide   wi ng 5.5 version...
Motorola solutions ap7131 access point installation guide wi ng 5.5 version...Advantec Distribution
 
Fuel Air Ratio Controller for Combustion Efficiency
Fuel Air Ratio Controller for Combustion EfficiencyFuel Air Ratio Controller for Combustion Efficiency
Fuel Air Ratio Controller for Combustion EfficiencyClassic Controls, Inc.
 
Fuel Air Ratio Controller for Combustion Equipment
Fuel Air Ratio Controller for Combustion EquipmentFuel Air Ratio Controller for Combustion Equipment
Fuel Air Ratio Controller for Combustion EquipmentClassic Controls, Inc.
 

Ähnlich wie LifeBreath Operation & Installation Manual max series 500 erv (20)

VRV - A.PDF
VRV - A.PDFVRV - A.PDF
VRV - A.PDF
 
VRV-A-DIDVA1808B.pdf
VRV-A-DIDVA1808B.pdfVRV-A-DIDVA1808B.pdf
VRV-A-DIDVA1808B.pdf
 
Cataloge ge 3.control and_automation_dienhathe.com-4_01_vat300_e_title_rev_c
Cataloge ge 3.control and_automation_dienhathe.com-4_01_vat300_e_title_rev_cCataloge ge 3.control and_automation_dienhathe.com-4_01_vat300_e_title_rev_c
Cataloge ge 3.control and_automation_dienhathe.com-4_01_vat300_e_title_rev_c
 
Cataloge ge 3.control and_automation-01_vat300_e_title_rev_c
Cataloge ge 3.control and_automation-01_vat300_e_title_rev_cCataloge ge 3.control and_automation-01_vat300_e_title_rev_c
Cataloge ge 3.control and_automation-01_vat300_e_title_rev_c
 
Acs550 x1-rev e
Acs550 x1-rev eAcs550 x1-rev e
Acs550 x1-rev e
 
Panelviewplusmanual
PanelviewplusmanualPanelviewplusmanual
Panelviewplusmanual
 
Installation, operation,
Installation, operation,Installation, operation,
Installation, operation,
 
Catalogo Cyber power
Catalogo Cyber powerCatalogo Cyber power
Catalogo Cyber power
 
04 V4- K TSM 380V 50Hz.pdf
04 V4- K TSM 380V 50Hz.pdf04 V4- K TSM 380V 50Hz.pdf
04 V4- K TSM 380V 50Hz.pdf
 
30rap 3pdchillers
30rap 3pdchillers30rap 3pdchillers
30rap 3pdchillers
 
Berges acm-std
Berges acm-stdBerges acm-std
Berges acm-std
 
Omron CS1D
Omron CS1DOmron CS1D
Omron CS1D
 
Manual CLP Omron CP1H
Manual CLP Omron CP1HManual CLP Omron CP1H
Manual CLP Omron CP1H
 
LG DU-37LZ30 Manual
LG DU-37LZ30 ManualLG DU-37LZ30 Manual
LG DU-37LZ30 Manual
 
Riello aros-central-transformer-based-solar-inverters
Riello aros-central-transformer-based-solar-invertersRiello aros-central-transformer-based-solar-inverters
Riello aros-central-transformer-based-solar-inverters
 
Panoklimasi hb32 628-735
Panoklimasi hb32 628-735Panoklimasi hb32 628-735
Panoklimasi hb32 628-735
 
Motorola solutions ap7131 access point installation guide wi ng 5.5 version...
Motorola solutions ap7131 access point installation guide   wi ng 5.5 version...Motorola solutions ap7131 access point installation guide   wi ng 5.5 version...
Motorola solutions ap7131 access point installation guide wi ng 5.5 version...
 
Fuel Air Ratio Controller for Combustion Efficiency
Fuel Air Ratio Controller for Combustion EfficiencyFuel Air Ratio Controller for Combustion Efficiency
Fuel Air Ratio Controller for Combustion Efficiency
 
Fuel Air Ratio Controller for Combustion Equipment
Fuel Air Ratio Controller for Combustion EquipmentFuel Air Ratio Controller for Combustion Equipment
Fuel Air Ratio Controller for Combustion Equipment
 
Voltronic Axpert V User Manual
Voltronic Axpert V User ManualVoltronic Axpert V User Manual
Voltronic Axpert V User Manual
 

Mehr von Olivier Bessire

Catalogo griglie airDecor 2014
Catalogo griglie airDecor 2014Catalogo griglie airDecor 2014
Catalogo griglie airDecor 2014Olivier Bessire
 
Installazione e Manutenzione recyclingair tube max
Installazione e Manutenzione recyclingair tube maxInstallazione e Manutenzione recyclingair tube max
Installazione e Manutenzione recyclingair tube maxOlivier Bessire
 
Scheda tecnica recyclingair Tube
Scheda tecnica recyclingair TubeScheda tecnica recyclingair Tube
Scheda tecnica recyclingair TubeOlivier Bessire
 
Istruzioni Montaggio Gesa Pet Fun
Istruzioni Montaggio Gesa Pet FunIstruzioni Montaggio Gesa Pet Fun
Istruzioni Montaggio Gesa Pet FunOlivier Bessire
 
Istruzioni Montaggio Joy Pet Fun
Istruzioni Montaggio Joy Pet FunIstruzioni Montaggio Joy Pet Fun
Istruzioni Montaggio Joy Pet FunOlivier Bessire
 
Istruzioni Montaggio Juliette Pet Fun
Istruzioni Montaggio Juliette Pet FunIstruzioni Montaggio Juliette Pet Fun
Istruzioni Montaggio Juliette Pet FunOlivier Bessire
 
Istruzioni Montaggio Ronja Pet Fun
Istruzioni Montaggio Ronja Pet FunIstruzioni Montaggio Ronja Pet Fun
Istruzioni Montaggio Ronja Pet FunOlivier Bessire
 
Istruzioni Montaggio Mika Pet Fun
Istruzioni Montaggio Mika Pet FunIstruzioni Montaggio Mika Pet Fun
Istruzioni Montaggio Mika Pet FunOlivier Bessire
 
Istruzioni Montaggio Jacky O Pet Fun II
Istruzioni Montaggio Jacky O Pet Fun IIIstruzioni Montaggio Jacky O Pet Fun II
Istruzioni Montaggio Jacky O Pet Fun IIOlivier Bessire
 
Istruzioni Montaggio Jacky O Pet Fun I
Istruzioni Montaggio Jacky O Pet Fun IIstruzioni Montaggio Jacky O Pet Fun I
Istruzioni Montaggio Jacky O Pet Fun IOlivier Bessire
 
Newsletter Vitalhaus - inVENTer 01/2011
Newsletter Vitalhaus - inVENTer 01/2011Newsletter Vitalhaus - inVENTer 01/2011
Newsletter Vitalhaus - inVENTer 01/2011Olivier Bessire
 
Notice de montage des inVENTair iv14r et iv14v
Notice de montage des inVENTair iv14r et iv14v Notice de montage des inVENTair iv14r et iv14v
Notice de montage des inVENTair iv14r et iv14v Olivier Bessire
 
Service und wartung inVENTer-lueftung
Service und wartung inVENTer-lueftungService und wartung inVENTer-lueftung
Service und wartung inVENTer-lueftungOlivier Bessire
 
Montageanleitung inVENTer 14
Montageanleitung inVENTer 14Montageanleitung inVENTer 14
Montageanleitung inVENTer 14Olivier Bessire
 
Installation guide inVENTter 14
Installation guide inVENTter 14 Installation guide inVENTter 14
Installation guide inVENTter 14 Olivier Bessire
 

Mehr von Olivier Bessire (20)

Catalogo griglie airDecor 2014
Catalogo griglie airDecor 2014Catalogo griglie airDecor 2014
Catalogo griglie airDecor 2014
 
Installazione e Manutenzione recyclingair tube max
Installazione e Manutenzione recyclingair tube maxInstallazione e Manutenzione recyclingair tube max
Installazione e Manutenzione recyclingair tube max
 
Scheda tecnica recyclingair Tube
Scheda tecnica recyclingair TubeScheda tecnica recyclingair Tube
Scheda tecnica recyclingair Tube
 
recyclingair project
recyclingair projectrecyclingair project
recyclingair project
 
Istruzioni Montaggio Gesa Pet Fun
Istruzioni Montaggio Gesa Pet FunIstruzioni Montaggio Gesa Pet Fun
Istruzioni Montaggio Gesa Pet Fun
 
Istruzioni Montaggio Joy Pet Fun
Istruzioni Montaggio Joy Pet FunIstruzioni Montaggio Joy Pet Fun
Istruzioni Montaggio Joy Pet Fun
 
Istruzioni Montaggio Juliette Pet Fun
Istruzioni Montaggio Juliette Pet FunIstruzioni Montaggio Juliette Pet Fun
Istruzioni Montaggio Juliette Pet Fun
 
Istruzioni Montaggio Ronja Pet Fun
Istruzioni Montaggio Ronja Pet FunIstruzioni Montaggio Ronja Pet Fun
Istruzioni Montaggio Ronja Pet Fun
 
Istruzioni Montaggio Mika Pet Fun
Istruzioni Montaggio Mika Pet FunIstruzioni Montaggio Mika Pet Fun
Istruzioni Montaggio Mika Pet Fun
 
Istruzioni Montaggio Jacky O Pet Fun II
Istruzioni Montaggio Jacky O Pet Fun IIIstruzioni Montaggio Jacky O Pet Fun II
Istruzioni Montaggio Jacky O Pet Fun II
 
Istruzioni Montaggio Jacky O Pet Fun I
Istruzioni Montaggio Jacky O Pet Fun IIstruzioni Montaggio Jacky O Pet Fun I
Istruzioni Montaggio Jacky O Pet Fun I
 
Newsletter Vitalhaus - inVENTer 01/2011
Newsletter Vitalhaus - inVENTer 01/2011Newsletter Vitalhaus - inVENTer 01/2011
Newsletter Vitalhaus - inVENTer 01/2011
 
Prospetto inVENTer 2011
Prospetto inVENTer 2011Prospetto inVENTer 2011
Prospetto inVENTer 2011
 
Notice de montage des inVENTair iv14r et iv14v
Notice de montage des inVENTair iv14r et iv14v Notice de montage des inVENTair iv14r et iv14v
Notice de montage des inVENTair iv14r et iv14v
 
Preisliste 2011
Preisliste 2011Preisliste 2011
Preisliste 2011
 
InVENTer-planungsmappe
InVENTer-planungsmappeInVENTer-planungsmappe
InVENTer-planungsmappe
 
Service und wartung inVENTer-lueftung
Service und wartung inVENTer-lueftungService und wartung inVENTer-lueftung
Service und wartung inVENTer-lueftung
 
Montageanleitung inVENTer 14
Montageanleitung inVENTer 14Montageanleitung inVENTer 14
Montageanleitung inVENTer 14
 
Price list inVENTer
Price list inVENTerPrice list inVENTer
Price list inVENTer
 
Installation guide inVENTter 14
Installation guide inVENTter 14 Installation guide inVENTter 14
Installation guide inVENTter 14
 

LifeBreath Operation & Installation Manual max series 500 erv

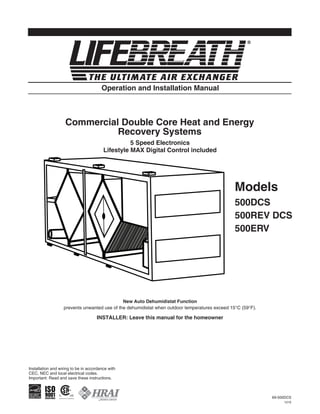
  • 1. Operation and Installation Manual Commercial Double Core Heat and Energy Recovery Systems 5 Speed Electronics Lifestyle MAX Digital Control included Models 500DCS 500REV DCS 500ERV New Auto Dehumidistat Function prevents unwanted use of the dehumidistat when outdoor temperatures exceed 15°C (59°F). INSTALLER: Leave this manual for the homeowner Installation and wiring to be in accordance with CEC, NEC and local electrical codes. Important: Read and save these instructions. 69-500DCS 1210
  • 2. Table of Contents Max Series Electronics Max Series Electronics..................................................................2 Max Series HRVs (Heat Recovery Ventilators) and ERVs (Energy Select the Correct HRV/ERV to Match your Climate ..................3 Recovery Ventilators) contain fully featured 5 Speed electronics to ERV Questions and Answers ........................................................4 provide complete ventilation control. Technical Data - Model 500DCS ..................................................5 The Lifestyle MAX Digital Control (included with each unit) Technical Data - Model 500REVDCS ..........................................6 should be mounted in an central location of the building. Technical Data - Model 500ERV..................................................7 Electronic features include: Controlling your HRV/ERV • 5 Speed Operation on each mode Select the Mode that’s Right for You • 2 user selectable operational modes to provide Glossary.........................................................................................8 - Continuous Ventilation The Lifestyle MAX Digital Control (Included Wall Control) How the Dehumidistat Works - 20 Minutes ON, 40 Minutes OFF How to Synchronize the Humidity Setting ...................................9 • Humidity Control through dehumidistat The Lifestyle MAX Programmable Control (Optional)..............10 • Automatic Dehumidistat Disable Optional Timers ..........................................................................11 • Built-in Relay for interfacing to an Air Handler/Furnace Location of the HRV/ERV for Mounting ...................................12 The Ductwork System Outside Weatherhoods ................................................................13 Stale Air Return System Fresh Air Supply System CAUTION Adjustable Grilles........................................................................14 The Integrated HVAC System ....................................................15 Before installation, careful consideration must be Drain Connection ........................................................................16 given to how this system will operate if connected Installation of the Main Control ..................................................17 to any other piece of mechanical equipment, i.e. a Installation and Operation 20/40/60/ Minute Timers forced air furnace or air handler, operating at a Installation of Mechanical Timers...............................................18 higher static. After installation, the compatibility of Interlocking the HRV/ERV to an Airhandler/Furnace Blower the two pieces of equipment must be confirmed, by Dry Contacts................................................................................19 measuring the air flows of the HRV/ERV, by using Balancing the HRV .....................................................................20 the balancing procedure found in this manual. Service and Maintenance .......................................................21-22 NEVER install a ventilator in a situation where its Wiring Diagram ..........................................................................23 normal operation, lack of operation or partial failure may result in the backdrafting or improper functioning of vented combustion equipment. IMPORTANT - ATTENTION PLEASE READ THIS MANUAL BEFORE INSTALLING UNIT. NOTE Do not apply electrical power to Due to ongoing research and product development, the unit until installation has been specifications, ratings and dimensions are subject to change without notice. fully completed (including low voltage control wiring). LEAVE WITH UNIT TO BE COMPLETED BY CONTRACTOR AFTER INSTALLATION Installing Contractor _________________________________________Telephone / Contact _____________________ Serial Number______________________________________________Installation Date ________________________ Model _________________________________________________________________________________________ 2
  • 3. Select the Correct HRV/ERV to Match your Climate HRV ERV A Heat Recovery Ventilator (HRV) is designed to provide fresh air An Energy Recovery Ventilator (ERV) is designed to provide fresh into a building while exhausting an equal amount of stale air. air into a building while exhausting an equal amount of stale air. During the winter months, the incoming cold fresh air is warmed by An ERV is designed for use in warm humid areas with heavy air utilizing the heat recovered from the stale air before it is exhausted conditioning use. The ERV will transfer both sensible and latent to the outdoors. During summer months, when the indoor space is heat from the incoming fresh air to the outgoing stale air thereby air conditioned, the Heat Recovery Ventilator will help in cooling reducing the load (due to ventilation) on the air conditioning the incoming fresh air with the stale air that is being exhausted. system. ERVs are not suitable for climates where the temperature drops below -4°C (25°F) for more than five days. 3
  • 4. ERV Questions and Answers What is the difference between an HRV What's the difference between this type of core and an ERV? and a rotary type? The core in an HRV (Heat Recovery Ventilator) transfers heat Here's a list of characteristics of the fixed plate core. from one air stream to the other. This is called sensible heat. The 1. No rotating parts, so maintenance is easy and the unit lasts a term ERV (Energy Recovery Ventilator) is usually used to long time. describe a unit with an enthalpic core that transfers moisture as well as heat from one air stream to the other. This (moisture 2. It is very flexible in terms of installation. transfer) is called latent heat. 3. The core can easily be changed. 4. Because the supply and exhaust air streams are completely separate, there is very little cross leakage of any Enthalpic - what does it mean? Enthalpy is the term used to describe the energy content of air. This energy is a combination of the sensible and latent heat. dust or germs. Therefore, a core which transfers energy is called an enthalpic Can the core become clogged with dust? core. Because the surface of the core is a turbulent flow area, dust sticks to it easily; however, because the inside of the element is a laminar flow area, virtually no dust sticks to it. Is an ERV better than an HRV? NOT NECESSARILY! In cold climates such as most of North America, an HRV works better than an ERV. This is because the What is the maintenance? air inside the home during the winter months will be more humid About once a year you should either rinse the ERV core with warm than the outside air. An ERV would transfer the latent heat water or use a vacuum cleaner to remove dust from the core's (humidity) from the exhaust air back into the incoming airstream. surface. This will aggravate moisture problems in the home and encourage the growth of mold and mildew. If the air in the home is too dry for Is an air filter needed? comfort, an ERV will not help. A humidifier should be used to To prevent clogging of the core, an air filter should always be increase the humidity to a comfortable level. installed on the supply and exhaust sides of the core. How much ventilation do I need? During seasons when your windows and doors are closed, the ERV Where do you use an ERV instead of an HRV? An ERV is recommended for warm, humid areas with heavy air conditioning use. As there is no defrost in an ERV it is not should operate continuously when the dwelling is occupied, and recommended for areas where the temperature drops below -4°C either continuously or intermittently when not occupied. (25°F) for more than five days. For most installations the ERV will normally be set to operate continuously on low speed with the option of going to high speed Why transfer moisture in the summer as the need arises. For example; if you are entertaining and there is (cooling season)? a large number of people present (some may be smoking), the unit The enthalpic core will allow moisture to be transferred from a should be switched to high speed. humid air flow to a dry air flow. This property is useful in the Your ERV may be equipped with automatic or manual switches, cooling season if an air conditioning system is used to lower the but all ERVs will have a manual speed control override. indoor humidity. You will then have dry, cool air in the exhaust of the ERV, and warm humid air in the supply stream. With these conditions, the ERV will be able to transfer the moisture and heat of the supply air to the exhaust air. In this way, the ERV will ATTENTION supply to the home air which is cooler and drier than outside. Remember that an ERV is not a dehumidifier, and on its own will The ERV - Enthalpic Core is not suitable for not take moisture out of the air. climates where the outdoor temperature drops below -4°C (25°F). So why use an ERV? A properly operating air conditioner will not only lower the temperature in your house, but will also lower the humidity level. This prevents an uncomfortable cold and damp ATTENTION situation. In fact, about 2/3 of the energy used by the air conditioner system is to remove moisture. Therefore, when Use the HRV core for ventilating smoking rooms ventilating in the summer, less moisture brought into the home regardless of the geographical location. means less work for the air conditioner, and energy savings for you. 4
  • 5. Model 500DCS PERFORMANCE ENGINEERING DATA Net supply airflow in cfm (L/s) against CORES external static pressure Two modular (two section) aluminum HRV cores arranged for high efficiency cross-flow ventilation. E.S.P cfm L/s @ 0.1” (25 Pa) 488 (229) MOTORS Two PSC, 5 speed double shafted, 120 VAC, 3.15 A motors. (6.3 A total on high speed) with @ 0.2” (50 Pa) 461 (217) 1/10 hp at 1625 RPM. Total of 610 watts on High speed. @ 0.3” (75 Pa) 440 (207) BLOWERS Centrifugal-type rated at 530 cfm (250 L/s) free air delivery. Each air stream has two centrifugal blowers driven by four PSC motors. @ 0.4” (100 Pa) 436 (205) FILTERS @ 0.5” (125 Pa) 371 (174) Washable air filters in exhaust and supply air streams. @ 0.6” (125 Pa) 326 (153) DEFROST Supply bypass damper routes indoor air to defrost cores. WEIGHT 178 lbs. (81 kg) SHIPPI G WEIGHT 203 lbs. (92 kg) VAC @ 60HZ 120 CONNECTION DUCT SIZES WATTS / Low speed 187 Four 14”x 8” ( 356 mm x 200 mm) WATTS / High speed 610 MOUNTING Unit to be set on support brackets hung by threaded rod-type apparatus (brackets and rods not included). Amp rating 2.9 CASE Twenty gauge pre-painted galvanized steel (G60) for superior corrosion resistance. Insulated with foil faced insulation duct liner where required to prevent exterior condensation. One drain AIRFLOWS (Each Air Stream) connection 1/2" (12 mm) OD. TOTAL CURRENT DRAW (AMPS) @ 120 VAC *5 - High Speed *4 - Medium High Speed AIRFLOW CFM (L/s) 600 (282) *3 - Medium Speed The Lifestyle MAX Digital Control (99-DXPL01) is included with the unit and can be wall CONTROLS & ELECTRONICS *2 - Medium Low speed 500 (235) *1 - Low speed - 6.3 HIGH mounted in a central location of the home. (3 wire) 20 gauge wire (min.) 100' length 5 - 3.8 MED Electronic features include: 400 (190) 4 - 3.1 LOW • 5 Speed Operation on each mode 300 (143) 3 2 • 2 user selectable operational modes: Continuous Ventilation, 20 ON/40 OFF 200 (94) 1 • Humidity Control through dehumidistat 100 (47) • Adjustable Dehumidistat function built into the main wall control • Built-in Relay for Interfacing to furnace 25 (.1) 50 (.2) 75 (.3) 100 (.4) 125 (.5) 150 (.6) EXTERNAL STATIC PRESSURE IN PASCALS (inches W.C.) 99-LS-01 Lifestyle MAX Programmable Control - contains all the features of the Lifestyle OPTIONAL PROGRAMMABLE CONTROL TEMPERATURE EFFECTIVENESS MAX Digital Control with 7/24 programmable ventilation, (3 wire) 20 gauge wire (min.) 100' length EFFECTIVENESS 100% 99-DH-01 Lifestyle Dehumidistat - Initiates high speed ventilation when the indoor OPTIONAL ACCESSORIES humidity level is above the set point. (3 wire) 20 gauge wire (min.) 100' length 90% 99-DET01 Lifestyle 20/40/60 Minute Timer - Initiates high speed ventilation for OPTIONAL TIMERS 80% 20, 40, or 60 minutes, (3 wire) 20 gauge wire (min.) 100' length NOTE: Exhaust Relative Humidity (RH) at 40% 99-20M01 Lifestyle 20 Minute Timer - Initiates high speed ventilation for 20 minutes, (3 wire) 20 gauge wire (min.) 100’ length. 200 300 400 500 600 (94) (143) (190) (235) (282) AIRFLOW IN CFM (L/s) WARRANTY Units carry a 15 year warranty on the heat recovery core and a 2 year replacement parts warranty. All units conform to CSA and UL standards. EXHAUST AIR EXHAUST AIR FROM BUILDING MOUNTING POINTS TO OUTSIDE 5 7/8" 5 7/8" (150 mm) (150 mm) NOTE: 18 3/4" 18 3/4" Service clearance 1 1/4" 1 3/8" (475 mm) (32 mm) (475 mm) (35 mm) is 30 in. (760 mm) 14" 8" 14" 8" (356 mm) (200 mm) (356 mm) (200 mm) SUPPLY AIR FROM OUTSIDE 49" 28 1/4" 28 1/4" DRAIN CONNECTION (1245 mm) SUPPLY AIR (717 mm) (717 mm) DEFROST TO BUILDING FRONT VIEW INTERIOR DUCT EXTERIOR DUCT CONNECTION SIDE CONNECTION SIDE Date: ___________________________________________ Contractor: ______________________________________ Tag: _____________________Qty:___________________ Supplier: ________________________________________ Project: _________________________________________ Quote#: _________________________________________ Engineer: _______________________________________ Submitted by: ____________________________________ info@lifebreath.com 5
  • 6. Model 500DCS-REV ENGINEERING DATA PERFORMANCE Net supply airflow in cfm (L/s) against CORES Two modular (two section) aluminum HRV cores arranged for high efficiency cross-flow external static pressure ventilation. E.S.P cfm L/s MOTORS Two PSC, 5 speed double shafted, 120 VAC, 3.15 A motors. (6.3 A total on high speed) with @ 0.1” (25 Pa) 488 (229) 1/10 hp at 1625 RPM. Total of 610 watts on High speed. @ 0.2” (50 Pa) 461 (217) BLOWERS Centrifugal-type rated at 530 cfm (250 L/s) free air delivery. Each air stream has two @ 0.3” (75 Pa) 440 (207) centrifugal blowers driven by four PSC motors. @ 0.4” (100 Pa) 436 (205) FILTERS Washable air filters in exhaust and supply air streams. @ 0.5” (125 Pa) 371 (174) DEFROST Supply bypass damper routes indoor air to defrost cores. @ 0.6” (125 Pa) 326 (153) WEIGHT 178 lbs. (81 kg) SHIPPI G WEIGHT 203 lbs. (92 kg) VAC @ 60HZ 120 CONNECTION DUCT SIZES Four ” x 8” ( 356 mm x 200 mm) WATTS / Low speed 187 MOUNTING Unit to be set on support brackets hung by threaded rod-type apparatus (brackets and WATTS / High speed 610 rods not included). Amp rating 2.9 CASE Twenty gauge pre-painted galvanized steel (G60) for superior corrosion resistance. Insulated with foil faced insulation duct liner where required to prevent exterior condensation. AIRFLOWS (Each Air Stream) One drain connection 1/2" (12 mm) OD. TOTAL CURRENT DRAW (AMPS) @ 120 VAC *5 - High Speed *4 - Medium High Speed AIRFLOW CFM (L/s) 600 (282) The Lifestyle MAX Digital Control (99-DXPL01) is included with unit and can be wall CONTROLS & ELECTRONICS *3 *2 - Medium Speed - Medium Low speed mounted in a central location of the home. (3 wire) 20 gauge wire (min.) 100' length 500 (235) *1 - Low speed - 6.3 HIGH 5 Electronic features include: - 3.8 MED 400 (190) 4 - 3.1 LOW • 5 Speed Operation on each mode 300 (143) 3 • 2 user selectable operational modes: Continuous Ventilation, 20 ON/40 OFF 2 200 (94) 1 • Humidity Control through dehumidistat 100 (47) • Adjustable Dehumidistat function built into the main wall control • Built-in Relay for Interfacing to furnace 25 (.1) 50 (.2) 75 (.3) 100 (.4) 125 (.5) 150 (.6) EXTERNAL STATIC PRESSURE IN PASCALS (inches W.C.) 99-LS-01 Lifestyle MAX Programmable Control - contains all the features of the OPTIONAL PROGRAMMABLE CONTROL TEMPERATURE EFFECTIVENESS Lifestyle MAX Digital Control with 7/24 programmable ventilation, (3 wire) 20 gauge wire (min.) 100' length EFFECTIVENESS 100% 99-DH-01 Lifestyle Dehumidistat - Initiates high speed ventilation when the indoor OPTIONAL ACCESSORIES humidity level is above the set point. (3 wire) 20 gauge wire (min.) 100' length 90% 99-DET01 Lifestyle 20/40/60 Minute Timer - Initiates high speed ventilation for OPTIONAL TIMERS 20, 40, or 60 minutes, (3 wire) 20 gauge wire (min.) 100' length 80% 99-20M01 Lifestyle 20 Minute Timer - Initiates high speed ventilation for 20 minutes, NOTE: Exhaust Relative Humidity (RH) at 40% (3 wire) 20 gauge wire (min.) 100’ length. 200 300 400 500 600 (94) (143) (190) (235) (282) AIRFLOW IN CFM (L/s) WARRANTY Units carry a 15 year warranty on the heat recovery core and a 2 year replacement parts warranty. All units conform to CSA and UL standards. EXHAUST AIR EXHAUST AIR FROM BUILDING TO OUTSIDE MOUNTING POINTS 5 7/8" 5 7/8" (150 mm) NOTE: (150 mm) Service clearance 18 3/4" 18 3/4" 1 3/8" 1 1/4" is 30 in. (760 mm) (475 mm) (32 mm) (475 mm) (35 mm) 14" 14" 8" 8" (356 mm) (200 mm) (356 mm) (200 mm) 49" 28 1/4" 28 1/4" (1245 mm) SUPPLY AIR (717 mm) (717 mm) SUPPLY AIR DRAIN CONNECTION FROM OUTSIDE TO BUILDING FRONT VIEW DEFROST INTERIOR DUCT EXTERIOR DUCT CONNECTION SIDE CONNECTION SIDE Date: ___________________________________________ Contractor: ______________________________________ Tag: _____________________Qty:___________________ Supplier: ________________________________________ Project: _________________________________________ Quote#: _________________________________________ Engineer: _______________________________________ Submitted by: ____________________________________ info@lifebreath.com 6
  • 7. Model 500ERV PERFORMANCE ENGINEERING DATA Net supply airflow in cfm (L/s) against external static pressure CORES One modular (two section) aluminum HRV cores and one modular (2 section) ERV core arranged for high efficiency cross-flow ventilation. E.S.P cfm L/s @ 0.1” (25 Pa) 415 (195) MOTORS Two PSC, 5 speed double shafted, 120 VAC, 3.15 A motors. (6.3 A total on high speed) with @ 0.2” (50 Pa) 392 (185) 1/10 hp at 1625 RPM. Total of 610 watts on High speed. @ 0.3” (75 Pa) 371 (175) BLOWERS Centrifugal-type rated at 530 cfm (250 L/s) free air delivery. Each air stream has two @ 0.4” (100 Pa) 344 (162) centrifugal blowers driven by four PSC motors. FILTERS @ 0.5” (125 Pa) 315 (149) Washable air filters in exhaust and supply air streams. @ 0.6” (150 Pa) 277 (131) DEFROST Supply bypass damper routes indoor air to defrost cores. VAC @ 60HZ 120 WEIGHT 178 lbs. (81 kg) SHIPPI G WEIGHT 203 lbs. (92 kg) WATTS / Low speed 187 CONNECTION DUCT SIZES Four ” x 8” ( 356 mm x 200 mm) WATTS / High speed 610 MOUNTING Unit to be set on support brackets hung by threaded rod-type apparatus (brackets and Amp rating 2.9 rods not included). CASE Twenty gauge pre-painted galvanized steel (G60) for superior corrosion resistance. Insulated AIRFLOWS (Each Air Stream) with foil faced insulation duct liner where required to prevent exterior condensation. TOTAL CURRENT DRAW (AMPS) @ 120 VAC One drain connection 1/2" (12 mm) OD. 5 - High Speed *4 - Medium High Speed AIRFLOW CFM (L/s) 600 (282) *3 - Medium Speed *2 - Medium Low Speed The Lifestyle MAX Digital Control (99-DXPL01) is included with the unit and can be wall CONTROLS & ELECTRONICS SPEED 500 (235) *1 - Low speed 6.3 HIGH mounted in a central location of the home. (3 wire) 20 gauge wire (min.) 100' length 5 3.8 MED 400 (190) Electronic features include: 3.1 LOW 4 300 (143) • 5 Speed Operation on each mode 3 2 200 (94) • 2 user selectable operational modes: Continuous Ventilation, 20 ON/40 OFF 1 100 (42) • Humidity Control through dehumidistat • Adjustable Dehumidistat function built into the main wall control 25(.1) 50(.2) 75(.3) 100(.4) 125(.5) 150(.6) • Built-in Relay for Interfacing to furnace EXTERNAL STATIC PRESSURE IN PASCALS (in. W.C.) TOTAL EFFECTIVENESS 99-LS-01 Lifestyle MAX Programmable Control - contains all the features of the OPTIONAL PROGRAMMABLE CONTROL Lifestyle MAX Digital Control with 7/24 programmable ventilation, (3 wire) 20 gauge wire (min.) 100' length EFFECTIVENESS 70% 99-DH-01 Lifestyle Dehumidistat - Initiates high speed ventilation when the indoor OPTIONAL ACCESSORIES 60% humidity level is above the set point. (3 wire) 20 gauge wire (min.) 100' length 99-DET01 Lifestyle 20/40/60 Minute Timer - Initiates high speed ventilation for OPTIONAL TIMERS 50% 20, 40, or 60 minutes, (3 wire) 20 gauge wire (min.) 100' length NOTE: Exhaust Relative Humidity (RH) at 40% 99-20M01 Lifestyle 20 Minute Timer - Initiates high speed ventilation for 20 minutes, 200 300 400 500 282 (3 wire) 20 gauge wire (min.) 100’ length. (94) (143) (190) (235) (600) AIRFLOW IN CFM (L/s) WARRANTY The aluminum core has a fifteen (15) year warranty. The enthalpic core All units conform to CSA and UL standards. has a two (2) year replacement parts warranty. The 500ERV carries a ERVs are not recommended for regions where the design two (2) year replacement parts warranty. ( ) temperature is below 25ºF (-4ºC). EXHAUST AIR EXHAUST AIR ENTHALPIC CORE ALUMINUM CORE FROM BUILDING MOUNTING POINTS TO OUTSIDE 5 7/8" 5 7/8" (150 mm) (150 mm) NOTE: 18 3/4" 18 3/4" Service clearance 1 1/4" 1 3/8" (475 mm) (32 mm) (475 mm) (35 mm) is 30 in. (760 mm) 14" 8" 14" 8" (200 mm) (356 mm) (200 mm) (356 mm) SUPPLY AIR FROM OUTSIDE 49" 28 1/4 " 28 1/4" (1245 mm) SUPPLY AIR (717 mm) (717 mm) DEFROST DRAIN CONNECTION TO BUILDING FRONT VIEW INTERIOR DUCT EXTERIOR DUCT CONNECTION SIDE CONNECTION SIDE Date: ___________________________________________ Contractor: ______________________________________ Tag: _____________________Qty:___________________ Supplier: ________________________________________ Project: _________________________________________ Quote#: _________________________________________ Engineer: _______________________________________ Submitted by: ____________________________________ info@lifebreath.com 7
  • 8. Controlling your HRV/ERV Today's modern, tight buildings require fresh outdoor air to HOW MUCH VENTILATION DO I NEED? maintain a healthy indoor air environment. The amount of During seasons when your windows and doors are closed (winter, ventilation you require in the building will depend upon: and summer if air conditioned), the HRV/ERV should be set to • the number of occupants and their activity levels, operate continuously on low speed with the option of going to high • the way the building was built. speed as the need arises. For example, if you are entertaining and there is a large number of people present, the unit should be • your personal preferences for fresh air, switched temporarily to high speed. The HRV/ERV introduces fresh air to the building while You may wish to use an intermittent operational mode if the recovering energy from the air it exhausts. Specifically, an building is unoccupied (20 minutes ON / 40 minutes OFF). HRV/ERV that is properly installed, operated and maintained will: • exhaust stale, contaminated air • recover the majority of the energy from the exhausted stale air • use the recovered energy to preheat or precool outside air that is drawn into the building • distribute the fresh air throughout the building Selecting the Mode of Operation that’s Right for You Your Lifebreath MAX SERIES HRV/ERV has 2 Operational This Operational Mode will provide 20 minutes of ventilation Modes and 5 speeds on each mode to adjust indoor ventilation each hour. You may wish to use this ventilation mode in low levels. Experiment with the ventilation levels in the building to speed for low activity levels or if the building is unoccupied. determine a suitable amount of ventilation. I. Continuous Ventilation Mode This is the most popular mode since it provides continuous ventilation within the building. You may, for example, select Continuous Ventilation at high speed for high household activity levels or Continuous Ventilation for lower activity levels. II. 20 minutes ON, 40 minutes OFF Mode GOOD Standby (fan speed set to 0) Allows unit to run on demand from remote controls such as DET Timer and Dehumidistat. BETTER Intermittent low speed operation 20 Provides 20 minutes air exchange and 40 minutes off. ON/40 OFF BEST Continuous low speed operation Ensures continuous air exchange within the building. Air is always fresh and healthy. Glossary DEFROST MODE - to ensure reliable operation during cold weather, the SELF TEST - each time the HRV/ERV is powered/energized the self test HRV/ERV will automatically cycle through its defrost mode as needed. function will automatically initiate. During the self test the HRV/ERV will DEHUMIDISTAT - a control device that senses the amount of moisture cycle through all the speeds available (1-5), test the damper motor in the air and activates high speed ventilation when the air moisture level in operation and will default back to the previous operational mode and speed the home exceeds the set point. selection. Total self test duration is approximately 90 seconds. RESET - whenever resetting of the HRV/ERV is required, disconnect STA DBY MODE - the HRV/ERV is powered/energized and waiting for power for 30 seconds. The Self Test will occur when the HRV/ERV is re fan operation to be initiated. For example, the HRV is set a Continuous reconnected. Ventilation Operational Mode at Speed 0. THERMISTOR - the HRV/ERV's temperature sensor which measures electrical resistance in a known manner, as outdoor temperatures fluctuate. 8
  • 9. The Lifestyle MAX Digital Control (Included Wall Control) Part # 99-DXPL01 The Lifestyle MAX Digital Control is fully digital and allows Instruction card you to easily control the building’s ventilation. Key Features Fan Speed • 5 Speed Fan setting Indicator Humidity • Electronic Dehumidistat 20/40/60 Minute High Speed Indicator • Two Selectable Modes of Operation Override Button Increase 20 min. On / 40 min. Off Mode Select Button Continuous Ventilation Button Set button • 20 / 40 /60 High Speed override timer Mode Indicator • Service/Maintenance Reminder display Decrease • Backlit LCD screen is easy to read ON/OFF Button Button * Recirculation not available on all models Service High Speed Indicator Override Setting the Control Timer 1. Press and release MODE Select Button until the FAN symbol Indicator appears on the screen. Press the SET Button. Connects to 3 wire 20 gauge 2. SCROLL (using Increase/Decrease Buttons) to select desired low voltage wire fan speed (0-5). Press SET Button. 20/40/60 Minute High Speed Override Button 3. SCROLL to select the desired operational mode This function temporarily initiates high speed ventilation for 20, (VENT, 20/40, OFF). Press SET. (Refer to "Operational 40 or 60 minutes. Press FAN button once for 20, twice for 40 and Modes" in this manual.) three times for 60 minutes. Setting the Dehumidistat Service Indicator Refer to "How the Dehumidistat Works" in this manual before After 4 months, a ‘SERVICE’ indicator will appear. Refer to setting the Dehumidistat. "Maintenance Routine for your HRV/ERV" in this manual. 1. Press and release MODE until "RH" and a number flashes. To reset the service indicator: SCROLL to desired number. Press MODE Select Button to • Press and release the Increase/Decrease buttons simultaneously. exit. The “SERVICE” icons will flash for 5 seconds.. 2. Press MODE Select Button to return to operational features. • Press SET within the 5 seconds and the service indicator will reset. How the Dehumidistat Works Often today's well insulated and tight buildings will have high The average person is comfortable between 30-50% RH. The indoor humidity levels during the heating season. Visible dehumidistat should be set to OFF for all seasons except the condensation on windows indicates a high level of humidity. The heating season. OFF is achieved by setting the dehumidistat to 80. amount of condensation on the windows will increase as outdoor temperatures drop. Dehumidistat Notes: Your HRV/ERV will reduce indoor humidity levels when outdoor The dehumidistat function will be disabled if outdoor air is drier than indoor air. This usually occurs during the heating temperatures exceed 15°C (59°F) for a 24 hour period. season when outdoor temperatures are less than 15°C (59°F). The dehumidistat function will be re-enabled if the unit is Your Lifestyle MAX Digital Control or the optional Lifestyle unplugged for 3 minutes or if the outdoor temperature drops MAX Programmable Control has an adjustable dehumidistat below 15°C (59°F) for a 24 hour period. which can be set to achieve a further dehumidification effect from your HRV/ERV. High speed ventilation will be initiated upon exceeding the dehumidistat set point regardless of the mode and How to Synchronize the Humidity Setting speed of operation. Once the humidity in the building is reduced, the HRV/ERV will revert back to its previous setting. The Lifestyle Digital wall control has a feature that will allow it to be synchronized with other humidity instruments in the building. We suggest operating the HRV/ERV for the first few days without use of the dehumidistat function to observe if a further 1. Turn off the control with the ON/OFF button. dehumidification effect will be required. The dehumidistat 2. Simultaneously press and release the ON/OFF button and the operates in % of RH (relative humidity) with 80 being high and 20/40/60 Minute High Speed override button. 20 being low. Set the Dehumidistat to 80% to disable. If, after a 3. Use the Increase/Decrease buttons to adjust the Humidity few days, further dehumidification is required (the building is still Indicator on the display screen to the number of degrees too humid), set the humidity level to a lower amount. difference between your humidity measuring device. Minus is indicated by flashing. 4. Press the MODE button. 9
  • 10. The Lifestyle MAX Programmable Control (Optional) Part # 99-LS-01 The optional Lifestyle MAX Programmable Control is fully Instruction card digital and allows you to program when and how much fresh air Fan Speed Indicator will be entering the building. Date and Time Key Features 20/40/60 Minute High Speed Humidity • 24 / 7 programmable ventilation Override Button Indicator • 4 programmable events per day Mode Select Increase • 5 Speed Fan setting Button Button • Electronic Dehumidistat Mode Indicator Set button • Two Selectable Modes of Operation ON/OFF 20 min. On / 40 min. Off Button Decrease Continuous Ventilation Button High Speed • 20 / 40 /60 High Speed override timer Service Override Timer Indicator • Service/Maintenance Reminder display Indicator • Backlit LCD screen is easy to read Daytime Event Connects to 3 wire 20 gauge Program Indicator low voltage wire Setting Date & Time 1. Press and release MODE Select Button until "TIME" and "SET" appear on the screen. Press SET Button. 2. The letter for the day of the week flashes. SCROLL (using Up/Down Arrows) to the correct day of the week. Press SET Only one main control can be installed on your Button. system. 3. The hour and "AM" or "PM" flashes. SCROLL to the correct hour using the Increase or Decrease Buttons. Press SET button. Setting the Dehumidistat Refer to "How the Dehumidistat Works" in this manual before 4. The minutes will flash. SCROLL to the correct minute. Press setting the Dehumidistat. SET button to complete entry. Programming Your Control 1. Press and release the MODE Button until "RH" and a number 1. Press and release the MODE Button until "PROGRAM SET" flashes. SCROLL using the Increase or Decrease Buttons to appears. Press SET Button. desired number (RH Set Point). Press the MODE Button to 2. Weekday letters (MTWTF) will flash. Press SET Button. exit. Refer to "How the Dehumidistat Works" in this manual 3. "WAKE" flashes. Press SET Button. for a description of the functionality of the Dehumidistat. 4. "AM" or "PM" flashes. SCROLL to desired time (in 20 2. Press the MODE Button to return to operational features. minute intervals). Press SET Button. Manually Setting the Control 5. "FAN" flashes. SCROLL to desired fan speed (0-5). Press SET 1. Press and release MODE until "MANUAL" and "RUN" are Button. indicated. Press SET. 6. "OFF" flashes. SCROLL to desired operation mode (VENT, 2. SCROLL to select desired fan speed (0-5). Press SET. 20/40, OFF). Press SET Button two times. (Refer to "Selecting 3. Use SCROLL to select the desired operational mode the Best Mode of Operation" in this manual for a description (VENT, 20/40). Press SET. of operational modes.) 4. The control will remain in the "MANUAL RUN" position until 7. "LEAVE" flashes. Repeat steps 4 to 6 to program up to 4 you change back to "PROGRAM RUN" (refer to "Running the events per day. Programmed Setting"). 8. “ARRIVE” flashes. Repeat steps 4 to 6 to program up to 4 events per day. 20/40/60 Minute High Speed Override Button This function temporarily initiates high speed ventilation for 20, 9. “SLEEP” flashes. Repeat steps 4 to 6 to program up to 4 40 or 60 minutes. Press FAN button once for 20, twice for 40 and events per day. three times for 60 minutes. 10. “Weekend” letters (SS) flash. Press SET. Repeat steps 3 to 9. Service Indicator Running the Programmed Setting After 4 months, a ‘SERVICE’ indicator will appear. Refer to Once the programming has been completed you must activate the "Maintenance Routine for your HRV/ERV" in this manual. program. To reset the service indicator: • Press the MODE Button until "PROGRAM" and "RUN" are • Press and release the Increase/Decrease buttons simultaneously. indicated. The “SERVICE” icons will flash for 5 seconds.. • Press SET within the 5 seconds and the service indicator will reset. 10
  • 11. Optional Timers Depending on the type of HRV/ERV installation, you may have timers in areas such as restrooms. The timer will override the Operational Mode (regardless of the setting) and initiate high speed ventilation. Upon completion of the timer cycle, the HRV/ERV will return to your selected Operational Mode and speed setting. Lifestyle 20/40/60 Minute Timer Part # 99-DET01 Initiates high speed ventilation for 20, 40 or 60 minutes. The 20/40/60 Minute Status Lights indicate high speed operation. 20/40/60 Minute Status Lights Lockout Mode is useful if you wish to disable the timer. Set lockout by holding the Select Button for 5 seconds. Unlock by holding for 5 seconds. Connect to 3 wire 20 gauge low voltage wire. Mounts in a standard 2" x 4" electrical box. Select Button Lifestyle 20 Minute Timer Part # 99-20M01 Initiates high speed ventilation for 20 minutes. The 20 Minute Status Light indicates high speed operation. Lockout Mode is useful if you wish to disable the timer. Set 20 Minute lockout by holding the Select Button for 5 seconds. Unlock by Status Lights holding for 5 seconds. Connect to 3 wire 20 gauge low voltage wire. Mounts in a standard 2" x 4" electrical box. Select Button Lifestyle Dehumidistat Part # 99-DH-01 Initiate high speed ventilation when the moisture level in the home exceeds the set point on the control. Once the humidity in the house is reduced, the HRV/ERV will revert back to its Dehumidistat LEDs previous setting. The Dehumidistat should be set to OFF for all % Set to the desired humidity season except the heating season. 80 level. High speed ventilation will initiate when the indoor Refer to "How the Dehumidistat Works" in this manual before moisture level exceeds the setting the Dehumidistat. set point on the control. 20 Dehumidistat Adjust Button 11
  • 12. Location of the HRV/ERV for Mounting The HRV/ERV must be located in a heated space where the A minimum clearance of 30 inches (76 cm) in front of the surrounding air temperature does not fall below 60°F HRV/ERV is recommended to service the heat exchanger (16°C). The unit must be mounted level (horizontal) to cores and the filters. The HRV/ERV may be mounted on an obtain proper drainage of water from the heat exchange equipment platform providing the drain hoses are clear and element and drip pans. The warranty will be void if these there is sufficient space to open the doors for servicing. conditions are not met. Typically, the HRV/ERV is positioned close to an outside wall or the roof to simplify the connections and keep the length of insulated ducting required for the fresh air intake to a minimum. Saddle Installation Curb Mounted Curb is wood or metal May be anchored to Vibration Isolators (Supplied by others) floor,leaving space (Supplied by others) for drain connections Threaded rod and U channel Mount unit on wooden or metal (Supplied by others) curb assembly. Unit must be raised Hang unit with suspended rods an adequate height for installation and slope of drain lines. Vibration Isolators and "U" channel members. (Supplied by others) ATTENTION Flexible duct connectors should be installed between the HRV and the galvanized ductwork. 12
  • 13. The Ductwork System A properly designed ducting system will allow the ducting one size larger than the metal equivalent. Use HRV/ERV to operate at its maximum efficiency. (Air flow flexible duct connectors at the HRV/ERV to avoid noise will be restricted by undersized ducting, use of too many transmission. elbows, tees, bends, etc.). Always try to keep duct runs as All duct joints must be secured with screws, rivets or duct short and straight as possible. sealant and sealed with aluminum duct tape to prevent OTE: Fully insulated ducting with an integral vapor leakage. barrier must be used on all runs passing through unheated areas in order to avoid condensation problems and energy losses from the air steams. ATTENTION All joints must be airtight, sealed and impervious to moisture. See specification sheets for each unit for exact Fully insulated ducting with an integral duct sizes and location. vapour barrier must be used on all runs To minimize pressure drop and noise, galvanized metal passing through unheated areas in order to ducts, properly sized, are recommended. Keep ducting as avoid condensation problems and energy short as possible and use a minimum of elbows and tees. losses from the air systems. Connecting sections and shorter runs may be flexible Outside Weatherhoods The weatherhoods must have built-in “bird” screen with Ducting from the Weatherhoods 1/4 in (6.35 mm) minimum mesh to prevent birds and Galvanized sheet metal ducting with sufficient cross section rodents from entering into the ductwork. Do not use smaller with an integral single piece vapor barrier should be used to mesh as it will be very susceptible to plugging up. Gravity connect the HRV/ERV to the weatherhoods. All ducting dampers at the vents must not be used as they will restrict must meet UL Class 1 requirements. air flow and often “seize up”. The preferred location of the A minimum R value of insulation should be equal to outside weatherhoods is: 4 (RSI 0.75) • no less than 10 ft. (3 m) apart from each other A good bead of high quality caulking (preferably acoustical • at least 18 in (46 cm) above snow line or ground level sealant) and taping with a high quality aluminum foil tape is recommended to seal the duct to both the HRV/ERV and • away from sources of contaminants, such as the weatherhood. automobile exhaust fumes, gas meters, garbage cans, containers, etc. • not exposed to prevailing winds The outside perimeter of the weatherhood must be caulked to prevent leakage into the building. The design and size of the weatherhoods or louvers chosen by the installer must allow for adequate free area. Water and debris penetration of the system is minimized when the airflow does not exceed 1000 FPM (5.08 m/s) free area velocity. 13
  • 14. Stale Air Return System The stale air return system is used to draw air from the Many commercial activities produce air contaminants in the points in the building where the worst air quality problems form of dusts, fumes, mists, vapors and gases. occur. Balancing dampers and/or adjustable grilles are Contaminants should be controlled at the source so they are recommended on all return air lines which are used during not dispersed through the building or allowed to increase to installation to help balance the “draw” from different areas toxic concentration levels. The ventilator allows for of the building. economical operation of the HVAC system while Alternatively, the stale air may be drawn directly from the effectively removing contaminants from the space. In return air duct. The airhandler/furnace blower must operate designing the exhaust portion of the system the exhaust continuously or be interfaced with the Airhandler/Furnace grilles are situated to remove the contaminants while not when this system is used (refer to “Interlocking the allowing them to enter the breathing zone of the occupants. HRV/ERV to an Airhandler/Furnace blower in this For contaminants lighter than air, grilles should be located manual). The HRV/ERV exhaust take-off connection must high on the wall. If contaminants are heavier than air, a be at least 3 ft (1 m) upstream from the HRV/ERV supply lower placement of the grilles will be required. Information duct if both are connected to the same duct run. on a contaminants specific gravity and toxicity should be A damper located just prior to the HRV/ERV is required to available from chemical data sheets. balance the stale air exhausted with the fresh air supply entering the building. Return air suction points should be located on the opposite side of the room from the fresh air inlet. The inlets may be located in the ceiling or high on the walls and fitted with inlet grilles. Fresh Air Supply System The fresh air supply ductwork from the HRV/ERV may be detectors and/or firestats in the HVAC or HRV/ERV directly connected to the return air duct of the forced air ductwork. system. Check the air flow balance of the HRV/ERV with Because an HRV/ERV is designed to bring fresh air into the the air handler blower both “ON” and “OFF” to determine building, structures may require supply voltage interrupt that it does not imbalance the HRV/ERV more than 10%. when smoke or flame sensors are triggered, or when a Also, it is advisable to include a short length of flex duct or central fire alarm system is activated. other non-metallic connector in this hard ducted line in Supply air grilles may be ceiling or high wall mounted. order to keep the HRV/ERV acoustically isolated and Avoid locating incoming fresh air grilles that could cause a separately grounded (electrically) from the airhandler. direct draft on the occupants as the incoming air may be It may be necessary to install a separate fresh air supply below room temperature. A reheat duct heater can be ductwork system if the heating is other than forced air. installed to improve occupant comfort. When installing an HRV/ERV, the designer and installer should be aware of local codes that may require smoke Adjustable Grilles The use of balancing dampers or adjustable grilles as supply air diffusers and air exhaust covers are recommended. TECHGRILLES™ are round, efficient, sound absorbing devices available in 4”, 5”, 6” and 8” (100, 125, 150, and 200 mm) models. Part# 99-140 4” diameter Techgrille Part# 99-141 5” diameter Techgrille Part# 99-142 6” diameter Techgrille Part# 99-148 8” diameter Techgrille 14
  • 15. The Integrated HVAC System The HRV/ERV has become an integral component of the In installations where it is satisfactory to provide general HVAC system. Figure A shows an HRV/ERV unit exhaust from the space, the air to be exhausted may be taken providing fresh air directly to the return air plenum of a directly from the return air plenum to the HRV/ERV as it is rooftop heat/cool unit. drawn back to the air handler. Fresh air supplied by the In the balanced airflow system, the HRV/ERV exhaust HRV/ERV is then introduced directly into the return air removes stale room air (eg. from lunch room, storage or plenum but at a location closer to the air handler. The air copy area) and returns to the space an equal amount of fresh handler would have a constant running blower to effectively outdoor air, making the use of an economizer obsolete in distribute the fresh air and remove the stale air. Balancing conjunction with an HRV/ERV. dampers would be located in both the HRV/ERV supply and exhaust ducts between the return air plenum and the Many buildings have ceiling return air plenum as in Figure HRV/ERV. B. Fresh air from the HRV/ERV can be introduced directly into the ceiling space but this should occur near the air OTE: At no time should the air handler T.E.S.P. on the return handler’s intake. duct exceed that of the HRV/ERV . The optional Lifestyle MAX Programmable Control (Part# 99-LS-01) can set the unit to operate when the occupancy or indoor conditions require the air exchanger. CAUTION When interlocking a rooftop unit with an ATTENTION! HRV/ERV, care must be taken to ensure the fans of both units operate in the correct rotation. These Illustrations are examples. Be sure to verify the duct configuration of exhaust and intake on the unit you are installing. ECONOMIZER ROOFTOP UNIT STALE AIR SUPPLY DUCT EXHAUST RETURN AIR DUCT or BREATHER T HRV/ERV UNIT B.D. B.D. FRESH AIR HRV/ERV FRESH SUPPLY AIR SUPPLY STALE AIR EXHAUST TO ERV ECONOMIZER ROOFTOP UNIT ROOF DECK CEILING RETURN AIR PLENUM 12" BREATHER SPACE SUPPLY DUCTWORK STALE AIR HRV/ERV UNIT B.D. EXHAUST B.D. FRESH AIR HRV/ERV FRESH SUPPLY STALE AIR EXHAUST AIR SUPPLY 15
  • 16. Drain Connection Drain Connection The HRV/ERV may produce some condensation during a defrost cycle. This water should flow into a nearby drain, or be taken away by a condensate pump. CAUTION The HRV and all condensate lines must be DRAIN HOSE PLUMBING installed in a space where the temperature is maintained above the freezing point or freeze protection must be provided. Pre-punched hole located in bottom center of HRV/ERV The HRV/ERV cabinet has a pre-punched hole for the O Ring drain. Insert the drain spout through the hole in the drain pan. Be sure to install the "O ring" which seals each spout to the pan. HAND TIGHTEN the washer and lock nut Drain Spout which hold the drain spout in place. Make a loop in a length of 1/2" drain hose to construct a P-Trap (drain hose not included). Ensure that the loop is Zip Tie large enough to avoid kinks and secure it with a zip tie (zip (not included) tie not included). Pour a cup of water into the drain pan of the HRV/ERV after the drain connection is complete. This 1/2" Drain Hose creates a water seal that prevents odors from being drawn P-Trap (not included) up the hose and into the fresh air supply of the HRV/ERV. To Drain or Condensate Pump ote: Secondary drain pan may be required to protect from condensate leakage. CAUTION Drain trap and tubing MUST be below bottom of door with 1/4" per foot downwards slope away from unit. 16