MULTIDISCIPLINRY NATURE OF THE ENVIRONMENTAL STUDIES.pptx
Rubrics
1. 14Rubrics
5.1 Rubrics
Rubrics, a long requested feature for Moo-
dle, are here. They will make your life easi-
er, and provide considerable measureable
feedback for your students (which will
hopefully make them happier). Rubrics is
the rst of many an cipated plug-in Ad-
vanced Grading features. Rubrics is only
currently supported with the use of the
“Assignment” ac vity; however, rubrics will
be implemented across all modules in later
Moodle releases.
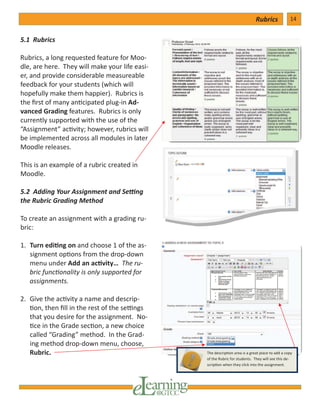
This is an example of a rubric created in
Moodle.
5.2 Adding Your Assignment and Se ng
the Rubric Grading Method
To create an assignment with a grading ru-
bric:
1. Turn edi ng on and choose 1 of the as-
signment op ons from the drop-down
menu under Add an ac vity… The ru-
bric func onality is only supported for
assignments.
2. Give the ac vity a name and descrip-
on, then ll in the rest of the se ngs
that you desire for the assignment. No-
ce in the Grade sec on, a new choice
called “Grading” method. In the Grad-
ing method drop-down menu, choose,
Rubric. The descrip on area is a great place to add a copy
of the Rubric for students. They will see this de-
scrip on when they click into the assignment.
2. 15Rubrics
3. Review the remainder of your se ngs,
and click Save and display at the
bo om of your screen.
5.3 Build and Launch Your Rubric
In this sec on, you will learn to build the
rubric that can be used for grading directly
within Moodle. If you have a rubric al-
ready created, you can cut and paste this
informa on into Moodle.
1. A er the rubric crea on window opens,
click on De ne new grading rubric from
scratch.
2. Give the rubric a name. A naming con-
ven on, such as COM110 Nonverbal,
will help as you build addi onal future
rubrics. If you want students to see the
rubric ahead of me, the descrip on
area is a good place to provide it (this
will be a copy of a rubric you have pre-
pared ahead of me).
3. Below the descrip on window is the
window to enter your criterion and nu-
meric levels. Clicking into any one of
the boxes in the rubric will allow you to
edit. Clicking the Add level box will al-
low you to add addi onal levels (0-5,
for example). Clicking the Add criterion
box under the rubric box will allow you
to add mul ple criterion.
The raw rubric score is calculated as a
sum of all criteria grades. The nal grade
is calculated by comparing the actual
score with the worst/best
possible score that could be
received.
TO AVOID CONFUSION
ALWAYS USE
A LEVEL WITH
0 POINTS.
3. 16Rubrics
Once you have added all of your infor-
ma on, your rubric should look similar to
this:
You can use the red “x” bu on to delete
and the green “arrow” to move criterion up
and down within the list.
5.4 Edi ng Your Exis ng Rubric
You can edit any rubric you create at any
me.
1. From your course homepage, with ed-
i ng turned on, click the edit bu on
(the hand holding the pencil) for the as-
signment (that contains the rubric you
wish to modify).
2. In your “Se ngs” menu, you’ll see the
Advanced grading op on. If you have
already de ned a rubric for the assign-
ment, the rubric will be displayed im-
mediately below. Ensure that the Ad-
vanced grading menu has been expand-
ed.
3. The rubric page appears, with your pre-
viously de ned levels and criterion dis-
played. You can edit just as you did
when originally crea ng the rubric.
4. 17Rubrics
5.5 Rubric Op ons
Rubric op ons appears at the bo om of
the rubric crea on screen. A checkmark
indicates the op on is turned on.
1. Sort order for levels provides a drop-
down list for choosing to have the levels
for each criterion appear in ascending
or descending order by number of
points.
2. Display points for each level during
evalua on controls whether or not the
instructor will see the available points
for each level while grading. This se ng
does not change what the student will
see.
3. Display points for each level to those
being graded controls if students will be
able to see the points available for each
level.
4. Allow grader to add text remarks for
each criterion displays a text box next
to each row of criteria to take notes or
provide student feedback of each crite-
rion.
5. Show remarks to those being graded
allow students to see the text remarks
from the instructor for each criterion.
5. 18Rubrics
5.6 Saving Your Rubric
1. Save as dra saves the rubric as an ed-
itable version but does not launch the
advanced grading form ready to be
used.
2. Save the rubric and making it ready
makes the rubric available to the in-
structor for grading. A new page will
open and you can edit, delete or make
the rubric a template. You will also nd
a Score to grade mapping rules sec on
that tells you how the grading will oc-
cur.
3. You can access and edit your rubric at
any me a er it is built. Click into the
assignment and in the se ngs block, go
to Advanced grading/De ne rubric.
4. A er saving the rubric and making it
ready, you can Publish the form as a
new template for making new rubrics
or to share with others. The template is
available to anyone on the GTCC Moo-
dle site. This feature is very helpful for
Course Directors and other depart-
ments who standardize courses across
sec ons.
6. 19Rubrics
5.7 Rubrics—Student Experience
When students click on the ac vity within
the course, a window will appear and the
student can click Add submission. In the
new window, students will type or cut and
paste their assignment text into the html
edit box and click Save changes.
The descrip on for
the assignment displays
for the student on each
page at the top.
Students will not be able to see
the rubric before adding their submis-
sion, so instructors may want to make
the rubric available by adding a
course le for students to download
and view or make the rubric available
in the assignment’s descrip on.
7. 20Rubrics
5.8 Grading Your Assignments Using the
Rubric
1. A er clicking on the assignment within
the course, select View “x” submi ed
assignments located on the right or lo-
cate the assignment in the gradebook.
2. Click Grade in the status column
(highlighted in yellow). A new window
appears showing the student’s name
submission me stamp, and the sub-
mi ed assignment.
3. A er selec ng the appropriate grade
for each criterion, the instructor can
add feedback that will appear with the
student’s grade when the student clicks
back into the assignment or views their
grades. This feedback area does not ap-
pear for all other types of assignments.
4. Mouse over the appropriate grade level
and click your mouse to choose it.
5. With the Online text assignment (only),
Instructor feedback pre-populates with
the student’s submi ed assignment.
6. Clicking Send no ca ons will allow
students to know their assignment has
been graded.
7. Click Save changes at the bo om of the
page.
8. 21Rubrics
5.9 Rubrics—A er Grading
Once the Online text assignment has been
graded and the student returns and clicks
on the assignment, he or she will see the
rubric with comments and grade. All other
ac vi es, except the Online text assign-
ment, only show the comments and grade.
The instructor will nd the ac vity with its
own column in the gradebook and scores
will be tabulated for each graded student.