More than Just Lines on a Map: Best Practices for U.S Bike Routes
How to arrange object and make a group animation
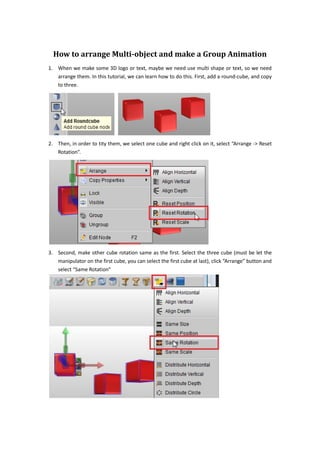
1. How to arrange Multi-object and make a Group Animation
1. When we make some 3D logo or text, maybe we need use multi shape or text, so we need
arrange them. In this tutorial, we can learn how to do this. First, add a round-cube, and copy
to three.
2. Then, in order to tity them, we select one cube and right click on it, select “Arrange -> Reset
Rotation”.
3. Second, make other cube rotation same as the first. Select the three cube (must be let the
manipulator on the first cube, you can select the first cube at last), click “Arrange” button and
select “Same Rotation”
2. 4. Select all cube and click “Arrange” button, select “Align Horizontal”.
5. Then, we got this result, and continue select “Distribute Horizontal”.
6. Select all cube and right click on these cube, make them to a Group.
7. Make two group copies, click “Arrange” button select “Align Vertical”.
3. 8. Click “Arrange” again, and select “Distribute Vertical”.
9. Select all groups, and make another group.
10. Rotate the group Y axis, make the value to 90.
4. 11. Make 2 copies for the group, click “Arrange” and select “Align Horizontal”.
12. Make all groups to a big group.
5. 13. Look, we can rotate the Y axis for this big group, and we can get this effect.
14. If you want make some animation with animation templates, just select this group, and
switch to “Animation” tab, and set “Light Animation” or other animation style.
Aurora3D Software: www.aurora3dsoftware.com www.presentation-3d.com
Email: support@presentation-3d.com