IAC 2024 - IA Fast Track to Search Focused AI Solutions
Replace Chip Ds512
1. ALZATEX, Inc.
6400 SW 213th Ave. Aloha, OR 97007 (503) 642-9693 Voice, (503) 649-6539 Fax
Serving the Business Community since 1993
Installation Instructions
Remove Power from the display.
Remove Rear Cover
Carefully remove the tape around the rear cover and carefully save for reuse later. Remove the
screws and remove the rear cover.
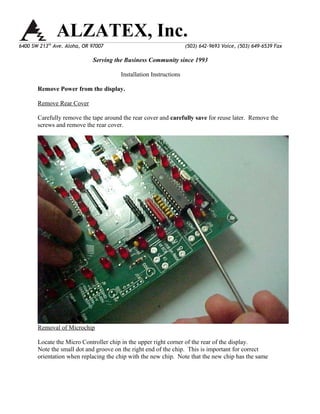
Removal of Microchip
Locate the Micro Controller chip in the upper right corner of the rear of the display.
Note the small dot and groove on the right end of the chip. This is important for correct
orientation when replacing the chip with the new chip. Note that the new chip has the same
2. ALZATEX, Inc.
6400 SW 213th Ave. Aloha, OR 97007 (503) 642-9693 Voice, (503) 649-6539 Fax
Serving the Business Community since 1993
small dot and groove as the old chip. Carefully insert a small screwdriver under the side of the
chip and with a twisting action lift the chip out of the socket.
Installation of new chip.
Check new chip for any bent pins. There shouldn’t be any but it is always a good practice to
check. If any bent pins carefully straighten. Install the new chip exactly in the same orientation
as the original chip. Small dot and groove on the right end of the chip.
Test and Reassemble
Before replacing the rear panel, plug the unit into power supply and check for proper operation.
Reassemble rear panel and apply the tape in the same manner as it was prior to removal.
Should there be any question please call 503-642-9693 for clarification or further instructions.
3. ALZATEX, Inc.
6400 SW 213th Ave. Aloha, OR 97007 (503) 642-9693 Voice, (503) 649-6539 Fax
Serving the Business Community since 1993