SlideShare a Scribd company logo
1 of 1
Download to read offline
IP camera firmware update for Tuxedo Touch cameras – Instructions

General Information
This document provides information on ensuring the iPCAM-PT, iPCAM-WO,                     iPCAM-PT Camera
and the iPCAM-WI2 cameras have the proper firmware version to work with
the following Honeywell products:
! Tuxedo Touch Series (TUXS, TUXW)                                                                                    Firmware must be
! Tuxedo Touch WIFI (TUXWIFIS)                                                                                        v1.0.14R00 or higher
If the firmware needs to be updated, this procedure provides a simple method.              iPCAM-WO Camera

Essentially the dealer will create a test account in AlarmNet Direct, enroll the
cameras, and view their firmware version. Up to 6 cameras can be enrolled
per account.
                                                                                                                      Firmware must be
You can then verify which cameras need updating. Then you log into Total                                              v1.0.05R00 or higher
Connect 2 and update the firmware for each camera. Next you go back to
AlarmNet Direct and delete the cameras (releases their MAC numbers from                    iPCAM-WI2 (and WI2B)
the system).
Lastly the camera boxes can be marked as “Tuxedo Ready” and returned to
stock.                                                                                                                 Firmware must be
                                                                                                                       v1.0.02R00 or higher


!1! Create a test account and enroll the cameras in AlarmNet Direct
Note: Ensure each camera is powered up and connected to the                  8.    Click SUBMIT. You will be directed to the newly created account
internet via a switch or router.                                                   and two welcome emails will be sent, containing the user name
                                                                                   and password for the TC2 account.
1.   Log into AlarmNet Direct and choose Program New Device
     GSM/I. (https://services.alarmnet.com/AlarmNetDirect/)                  9.    From the Actions dropdown menu, choose Manage TC2 Accounts,
                                                                                   the click GO.
2.   Check the Video Services Only box.
                                                                             10. Ensure the Search field is set to Account Name, and find the new
3.   Enter the Account Number consisting of the; Primary City ID,
                                                                                 account. (In this example “Keypad IP camera TEST.”)
     Primary CSID, and Primary Subscriber.
4.   Click DONE.                                                             11. At the left-side account bar, click the red ! icon to expand the
                                                                                 account. Then at the location bar, click the Add Device to Location
5.   Using the Actions dropdown menu, select Total Connect Setup,                    icon and add a camera.
     then click GO.
                                                                             12. Enter the camera’s MAC ID (located on the camera), then click
6.   Choose Total Connect 2.0, then click NEXT.
                                                                                 Save. Repeat for each camera.
7.   Enter a User Name, Account Name, and email address for the
                                                                             13. At the location bar, click the IP Camera Details    icon to reveal
     new account. (Use an account name such as “Keypad IP
     camera TEST” to clearly identify the account.)                              the camera’s firmware information.
                                                                             14. Verify each camera has the necessary firmware version.

!2! Update the camera’s firmware                                             !3! Free up the camera’s MAC IDs
1.   Go to the Total Connect 2 website and login using the user name         1.    At AlarmNet Direct, delete the cameras from service. This frees
     and password emailed to you for the account.                                  up the MAC IDs for use.
     (https://rs.alarmnet.com/TotalConnect2/)
                                                                             2.    Repack the cameras and mark their boxes “Tuxedo Ready” to
2.   Open the Video module. The cameras that need firmware                         identify them.
     updates will have the notification icon present.
                                                                             3.    They are now ready for installation with Tuxedo products.
     Note: Even though certain cameras may have the required
     firmware for use with Tuxedo products, this is a good time to
     update the firmware for all the cameras.
3.   Click the icon and follow the prompts to update the firmware. Do
     one camera at a time.
4.   Using a paper clip, depress and hold the reset button for 12
     seconds, then RELEASE.


                          DOCUMENTATION AND ONLINE SUPPORT Go to: http://www.security.honeywell.com/hsc/resources/MyWebTech/

                                                                                                           2 Corporate Center Drive, Suite 100

Ê800-112664Š                                                                                                P.O. Box 9040, Melville, NY 11747
                                                                                                       Copyright " 2012 Honeywell International Inc.
800-11266 3/12 Rev. A                                                                                          www.honeywell.com/security

More Related Content

More from Alarm Grid

Leviton vri10 1 lz product manual and setup guide
Leviton vri10 1 lz product manual and setup guideLeviton vri10 1 lz product manual and setup guide
Leviton vri10 1 lz product manual and setup guideAlarm Grid
 
Leviton vri06 1 lz product manual and setup guide
Leviton vri06 1 lz product manual and setup guideLeviton vri06 1 lz product manual and setup guide
Leviton vri06 1 lz product manual and setup guideAlarm Grid
 
Leviton vrf01 1 lz product manual and setup guide
Leviton vrf01 1 lz product manual and setup guideLeviton vrf01 1 lz product manual and setup guide
Leviton vrf01 1 lz product manual and setup guideAlarm Grid
 
Leviton vre06 1 lz
Leviton vre06 1 lzLeviton vre06 1 lz
Leviton vre06 1 lzAlarm Grid
 
Leviton vrcz4 mr, vrcs4-mr, and vrc52-mr product specifications
Leviton vrcz4 mr, vrcs4-mr, and vrc52-mr product specificationsLeviton vrcz4 mr, vrcs4-mr, and vrc52-mr product specifications
Leviton vrcz4 mr, vrcs4-mr, and vrc52-mr product specificationsAlarm Grid
 
Leviton vrcz4 1 l, vrcs4-1l, vrcz1-1l, vrcs1-1l and vrmr1-osg product specifi...
Leviton vrcz4 1 l, vrcs4-1l, vrcz1-1l, vrcs1-1l and vrmr1-osg product specifi...Leviton vrcz4 1 l, vrcs4-1l, vrcz1-1l, vrcs1-1l and vrmr1-osg product specifi...
Leviton vrcz4 1 l, vrcs4-1l, vrcz1-1l, vrcs1-1l and vrmr1-osg product specifi...Alarm Grid
 
Leviton vrcz1 installation manual and setup guide
Leviton vrcz1 installation manual and setup guideLeviton vrcz1 installation manual and setup guide
Leviton vrcz1 installation manual and setup guideAlarm Grid
 
Leviton vrcs1 1 l
Leviton vrcs1 1 lLeviton vrcs1 1 l
Leviton vrcs1 1 lAlarm Grid
 
Leviton vp00 r 10z, vp00r-1lz, vp0sr-10z, vp0sr-1lz installation manual and s...
Leviton vp00 r 10z, vp00r-1lz, vp0sr-10z, vp0sr-1lz installation manual and s...Leviton vp00 r 10z, vp00r-1lz, vp0sr-10z, vp0sr-1lz installation manual and s...
Leviton vp00 r 10z, vp00r-1lz, vp0sr-10z, vp0sr-1lz installation manual and s...Alarm Grid
 
Leviton dimmers, switches and fan speed controllers
Leviton dimmers, switches and fan speed controllersLeviton dimmers, switches and fan speed controllers
Leviton dimmers, switches and fan speed controllersAlarm Grid
 
Fluorescent dimmer for hi lume or eco-10 ballasts
Fluorescent dimmer for hi lume or eco-10 ballastsFluorescent dimmer for hi lume or eco-10 ballasts
Fluorescent dimmer for hi lume or eco-10 ballastsAlarm Grid
 
Controlling z wave door locks with the vrc0 p
Controlling z wave door locks with the vrc0 pControlling z wave door locks with the vrc0 p
Controlling z wave door locks with the vrc0 pAlarm Grid
 
Vizia rf+ collection
Vizia rf+ collectionVizia rf+ collection
Vizia rf+ collectionAlarm Grid
 
Honeywell vista-50p-user-guide
Honeywell vista-50p-user-guideHoneywell vista-50p-user-guide
Honeywell vista-50p-user-guideAlarm Grid
 
Honeywell vista-50p-install-guide
Honeywell vista-50p-install-guideHoneywell vista-50p-install-guide
Honeywell vista-50p-install-guideAlarm Grid
 
Honeywell vista-50p-connections-summary
Honeywell vista-50p-connections-summaryHoneywell vista-50p-connections-summary
Honeywell vista-50p-connections-summaryAlarm Grid
 
Honeywell vista-10p-programming-guide
Honeywell vista-10p-programming-guideHoneywell vista-10p-programming-guide
Honeywell vista-10p-programming-guideAlarm Grid
 
Honeywell total-connect-video-residential-brochure
Honeywell total-connect-video-residential-brochureHoneywell total-connect-video-residential-brochure
Honeywell total-connect-video-residential-brochureAlarm Grid
 
Honeywell lynxrchkit-sc-honeywell-lynxyrchkit-hc-honeywell-lynxrchkit-sha-ins...
Honeywell lynxrchkit-sc-honeywell-lynxyrchkit-hc-honeywell-lynxrchkit-sha-ins...Honeywell lynxrchkit-sc-honeywell-lynxyrchkit-hc-honeywell-lynxrchkit-sha-ins...
Honeywell lynxrchkit-sc-honeywell-lynxyrchkit-hc-honeywell-lynxrchkit-sha-ins...Alarm Grid
 
Honeywell l5100-programming-guide
Honeywell l5100-programming-guideHoneywell l5100-programming-guide
Honeywell l5100-programming-guideAlarm Grid
 

More from Alarm Grid (20)

Leviton vri10 1 lz product manual and setup guide
Leviton vri10 1 lz product manual and setup guideLeviton vri10 1 lz product manual and setup guide
Leviton vri10 1 lz product manual and setup guide
 
Leviton vri06 1 lz product manual and setup guide
Leviton vri06 1 lz product manual and setup guideLeviton vri06 1 lz product manual and setup guide
Leviton vri06 1 lz product manual and setup guide
 
Leviton vrf01 1 lz product manual and setup guide
Leviton vrf01 1 lz product manual and setup guideLeviton vrf01 1 lz product manual and setup guide
Leviton vrf01 1 lz product manual and setup guide
 
Leviton vre06 1 lz
Leviton vre06 1 lzLeviton vre06 1 lz
Leviton vre06 1 lz
 
Leviton vrcz4 mr, vrcs4-mr, and vrc52-mr product specifications
Leviton vrcz4 mr, vrcs4-mr, and vrc52-mr product specificationsLeviton vrcz4 mr, vrcs4-mr, and vrc52-mr product specifications
Leviton vrcz4 mr, vrcs4-mr, and vrc52-mr product specifications
 
Leviton vrcz4 1 l, vrcs4-1l, vrcz1-1l, vrcs1-1l and vrmr1-osg product specifi...
Leviton vrcz4 1 l, vrcs4-1l, vrcz1-1l, vrcs1-1l and vrmr1-osg product specifi...Leviton vrcz4 1 l, vrcs4-1l, vrcz1-1l, vrcs1-1l and vrmr1-osg product specifi...
Leviton vrcz4 1 l, vrcs4-1l, vrcz1-1l, vrcs1-1l and vrmr1-osg product specifi...
 
Leviton vrcz1 installation manual and setup guide
Leviton vrcz1 installation manual and setup guideLeviton vrcz1 installation manual and setup guide
Leviton vrcz1 installation manual and setup guide
 
Leviton vrcs1 1 l
Leviton vrcs1 1 lLeviton vrcs1 1 l
Leviton vrcs1 1 l
 
Leviton vp00 r 10z, vp00r-1lz, vp0sr-10z, vp0sr-1lz installation manual and s...
Leviton vp00 r 10z, vp00r-1lz, vp0sr-10z, vp0sr-1lz installation manual and s...Leviton vp00 r 10z, vp00r-1lz, vp0sr-10z, vp0sr-1lz installation manual and s...
Leviton vp00 r 10z, vp00r-1lz, vp0sr-10z, vp0sr-1lz installation manual and s...
 
Leviton dimmers, switches and fan speed controllers
Leviton dimmers, switches and fan speed controllersLeviton dimmers, switches and fan speed controllers
Leviton dimmers, switches and fan speed controllers
 
Fluorescent dimmer for hi lume or eco-10 ballasts
Fluorescent dimmer for hi lume or eco-10 ballastsFluorescent dimmer for hi lume or eco-10 ballasts
Fluorescent dimmer for hi lume or eco-10 ballasts
 
Controlling z wave door locks with the vrc0 p
Controlling z wave door locks with the vrc0 pControlling z wave door locks with the vrc0 p
Controlling z wave door locks with the vrc0 p
 
Vizia rf+ collection
Vizia rf+ collectionVizia rf+ collection
Vizia rf+ collection
 
Honeywell vista-50p-user-guide
Honeywell vista-50p-user-guideHoneywell vista-50p-user-guide
Honeywell vista-50p-user-guide
 
Honeywell vista-50p-install-guide
Honeywell vista-50p-install-guideHoneywell vista-50p-install-guide
Honeywell vista-50p-install-guide
 
Honeywell vista-50p-connections-summary
Honeywell vista-50p-connections-summaryHoneywell vista-50p-connections-summary
Honeywell vista-50p-connections-summary
 
Honeywell vista-10p-programming-guide
Honeywell vista-10p-programming-guideHoneywell vista-10p-programming-guide
Honeywell vista-10p-programming-guide
 
Honeywell total-connect-video-residential-brochure
Honeywell total-connect-video-residential-brochureHoneywell total-connect-video-residential-brochure
Honeywell total-connect-video-residential-brochure
 
Honeywell lynxrchkit-sc-honeywell-lynxyrchkit-hc-honeywell-lynxrchkit-sha-ins...
Honeywell lynxrchkit-sc-honeywell-lynxyrchkit-hc-honeywell-lynxrchkit-sha-ins...Honeywell lynxrchkit-sc-honeywell-lynxyrchkit-hc-honeywell-lynxrchkit-sha-ins...
Honeywell lynxrchkit-sc-honeywell-lynxyrchkit-hc-honeywell-lynxrchkit-sha-ins...
 
Honeywell l5100-programming-guide
Honeywell l5100-programming-guideHoneywell l5100-programming-guide
Honeywell l5100-programming-guide
 

Honeywell total-connect-video-tuxedo-touch-firmware-update

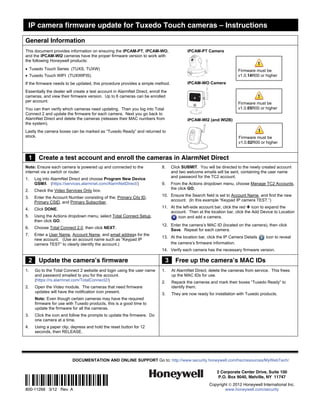
  • 1. IP camera firmware update for Tuxedo Touch cameras – Instructions General Information This document provides information on ensuring the iPCAM-PT, iPCAM-WO, iPCAM-PT Camera and the iPCAM-WI2 cameras have the proper firmware version to work with the following Honeywell products: ! Tuxedo Touch Series (TUXS, TUXW) Firmware must be ! Tuxedo Touch WIFI (TUXWIFIS) v1.0.14R00 or higher If the firmware needs to be updated, this procedure provides a simple method. iPCAM-WO Camera Essentially the dealer will create a test account in AlarmNet Direct, enroll the cameras, and view their firmware version. Up to 6 cameras can be enrolled per account. Firmware must be You can then verify which cameras need updating. Then you log into Total v1.0.05R00 or higher Connect 2 and update the firmware for each camera. Next you go back to AlarmNet Direct and delete the cameras (releases their MAC numbers from iPCAM-WI2 (and WI2B) the system). Lastly the camera boxes can be marked as “Tuxedo Ready” and returned to stock. Firmware must be v1.0.02R00 or higher !1! Create a test account and enroll the cameras in AlarmNet Direct Note: Ensure each camera is powered up and connected to the 8. Click SUBMIT. You will be directed to the newly created account internet via a switch or router. and two welcome emails will be sent, containing the user name and password for the TC2 account. 1. Log into AlarmNet Direct and choose Program New Device GSM/I. (https://services.alarmnet.com/AlarmNetDirect/) 9. From the Actions dropdown menu, choose Manage TC2 Accounts, the click GO. 2. Check the Video Services Only box. 10. Ensure the Search field is set to Account Name, and find the new 3. Enter the Account Number consisting of the; Primary City ID, account. (In this example “Keypad IP camera TEST.”) Primary CSID, and Primary Subscriber. 4. Click DONE. 11. At the left-side account bar, click the red ! icon to expand the account. Then at the location bar, click the Add Device to Location 5. Using the Actions dropdown menu, select Total Connect Setup, icon and add a camera. then click GO. 12. Enter the camera’s MAC ID (located on the camera), then click 6. Choose Total Connect 2.0, then click NEXT. Save. Repeat for each camera. 7. Enter a User Name, Account Name, and email address for the 13. At the location bar, click the IP Camera Details icon to reveal new account. (Use an account name such as “Keypad IP camera TEST” to clearly identify the account.) the camera’s firmware information. 14. Verify each camera has the necessary firmware version. !2! Update the camera’s firmware !3! Free up the camera’s MAC IDs 1. Go to the Total Connect 2 website and login using the user name 1. At AlarmNet Direct, delete the cameras from service. This frees and password emailed to you for the account. up the MAC IDs for use. (https://rs.alarmnet.com/TotalConnect2/) 2. Repack the cameras and mark their boxes “Tuxedo Ready” to 2. Open the Video module. The cameras that need firmware identify them. updates will have the notification icon present. 3. They are now ready for installation with Tuxedo products. Note: Even though certain cameras may have the required firmware for use with Tuxedo products, this is a good time to update the firmware for all the cameras. 3. Click the icon and follow the prompts to update the firmware. Do one camera at a time. 4. Using a paper clip, depress and hold the reset button for 12 seconds, then RELEASE. DOCUMENTATION AND ONLINE SUPPORT Go to: http://www.security.honeywell.com/hsc/resources/MyWebTech/ 2 Corporate Center Drive, Suite 100 Ê800-112664Š P.O. Box 9040, Melville, NY 11747 Copyright " 2012 Honeywell International Inc. 800-11266 3/12 Rev. A www.honeywell.com/security