How to Wallpaper A Room
•Download as DOCX, PDF•
1 like•347 views

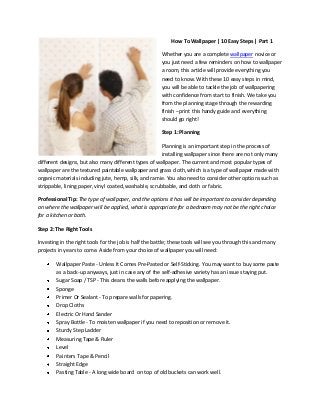
Whether you are a complete wallpaper novice or you just need a few reminders on how to wallpaper a room, this article will provide everything you need to know. With these 10 easy steps in mind, you will be able to tackle the job of wallpapering with confidence from start to finish. We take you from the planning stage through the rewarding finish --print this handy guide and everything should go right!

Recommended
More Related Content
Viewers also liked
Viewers also liked (12)
Recently uploaded
Recently uploaded (9)
How to Wallpaper A Room
- 1. How To Wallpaper | 10 Easy Steps | Part 1 Whether you are a complete wallpaper novice or you just need a few reminders on how to wallpaper a room, this article will provide everything you need to know. With these 10 easy steps in mind, you will be able to tackle the job of wallpapering with confidence from start to finish. We take you from the planning stage through the rewarding finish --print this handy guide and everything should go right! Step 1: Planning Planning is an important step in the process of installing wallpaper since there are not only many different designs, but also many different types of wallpaper. The current and most popular types of wallpaper are the textured paintable wallpaper and grass cloth, which is a type of wallpaper made with organic materials including jute, hemp, silk, and ramie. You also need to consider other options such as strippable, lining paper, vinyl coated, washable, scrubbable, and cloth or fabric. Professional Tip: The type of wallpaper, and the options it has will be important to consider depending on where the wallpaper will be applied, what is appropriate for a bedroom may not be the right choice for a kitchen or bath. Step 2: The Right Tools Investing in the right tools for the job is half the battle; these tools will see you through this and many projects in years to come. Aside from your choice of wallpaper you will need: Wallpaper Paste - Unless It Comes Pre-Pasted or Self-Sticking. You may want to buy some paste as a back-up anyways, just in case any of the self-adhesive variety has an issue staying put. Sugar Soap / TSP - This cleans the walls before applying the wallpaper. Sponge Primer Or Sealant - To prepare walls for papering. Drop Cloths Electric Or Hand Sander Spray Bottle - To moisten wallpaper if you need to reposition or remove it. Sturdy Step Ladder Measuring Tape & Ruler Level Painters Tape & Pencil Straight Edge Pasting Table - A long wide board on top of old buckets can work well.
- 2. A Clean Stirring Stick & Two Buckets For Paste and Water Paste Brush A Plumb Bob Weight A Bristle Brush Stainless Steel Scissors Damp Cloths - To clean off excess paste. Broad Blade Knife Trimming Knife Toss-Away Clothes - This process can be messy and stain clothing just like painting. You May Also Need: Overlap Paste - For Vinyl Wallpaper. Water Tray - For Pre-Pasted Paper. Safety Goggles - To protect your eyes. Felt Wallpaper Roller - For flock, molded, and other delicate wallpaper. Steam Stripper - To Help remove old wallpaper. Extra Wallpaper - You may need to make repairs in the future, so having an extra roll handy is a good idea. How To Wallpaper | 10 Easy Steps | Part 2 In part 1 we took you through the process of planning how to wallpaper. We showed you the tools you will need to get the job done the right way. In part 2 we will continue by tackling the wallpapering job itself. Let's get started... Step 3: Prepare Your Space You will need to move all furniture away from the walls to the center of the room, remove photos from walls, and take down curtains and curtain hardware. If you have anything especially fragile or easily damaged remove it from the room, you need enough space to set up your supplies and pasting table so you can work without too many obstacles in the way. Make sure to cover and protect outlets and light switches. Professional Tip: Make sure to follow any specific how to wallpaper instructions that come with your wallpaper paste and the wallpaper itself. Step 4: Measure & Mark Your Way Measure the height of your walls at a few points around the room using the maximum measurement plus an additional 4 inches, you can then trim at the ceiling and baseboard later for the perfect fit. Start at a corner where there are no doors or windows if possible and use a plumb bob to mark a straight line
- 3. for your first strip. Begin an inch or two less than one roll width away from the corner, make sure to do this for each corner you round. Step 5: Cutting Wallpaper Use your stainless steel scissors to cut your first strip of wallpaper. Avoid cutting several strips of paper until you hang the first one, this will allow you to change length if necessary. Once you have the right length it is helpful to cut many to help the work go faster. Step 6: Pasting Wallpaper Place the wallpaper back-side up on your pasting table. Add paste evenly from the centre of the paper to the edge of the paper. Make sure not to use too much paste, and also ensure the wallpaper is coated evenly to all edges. Professional Tip: Make sure to check your specific wallpaper manufacturer's instructions, they may vary from this method. Some wallpaper requires a soak time, others are pre-pasted and may require no added paste and will use water instead. Step 7: Hanging Wallpaper Carefully press the pasted wallpaper to the top of the wall, aligning it neatly with your pre-measured line, leave some surplus paper at the top for trimming later. Smooth the wallpaper into position starting at the top and working down using a wallpaper brush to avoid air bubbles. Make sure to watch so your paper lines up with your measurements all the way down. Step 8: Finish Up Smooth the wallpaper into the creases between the wall, ceiling, and baseboard as you go, then once finished trim along the creases. Wipe any excess paste from the wallpaper surface, ceiling, and baseboards with damp cloths or a sponge. When the wallpaper is nearly dry, smooth the seams between strips with a seam roller, do not over-roll since this can cause the paste to be too thin and the edges will lift. Professional Tip: Use a smoothing brush to tap seams on the following wallpaper types: embossed wallpaper, fabric wallpaper, foil wallpaper, and flocked wallpaper. Step 9: Troubleshooting Wallpaper Issues Air Bubbles: A common issue with wallpaper is air bubbles and there is an easy solution, simply make a tiny neat incision, apply paste, and smooth the wallpaper gently back into place with a seam roller. Paste Bubbles: If paste is added too thickly or gets trapped it can make bubbles just like air. In this case make another tiny incision and squeeze out excess paste, then wipe it clean with a damp cloth. Uneven Ceiling Line: Often the only way to fix this is with crown molding or by adding a narrow wallpaper border.
- 4. Peeling Wallpaper: The most dreaded of issues, often the solution is to re-paste the paper on the edges. If this does not fix your issue you may have to remove the strip, clean the wall, and re-paste the paper. This issue is usually caused by poorly preparing walls, of by not pasting the edges of the wallpaper well- enough. Step 10: Enjoy Your New Wallpaper After all that hard work you can step back and... finally... enjoy it. You have created an inspiring new space to enjoy for many years to come! Now you know how to wallpaper a room. See Also… How To Remove Wallpaper Now that you know how to wallpaper, visit us today at Wallpaper Wholesaler to see the latest in modern wallpaper patterns by top brand names in the industry at up to 85% off retail prices. We also offer free shipping* and no sales tax** on all orders! By Victoria Gates Home Design Enthusiast & Senior SEO Analyst Learn More About Victoria at Google+ I am a writer, senior web analyst, and interior design enthusiast for Internet Wholesalers Inc. You can learn more about me and my projects by checking out my Google+ page.