
Recommended
Recommended
More Related Content
Viewers also liked
Similar to Office 2007 Survival Guide
Similar to Office 2007 Survival Guide (20)
More from Sarah Bombich
More from Sarah Bombich (12)
Office 2007 Survival Guide
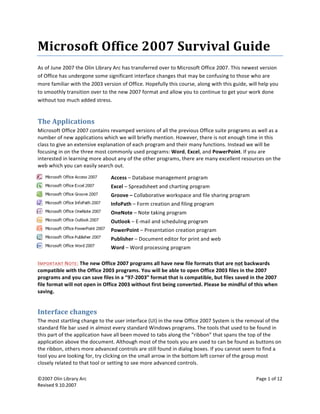
- 3. ©2007 Olin Library Arc Page 3 of 12 Revised 9.10.2007 Revised 9.10.2007 The Suite as a Whole What you will find in using Microsoft Office Suite is that the same tools and functions appear throughout the different programs. Because of this, you will find that many of the different functions explained in conjunction with a specific program in this tutorial will inform your use of other applications contained within the Office 2007 Suite. Word 2007 Microsoft Word is Microsoft’s flagship word processing software and the most commonly used word processor worldwide and many of the tools for manipulating text in the other Office Suite programs are taken directly from it, hence it will be the first thing covered in this tutorial. Home: Fonts, Alignment, Spacing, Styles, Editing The Home tab contains all the controls for Fonts, Alignment, Spacing, Styles and Editing. If you cannot seem to find a specific control relating to one of these topics on the ribbon it will most likely be in a pop‐ out box that you can access by clicking on the small arrow in the bottom left corner of each box. (NOTE: the small arrows on the bottom left corner of each box are a universal feature in the Office Suite, always check them for tools you cannot otherwise find on the ribbon) The Font Group In Word 2007 the default font settings have changed from Times New Roman 12pt font to Calibri (Body) 11pt font. However, all the standard tools for modifying text have remained much the same and can be found in the “Font” group on the Home tab of the ribbon The Paragraph Group In Word 2007 the default spacing settings have changed from the standard single spacing between lines to a spacing of 1.15, which looks much closer to double spacing. However, many of the buttons in the paragraph group remain similar and the spacing can be easily adjusted back to the 97‐2003 default by clicking on the Style labeled “No Spacing” in the Style group of the Home Tab.
- 4. ©2007 Olin Library Arc Page 4 of 12 Revised 9.10.2007 Revised 9.10.2007 The Styles Group New to Word 2007 are the ready‐made quick styles. These styles can be used to quickly jump between different text formats within a document. Within each style set there are a number of distinct styles that can be applied. By clicking on the “Change Styles” button you can toggle between different Style Sets, Colors, and Fonts; adjusting all of the Styles you have used within the document. If you would like your document to look more like it would have in older versions of Office, you can select the style set “Word 2003.” Insert: Pictures, Tables, Page Numbers, Headers/Footers, etc. The Insert tab contains all the controls for inserting Pictures, Clip Art, Tables, Equations, Cover Pages, and Links, as well as Headers/Footers and Page Numbers. If you cannot seem to find a specific control relating to one of these topics on the ribbon it will most likely be in a pop‐out box that you can access by clicking on the small arrow in the bottom left corner of each box. PLEASE NOTE: After inserting either a Table or a Picture into your word document extra tabs on the ribbon will appear to give you access to tools specific to those items. These tabs can be located at the rightmost end of the ribbon. Inserting a Table 1. Click on the “Table” button on the ribbon. 2. Option A: Select the number of rows and columns using the grid provided in the dropdown menu Option B: Click on “Insert Table” and enter them into the resulting dialog box Option C: Click on “Draw Table” and use the drawing tool to manually draw the table Option D: Scroll over “Quick Tables” and select one of the preformatted table styles supplied by Word Inserting Illustrations In Word 2007 controls for inserting and manipulating image files and other kinds of illustrations have been greatly improved. After inserting either a Table or a Picture into your word document extra tabs on the end of the ribbon will appear to give you access to tools specific to those items.
- 5. ©2007 Olin Library Arc Page 5 of 12 Revised 9.10.2007 Revised 9.10.2007 Positioning Illustrations There are many new controls for modifying illustrations within Word 2007, and therefore we cannot cover them all in this tutorial. Instead we will cover the most basic feature for working with illustrations within Word, Positioning. 1. After inserting the illustration click on the “Format” tab 2. Click the “Position” button in the “Arrange” group 3. Select the kind of positioning closest to your desired position 4. Manually move the illustration into the final position by either clicking and dragging or by selecting the illustration and moving it with the arrow keys 5. For further control click on “More Layout Options…” Page Layout The Page Layout tab contains all the controls for setting Themes, Page Margins, Page Orientation, Columns, and Indentation and Spacing Settings. Page Setup The Page Setup group on the Page Layout tab of the ribbon contains all the important controls for the universal attributes of the document such as orientation, margins, etc. It is important to note that the default margins have changed from the 2003 standard but can be quickly set back. To Set the Margins Back to the 2003 Default 1. Click the “Margins” button in the “Page Setup” group 2. Select “Office 2003 Default” From the drop down menu
- 6. ©2007 Olin Library Arc Page 6 of 12 Revised 9.10.2007 Revised 9.10.2007 Reference The Reference tab on the ribbon contains most of the functions specific to academic papers such as Citations, Footnotes, Endnotes, Table of Contents, and Captions. Unfortunately there is not enough time in this class to go through all the nuances of the controls for the tools on the Reference tab, if you would like to learn more feel free to look at our “Word Class Guide.” Other Noteworthy Things Spelling & Grammar Check The Spelling & Grammar Check tool, like all of the other review tools, has been moved onto the Review tab of the ribbon and functions much in the same way as it always has. Document Views & Print Preview All the tools for altering the way you view your document have been moved onto the View tab of the ribbon, however this is not how you access Print Preview. Print Preview can be found in the Office Logo Button menu, under the Print option or can be added to the Quick Access Toolbar. Undo & Redo Undo & Redo can both be found on the Quick Access Toolbar, however knowing the hotkeys for them will make working in any application much more efficient so it is worth putting in the effort. Undo Ctrl+Z Redo Ctrl+Y Excel 2007 Microsoft Excel is a spreadsheet application which features calculation and graphing tools that allow the users to utilize and manipulate data entered into the program. In this section of the class we will give a brief overview of some of the basics of working in Excel and will point out some of its more advanced features. Basics Workbook vs. Worksheet Workbook is the entire document, and it contains several worksheets. It’s like a journal – the entire journal is the workbook, but each page is like a worksheet.
- 7. ©2007 Olin Library Arc Page 7 of 12 Revised 9.10.2007 Revised 9.10.2007 Text wrap Text wrapping allows you to fit text on several lines within a single cell without having to do messy formatting. Once the text has been entered, right click the cell and select “Format Cells.” Then choose the “Alignment” tab where, about halfway down, you will see “Wrap text.” Click the box next to “Wrap text” and select okay. The cell will still be as wide as the other cells in the column but not be much taller. Inserting Data Click on the cell and enter the desired information. Rows and Columns Changing width and height Drag along the line between the row number or column letter. Double‐click and Excel will automatically size all the cells to the size of the cell with the most characters. Inserting or removing To insert a row, right click on a row number and select “Insert”; a row will be inserted directly above the selected number. To insert a column, right click on a column letter and select “Insert”; a column will be inserted directly above the selected number. To remove a row or column, right‐click the row or column to be removed and select “Delete.” Sorting If you only want to sort a single row or column, select that row/column by right‐clicking on the header to select the row/column; then, navigate to the Data ribbon and select sort ascending or descending. But if one column is tied to another, e.g. you are making mailing labels and want to sort by last name, you need to select the entire document and then choose by which row or column you want to sort. Select the entire document by clicking the cell in between Cell 1 and Cell A, then repeat as above. Calculations and Graphing Simple formulas To make a formula, you need already existing data. To enter a formula, select the desired cell and then go to the function bar up top. Each formula must start with an equal sign, and each cell must be entered with the column letter followed by the row number. Alternatively, you can click on each cell to input it into the formula. To multiply, use the asterisk sign (Shift+8), and to divide, use the backslash. If Excel thinks you made a mistake or cannot read the formula, a dialog box will appear suggesting a change. For example, a formula might look like = (A1*A2)/(B1+B2) Using functions Excel is really powerful and has a lot of functions, especially for finances and more basic mathematics. If you not sure exactly what you are looking for, click on the f(x) icon next to the formula bar. Then, type a description or name of the function, and Excel will return a list of what it thinks you are looking for. It
- 9. ©2007 Olin Library Arc Page 9 of 12 Revised 9.10.2007 Revised 9.10.2007 PowerPoint 2007 Microsoft’s PowerPoint is a presentation creation application that allows users to make slideshows that include dynamic elements such as animations, images, sound, and video. In this section of the class we will give a brief overview of some of the basics of working in PowerPoint and will point out some of its more advanced features. Starting a New Slide Show Home Tab This is where you will find the old “Edit” menu with Cut, Copy, and Paste options. This is also where the controls for Slides, Fonts, Alignment, Spacing, Drawing, and Editing will be. PLEASE NOTE: Some sections in each tab also have arrows in the bottom right hand corner that offer additional options in that particular section. For example, if you want to change the alignment, indentation, or spacing of your paragraph, you will not find those options in the menu above. If you click on the arrow in the “Paragraph” section, however, you will find them Customizing a Slide Insert Tab This is where you will find controls for inserting Pictures, Movies, Tables, Word Art, Sounds, and Links. Inserting Illustrations, Links, and Media Clips Click on the “Insert” button. In the Illustrations section, you will find picture, clip art, photo album, shapes, smart art, and chart. To insert a picture of something that is already saved on your computer, click “Picture”. A window will pop up under My Pictures for you to choose from.
- 12. ©2007 Olin Library Arc Page 12 of 12 Revised 9.10.2007 Reviewing a Slide Show Slide Show: Here, you can Start Slide Show from either the beginning or the current slide, Set Up your slide by recording a narration and time the show, or change the Monitors option by setting up resolution and which monitor you are using. Review: Here, you will find your basic proofreading options: Spell Check, Research, Thesaurus, Translator, Language Check, leave Comments, and Protect Presentation. Conclusion and Other Resources Although this tutorial has covered most of the important tools in the three most commonly used programs within the Microsoft Office Suite, it comes far from covering everything. Hopefully many of the tools you have learned to use in this tutorial will apply to other Office applications you may need to use in the future and give you a better sense of the new user interface. If you have any specific questions about the three programs covered in this tutorial feel free to look at one of the more complete guides to Word, Excel, and PowerPoint located at the front desk. For any information regarding other Microsoft Office applications you can find many resources on the Web.