Weitere ähnliche Inhalte
Ähnlich wie Kinesiotaping (20)
Kürzlich hochgeladen (20)
Kinesiotaping
- 1. Anchor end - rip tape backing 2-3” from end of tape and remove backing.
Anchor end to skin and rub vigorously. Apply tape to area indicated.
Calf 1. Flex foot.
Anchor tape at
lower calf and
run to below
back of knee.
Stretch tape
50% in middle,
no stretch on
ends.
2. Apply
piece across
area that is
fatigued.
Stretch tape
50% in
middle, no
stretch on
ends.
1. 2.
1. Place hand in back pocket. Anchor front tape (a) from top of shoulder to
lower arm with no stretch. Place hand in lap. Repeat with back tape (b). Apply
tape on top of shoulder (c). Stretch tape 50% in middle, no stretch in ends.
Push ups - Shoulder
1.
Watch online instructional videos at www.rocktape.com
Instructions
Apply on clean, dry skin 10 minutes before exercise. Rub vigorously to set adhesive.
Never stretch the ends of the tape, only the middle.
Rocktape can be worn up to five days and is water resistant .
Store tape in cool, dry place. Let tape come to room temperature before applying.
endurance tape for athletes
PowerTaping applications
Start Here
Middle stretch - rip tape in middle, peel backing and pull evenly on each end of
tape. When applying, never stretch ends of the tape, only stretch the middle.
Rub vigorously to set adhesive.
Copyright©2009Rocktape.
Always consult your medial professional or therapist for advice. Stop using Rocktape immediately if you see any irritation. These instructions are provided for educational purposes and are not intended to replace medical advice. Muscle and joint pain can indicate a serious condition and you should seek medical care if your pain is persistent.
2. 3.
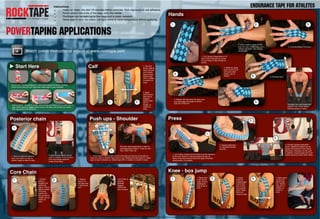
1. Cut 2 strips of tape about 8-12”
long. Fold in half and cut a hole
for your finger to slip through as
shown.
2. Have a partner apply the first
strip over your middle finger so it
matches the photo. Rub hard to
set the tape.
1.
3. Correctly applied first piece
Hands
6. Finished hand6.
4. Repeat with 2nd piece but apply over
your ring finger and angle as shown.
USE NO STRETCH.
5. Make fist. Apply
piece around wrist
and cover other
pieces, use no
stretch.
4.
5.
Rocktape can help protect and
stabilize your hands without
reducing range of motion.
3. Correctly applied application
shown. Additional support can be
gained with posterior chain (back)
application. Rocktape can be used
to stabilize, ensure proper form and
enable explosive power when lifting.1. Cut 2 strips of tape that will reach from the trapezius
to the wrist. Anchor on top and apply half way. At
elbow, bring hand toward chest and apply remainder
along forearm. No stretch.
1.
2.
Press
3.
2. Repeat application
on opposite shoulder
and arm.
1.
Posterior chain
1. Bend at waist and apply to
back from bottom to top, no
stretch. Apply on back of calfs.
Posterior chain (back) can be
used to stabilize, ensure proper
form and enable explosive
power when lifting.
2. Create
basket by
wrapping tape
around each
side of knee.
Use a gentle
radius. Apply
little to no
stretch to tape.
Knee - box jump
3. Apply piece
across and
below knee
cap. Stretch
tape 50% in
middle, no
stretch in
ends.
1. Place knee
in 90° flexion
angle. Anchor
stabilization
tape at top of
knee.
1. 2. 3.
a. b.
c.
Shoulder taping application is ideal for
pushing/pulling motions - Push Up, Pull
Ups, Push Press, etc.
2. Repeat
step #1 on
the other side
of abdominal
wall.
Core Chain
Core Chain is
ideal for
strained/
fatigued
abdominal/
core muscles
1. Extend
spine to
lengthen the
abdominal
region. Anchor
tape at crease
of hip and
extend with
50% stretch in
middle, and no
stretch on
ends.
1. 2.