SlideShare ist ein Scribd-Unternehmen logo
1 von 26
sopont@gmail.comCreated by Sopon TumchotaDate : April 2015
Installation
Guide
sopont@gmail.comCreated by Sopon TumchotaDate : April 2015
Installation Contents
• Choose Installation Type
• Download pfSense
• Prepare Installation Media
• Connect to Serial Console (NanoBSD, Memstick-serial)
• Performing a Full Install (LiveCD, Memstick)
• Embedded / NanoBSD
• Assign Interfaces on the Console
• pfSense Default Configuration
• Post-Install Tasks
• Installation Troubleshooting
• Additional Information
sopont@gmail.comCreated by Sopon TumchotaDate : April 2015
Choose Installation Type
• 64-bit vs 32-bit
– Does pfSense support 64 bit systems
– Is 32-bit or 64-bit pfSense Preferred
• Full vs Embedded vs LiveCD
– Full Install is performed to an SSD or HDD.
– Embedded is used for CF/SD/USB media.
– A third, much less used type, is running the LiveCD
without installing to disk.
• LiveCD vs Memstick vs Memstick Serial
– LiveCD (ISO image, CD/DVD disc): Easy and familiar to
many.
– Memstick: Like the LiveCD, but run from a USB thumb
drive.
– Serial Memstick: Like the Memstick image, but runs
sopont@gmail.comCreated by Sopon TumchotaDate : April 2015
Choose Installation Type
• NanoBSD vs NanoBSD+VGA
– NanoBSD: Embedded install type using the serial
console by default.
– NanoBSD+VGA: Like NanoBSD, but uses the VGA
console instead.
• Virtual Machines
Virtual Machines, such as VMware/ESX, should be installed
using the ISO image
– Installing_pfSense_in_vmware_under_windows
– pfSense 2 on VMware ESXi 5
sopont@gmail.comCreated by Sopon TumchotaDate : April 2015
Download pfSense
• Visit https://www.pfsense.org/download/mirro
r.php?section=downloads
• Pick the chosen Computer
Architecture, Platform, and Console type
• Download the MD5 checksum and/or SHA256
checksum files to verify the image later
• Pick a mirror and click the link on its row to
download the image from there
• Wait for the download to complete
• Verify Downloaded Files
sopont@gmail.comCreated by Sopon TumchotaDate : April 2015
Prepare Installation Media
The downloaded image must be written to
target media before it can be used. For a Full
Install, this media is used to boot and install and
then will not be needed again, and for LiveCD it
will remain connected to the firewall. For
Embedded, the target media is the disk (CF/SD)
that will contain the Operating System.
• Write the ISO (LiveCD): If the LiveCD .iso file
was downloaded, it must be burned to a disc
as an ISO image. See Writing ISO Images for
assistance.
• Writing Memstick or NanoBSD images: This
sopont@gmail.comCreated by Sopon TumchotaDate : April 2015
Connect to Serial Console
Before attempting to install or boot, if a serial-
based image was used, such as NanoBSD or
Memstick-Serial, connect to the serial console
with a null modem cable and with appropriate
terminal options. See Connecting to the Serial
Console for specifics.
sopont@gmail.comCreated by Sopon TumchotaDate : April 2015
Performing a Full Install (LiveCD,
Memstick)
• Power on the target system and connect the
install media: Place the CD into the drive or
plug the Memstick into a USB port. If the BIOS
is set to boot from CD/USB, pfSense will start.
• For other boot issues, Installation
Troubleshooting.
• As the operating system boots and pfSense
starts, a prompt is presented with some
choices and a countdown timer. At this
prompt, press i to invoke the installer now.
sopont@gmail.comCreated by Sopon TumchotaDate : April 2015
Performing a Full Install (LiveCD,
Memstick)
sopont@gmail.comCreated by Sopon TumchotaDate : April 2015
Memstick)
First, the installer
console can be
changed to use a
different font,
screen map, or key
map. Most people
do not need to
change these, but
it may help with
some international
keyboards.
sopont@gmail.comCreated by Sopon TumchotaDate : April 2015
Memstick)
At the Select
Task prompt,
choose Quick/Easy
Install.
sopont@gmail.comCreated by Sopon TumchotaDate : April 2015
Memstick)
The Quick/Easy Install option
assumes the first located disk
is the intended target, so be
sure there is only one
SSD/HDD is present in the
system.
NOTE: A GEOM mirror
(software RAID) may also be
configured by
choosing Custom Install and
then invoking the option to
create the mirror and select
the disks. Once that has been
completed, then it is possible
to return to the Select
Task screen and proceed with
a Quick/Easy Install Because
the next step is destructive to
whatever is currently on the
sopont@gmail.comCreated by Sopon TumchotaDate : April 2015
Memstick)
The install will
proceed, wiping the
target disk and
installing pfSense.
Copying files may take
some time to finish.
After the files have
been copied to the
target disk, a choice is
presented to select
the console
type. Standard default
s to the VGA
console. Embedded de
faults to serial console.
sopont@gmail.comCreated by Sopon TumchotaDate : April 2015
Memstick)
Now the system
must reboot so
that pfSense may
start from the
target disk.
Select Reboot and
then press Enter.
Be sure to remove
the disc or USB
Memstick so that
the system will not
attempt to boot
from there next
sopont@gmail.comCreated by Sopon TumchotaDate : April 2015
Memstick)
After the system
reboots, pfSense
will be running
from the target
disk. The next step
is to Assign
Interfaces on the
Console below.
sopont@gmail.comCreated by Sopon TumchotaDate : April 2015
Embedded / NanoBSD
• Before attempting to boot, if ALIX hardware is
being used, ensure the device has the latest
BIOS (at least 0.99h) and set CHSmode in the
BIOS. See ALIX BIOS Update Procedure for
details.
• Install the target media into the device, and
ensure the BIOS is configured to boot from
that disk.
• If everything is configured correctly the kernel
will begin to load. For serial console images,
systems with VGA output will stop displaying
with a "/" on the screen or may stop at a "BTX"
sopont@gmail.comCreated by Sopon TumchotaDate : April 2015
Assign Interfaces on the
Console
• The default configuration file on pfSense 2.2
has em0 assigned as WAN, and em1 assigned as
LAN. If the target hardware hasem0 and em1,
then the assignment prompt is skipped and the
install will proceed as usual.
• A list of network interfaces and their MAC
addresses that were located on the system will
appear, along with an indication of their link state
if that is supported by the network card. The link
state is denoted by "(up)" appearing after the
MAC address if a link is detected on that
interface. The MAC (Media Access Control)
address of a network card is a unique identifier
sopont@gmail.comCreated by Sopon TumchotaDate : April 2015
Assign Interfaces on the
Console
• VLANS
The option to assign VLANs is presented first. If
VLANs are not required, or they are not known,
enter No here. VLANs are optional and are only
needed for advanced networking. VLAN-capable
equipment is also required if they are to be
used. See VLAN Trunking for details.
sopont@gmail.comCreated by Sopon TumchotaDate : April 2015
Assign Interfaces on the
Console
• LAN, WAN, OPTx
– The first interface prompt is for the WAN interface. If the interface is
known, enter its name, such as igb0 or em0 and press Enter. If the
identity of the card is not known, see the next section for the Auto
Assign Procedure.
– The second interface prompt is for the LAN interface. Enter the
appropriate interface, such as igb1 or em1, and press Enter again. If
only the WAN interface is to be used, and no LAN,
press Enter without giving any other input.
– Only one interface (WAN) is required to setup pfSense. If more
interfaces are available they may be assigned as LAN and OPTx
interfaces. The procedure is the same for additional interfaces: Enter
the appropriate interface name, then press Enter.
– When there are no more interfaces to add, press Enter. The list of
assigned interfaces is displayed. If the mappings are correct, enter y,
otherwise enter n and repeat the assignment.
– NOTE: If only one NIC is assigned (WAN), This is called Appliance
Mode. In this mode, pfSense will move the GUI anti-lockout rule to
the WAN interface so the firewall may be accessed from there. The
sopont@gmail.comCreated by Sopon TumchotaDate : April 2015
Assign Interfaces on the
Console
• Auto Assign Procedure
For automatic interface assignment, first unplug
all network cables from the system, then
type a and press Enter. Now plug a network
cable into the interface that should connect to
the WAN, and press Enter. If all went well,
pfSense should know now which interface to use
for the WAN. The same process may be
repeated for the LAN, and any optional
interfaces that will be needed. If a message is
displayed such as No link-up detected,
see Installation Troubleshooting for more
sopont@gmail.comCreated by Sopon TumchotaDate : April 2015
pfSense Default Configuration
After installation and interface assignment, pfSense has the following default
configuration:
• WAN is configured as an IPv4 DHCP client
• WAN is configured as an IPv6 DHCP client and will request a prefix
delegation
• LAN is configured with a static IPv4 address of 192.168.1.1/24
• LAN is configured to use a delegated IPv6 address/prefix obtained by WAN
(Track IPv6) if one is available
• All incoming connections to WAN are blocked
• All outgoing connections from LAN are allowed
• NAT is performed on IPv4 traffic leaving WAN from the LAN subnet
• The firewall will act as an IPv4 DHCP Server
• The firewall will act as an IPv6 DHCPv6 Server if a prefix delegation was
obtained on WAN, and also enables SLAAC
• The DNS Resolver is enabled so the firewall can accept and respond to DNS
queries
• SSH is disabled.
• WebGUI is running on port 443 using HTTPS
• Default credentials are set to a username of admin with password pfsense
sopont@gmail.comCreated by Sopon TumchotaDate : April 2015
Post-Install Tasks
After installation
and assignment, a
shell menu is
presented on the
console with a
number of options.
pfSense now is
ready to be
accessed via the
network, either on
the LAN interface
(if one is assigned),
or on the WAN
sopont@gmail.comCreated by Sopon TumchotaDate : April 2015
Post-Install Tasks
• Connect to the GUI
– The WebGUI is used to configure the vast majority
of items in pfSense. It may be accessed by any
modern browser, though Firefox and Chrome are
preferred.
– Connect a client PC to the LAN of the firewall and
ensure it obtained an IP address. If it did not, it
may be plugged into the wrong port.
– Open a web browser and navigate
to https://192.168.1.1/, using the default
username admin and password pfsense to login.
– The first visit to the WebGUI will be redirected to
the setup wizard, which is also accessible at System
sopont@gmail.comCreated by Sopon TumchotaDate : April 2015
Installation Troubleshooting
If the installation did not proceed as planned,
see Installation Troubleshooting for help.
pfSense Software Support
sopont@gmail.comCreated by Sopon TumchotaDate : April 2015
Additional Information
For additional information on Installing pfSense,
see the page Category:Installation. Sign up for
a Gold Subscription, which gives access to the
official pfSense book and monthly hangouts
that cover a variety of topics as well as our Auto
Config Backup service, a secure place to store
and retrieve off-site backups.
Get pfSense Book
sopont@gmail.comCreated by Sopon TumchotaDate : April 2015
Good Luck
https://doc.pfsense.oReference from :
Version 2.x

Weitere ähnliche Inhalte

Was ist angesagt?

Advanced OpenVPN Concepts on pfSense 2.4 & 2.3.3 - pfSense Hangout February 2017
Advanced OpenVPN Concepts on pfSense 2.4 & 2.3.3 - pfSense Hangout February 2017Advanced OpenVPN Concepts on pfSense 2.4 & 2.3.3 - pfSense Hangout February 2017
Advanced OpenVPN Concepts on pfSense 2.4 & 2.3.3 - pfSense Hangout February 2017Netgate
 
What's Coming In CloudStack 4.18
What's Coming In CloudStack 4.18What's Coming In CloudStack 4.18
What's Coming In CloudStack 4.18ShapeBlue
 
High Availability on pfSense 2.4 - pfSense Hangout March 2017
High Availability on pfSense 2.4 - pfSense Hangout March 2017High Availability on pfSense 2.4 - pfSense Hangout March 2017
High Availability on pfSense 2.4 - pfSense Hangout March 2017Netgate
 
Hacking Lab con ProxMox e Metasploitable
Hacking Lab con ProxMox e MetasploitableHacking Lab con ProxMox e Metasploitable
Hacking Lab con ProxMox e MetasploitableAndrea Draghetti
 
Squid, SquidGuard, and Lightsquid on pfSense 2.3 & 2.4 - pfSense Hangout Janu...
Squid, SquidGuard, and Lightsquid on pfSense 2.3 & 2.4 - pfSense Hangout Janu...Squid, SquidGuard, and Lightsquid on pfSense 2.3 & 2.4 - pfSense Hangout Janu...
Squid, SquidGuard, and Lightsquid on pfSense 2.3 & 2.4 - pfSense Hangout Janu...Netgate
 
Tutorial: Using GoBGP as an IXP connecting router
Tutorial: Using GoBGP as an IXP connecting routerTutorial: Using GoBGP as an IXP connecting router
Tutorial: Using GoBGP as an IXP connecting routerShu Sugimoto
 
Linux Networking Explained
Linux Networking ExplainedLinux Networking Explained
Linux Networking ExplainedThomas Graf
 
Practical CephFS with nfs today using OpenStack Manila - Ceph Day Berlin - 12...
Practical CephFS with nfs today using OpenStack Manila - Ceph Day Berlin - 12...Practical CephFS with nfs today using OpenStack Manila - Ceph Day Berlin - 12...
Practical CephFS with nfs today using OpenStack Manila - Ceph Day Berlin - 12...TomBarron
 
Understanding Cisco Next Generation SD-WAN Solution
Understanding Cisco Next Generation SD-WAN SolutionUnderstanding Cisco Next Generation SD-WAN Solution
Understanding Cisco Next Generation SD-WAN SolutionCisco Canada
 
Cisco asa firewall command line technical guide
Cisco asa firewall command line technical guideCisco asa firewall command line technical guide
Cisco asa firewall command line technical guideMDEMARCOCCIE
 
Local DNS with pfSense 2.4 - pfSense Hangout April 2018
Local DNS with pfSense 2.4 - pfSense Hangout April 2018Local DNS with pfSense 2.4 - pfSense Hangout April 2018
Local DNS with pfSense 2.4 - pfSense Hangout April 2018Netgate
 
IPv6 Basics - pfSense Hangout July 2015
IPv6 Basics - pfSense Hangout July 2015IPv6 Basics - pfSense Hangout July 2015
IPv6 Basics - pfSense Hangout July 2015Netgate
 
Introduction to Kubernetes
Introduction to KubernetesIntroduction to Kubernetes
Introduction to Kubernetesrajdeep
 
Dynamic ARP Inspection (DAI)
Dynamic ARP Inspection (DAI)Dynamic ARP Inspection (DAI)
Dynamic ARP Inspection (DAI)NetProtocol Xpert
 
Monitoring pfSense 2.4 with SNMP - pfSense Hangout March 2018
Monitoring pfSense 2.4 with SNMP - pfSense Hangout March 2018Monitoring pfSense 2.4 with SNMP - pfSense Hangout March 2018
Monitoring pfSense 2.4 with SNMP - pfSense Hangout March 2018Netgate
 

Was ist angesagt? (20)

Advanced OpenVPN Concepts on pfSense 2.4 & 2.3.3 - pfSense Hangout February 2017
Advanced OpenVPN Concepts on pfSense 2.4 & 2.3.3 - pfSense Hangout February 2017Advanced OpenVPN Concepts on pfSense 2.4 & 2.3.3 - pfSense Hangout February 2017
Advanced OpenVPN Concepts on pfSense 2.4 & 2.3.3 - pfSense Hangout February 2017
 
What's Coming In CloudStack 4.18
What's Coming In CloudStack 4.18What's Coming In CloudStack 4.18
What's Coming In CloudStack 4.18
 
High Availability on pfSense 2.4 - pfSense Hangout March 2017
High Availability on pfSense 2.4 - pfSense Hangout March 2017High Availability on pfSense 2.4 - pfSense Hangout March 2017
High Availability on pfSense 2.4 - pfSense Hangout March 2017
 
Hacking Lab con ProxMox e Metasploitable
Hacking Lab con ProxMox e MetasploitableHacking Lab con ProxMox e Metasploitable
Hacking Lab con ProxMox e Metasploitable
 
Squid, SquidGuard, and Lightsquid on pfSense 2.3 & 2.4 - pfSense Hangout Janu...
Squid, SquidGuard, and Lightsquid on pfSense 2.3 & 2.4 - pfSense Hangout Janu...Squid, SquidGuard, and Lightsquid on pfSense 2.3 & 2.4 - pfSense Hangout Janu...
Squid, SquidGuard, and Lightsquid on pfSense 2.3 & 2.4 - pfSense Hangout Janu...
 
Tutorial: Using GoBGP as an IXP connecting router
Tutorial: Using GoBGP as an IXP connecting routerTutorial: Using GoBGP as an IXP connecting router
Tutorial: Using GoBGP as an IXP connecting router
 
Linux Networking Explained
Linux Networking ExplainedLinux Networking Explained
Linux Networking Explained
 
Practical CephFS with nfs today using OpenStack Manila - Ceph Day Berlin - 12...
Practical CephFS with nfs today using OpenStack Manila - Ceph Day Berlin - 12...Practical CephFS with nfs today using OpenStack Manila - Ceph Day Berlin - 12...
Practical CephFS with nfs today using OpenStack Manila - Ceph Day Berlin - 12...
 
Advanced Topics in IP Multicast Deployment
Advanced Topics in IP Multicast DeploymentAdvanced Topics in IP Multicast Deployment
Advanced Topics in IP Multicast Deployment
 
Understanding Cisco Next Generation SD-WAN Solution
Understanding Cisco Next Generation SD-WAN SolutionUnderstanding Cisco Next Generation SD-WAN Solution
Understanding Cisco Next Generation SD-WAN Solution
 
Deploying IPv6 on OpenStack
Deploying IPv6 on OpenStackDeploying IPv6 on OpenStack
Deploying IPv6 on OpenStack
 
Cisco asa firewall command line technical guide
Cisco asa firewall command line technical guideCisco asa firewall command line technical guide
Cisco asa firewall command line technical guide
 
Qemu
QemuQemu
Qemu
 
Local DNS with pfSense 2.4 - pfSense Hangout April 2018
Local DNS with pfSense 2.4 - pfSense Hangout April 2018Local DNS with pfSense 2.4 - pfSense Hangout April 2018
Local DNS with pfSense 2.4 - pfSense Hangout April 2018
 
IPv6 Basics - pfSense Hangout July 2015
IPv6 Basics - pfSense Hangout July 2015IPv6 Basics - pfSense Hangout July 2015
IPv6 Basics - pfSense Hangout July 2015
 
Linux Network Stack
Linux Network StackLinux Network Stack
Linux Network Stack
 
Introduction to Kubernetes
Introduction to KubernetesIntroduction to Kubernetes
Introduction to Kubernetes
 
Dynamic ARP Inspection (DAI)
Dynamic ARP Inspection (DAI)Dynamic ARP Inspection (DAI)
Dynamic ARP Inspection (DAI)
 
9 ipv6-routing
9 ipv6-routing9 ipv6-routing
9 ipv6-routing
 
Monitoring pfSense 2.4 with SNMP - pfSense Hangout March 2018
Monitoring pfSense 2.4 with SNMP - pfSense Hangout March 2018Monitoring pfSense 2.4 with SNMP - pfSense Hangout March 2018
Monitoring pfSense 2.4 with SNMP - pfSense Hangout March 2018
 

Ähnlich wie pfSense Installation Slide

Installing mandriva linux mandriva community wiki
Installing mandriva linux   mandriva community wikiInstalling mandriva linux   mandriva community wiki
Installing mandriva linux mandriva community wikiAdolfo Nasol
 
install CentOS 6.3 minimal on Hyper-V
install CentOS 6.3 minimal on Hyper-Vinstall CentOS 6.3 minimal on Hyper-V
install CentOS 6.3 minimal on Hyper-VTũi Wichets
 
Linux red hat overview and installation
Linux red hat overview and installationLinux red hat overview and installation
Linux red hat overview and installationdevenderbhati
 
Installing NetWare 5 Servers
Installing NetWare 5 ServersInstalling NetWare 5 Servers
Installing NetWare 5 Serversshammi mehra
 
FOSS_GNU/Linux
FOSS_GNU/LinuxFOSS_GNU/Linux
FOSS_GNU/LinuxYogesh Ks
 
DBS Commissioning Guide
DBS Commissioning GuideDBS Commissioning Guide
DBS Commissioning GuideHmidaNasri
 
3 05-2018-install slackwarelinux
3 05-2018-install slackwarelinux3 05-2018-install slackwarelinux
3 05-2018-install slackwarelinuxAlexander Bitar
 
Linux conf-admin
Linux conf-adminLinux conf-admin
Linux conf-adminbadamisri
 
Linux conf-admin
Linux conf-adminLinux conf-admin
Linux conf-adminbadamisri
 
Centralized Fog Server with OpenLDAP
Centralized Fog Server with OpenLDAP Centralized Fog Server with OpenLDAP
Centralized Fog Server with OpenLDAP tare
 

Ähnlich wie pfSense Installation Slide (20)

Koha Installation Manual in Ubuntu 14.04 Alongwith Windows
Koha Installation Manual in Ubuntu 14.04 Alongwith WindowsKoha Installation Manual in Ubuntu 14.04 Alongwith Windows
Koha Installation Manual in Ubuntu 14.04 Alongwith Windows
 
Installing mandriva linux mandriva community wiki
Installing mandriva linux   mandriva community wikiInstalling mandriva linux   mandriva community wiki
Installing mandriva linux mandriva community wiki
 
Dspace Installation Manual in Ubuntu 14.04 Alongwith Windows
Dspace Installation Manual in Ubuntu 14.04 Alongwith WindowsDspace Installation Manual in Ubuntu 14.04 Alongwith Windows
Dspace Installation Manual in Ubuntu 14.04 Alongwith Windows
 
Guide koha
Guide kohaGuide koha
Guide koha
 
snortinstallguide
snortinstallguidesnortinstallguide
snortinstallguide
 
install CentOS 6.3 minimal on Hyper-V
install CentOS 6.3 minimal on Hyper-Vinstall CentOS 6.3 minimal on Hyper-V
install CentOS 6.3 minimal on Hyper-V
 
Linux red hat overview and installation
Linux red hat overview and installationLinux red hat overview and installation
Linux red hat overview and installation
 
Installing NetWare 5 Servers
Installing NetWare 5 ServersInstalling NetWare 5 Servers
Installing NetWare 5 Servers
 
FOSS_GNU/Linux
FOSS_GNU/LinuxFOSS_GNU/Linux
FOSS_GNU/Linux
 
DBS Commissioning Guide
DBS Commissioning GuideDBS Commissioning Guide
DBS Commissioning Guide
 
Bsd routers
Bsd routersBsd routers
Bsd routers
 
Ubuntu server guide
Ubuntu server guideUbuntu server guide
Ubuntu server guide
 
3 05-2018-install slackwarelinux
3 05-2018-install slackwarelinux3 05-2018-install slackwarelinux
3 05-2018-install slackwarelinux
 
Pfsense%20%20note
Pfsense%20%20notePfsense%20%20note
Pfsense%20%20note
 
Linux conf-admin
Linux conf-adminLinux conf-admin
Linux conf-admin
 
Linux conf-admin
Linux conf-adminLinux conf-admin
Linux conf-admin
 
Linux Conf Admin
Linux Conf AdminLinux Conf Admin
Linux Conf Admin
 
Linux
LinuxLinux
Linux
 
Centralized Fog Server with OpenLDAP
Centralized Fog Server with OpenLDAP Centralized Fog Server with OpenLDAP
Centralized Fog Server with OpenLDAP
 
Linux
LinuxLinux
Linux
 

Mehr von Sopon Tumchota

pfSense OpenVPN Configuration
pfSense OpenVPN ConfigurationpfSense OpenVPN Configuration
pfSense OpenVPN ConfigurationSopon Tumchota
 
Telecommunications and networks
Telecommunications and networksTelecommunications and networks
Telecommunications and networksSopon Tumchota
 
Utc webinar nerc-cip-2015-09-30
Utc webinar nerc-cip-2015-09-30Utc webinar nerc-cip-2015-09-30
Utc webinar nerc-cip-2015-09-30Sopon Tumchota
 
Samsung cctv presentation
Samsung cctv presentationSamsung cctv presentation
Samsung cctv presentationSopon Tumchota
 
Wireless technology training
Wireless technology trainingWireless technology training
Wireless technology trainingSopon Tumchota
 
Network training present
Network training presentNetwork training present
Network training presentSopon Tumchota
 

Mehr von Sopon Tumchota (8)

pfSense OpenVPN Configuration
pfSense OpenVPN ConfigurationpfSense OpenVPN Configuration
pfSense OpenVPN Configuration
 
Telecommunications
TelecommunicationsTelecommunications
Telecommunications
 
Telecommunications and networks
Telecommunications and networksTelecommunications and networks
Telecommunications and networks
 
Dcn introduction
Dcn introductionDcn introduction
Dcn introduction
 
Utc webinar nerc-cip-2015-09-30
Utc webinar nerc-cip-2015-09-30Utc webinar nerc-cip-2015-09-30
Utc webinar nerc-cip-2015-09-30
 
Samsung cctv presentation
Samsung cctv presentationSamsung cctv presentation
Samsung cctv presentation
 
Wireless technology training
Wireless technology trainingWireless technology training
Wireless technology training
 
Network training present
Network training presentNetwork training present
Network training present
 

Kürzlich hochgeladen

Application orientated numerical on hev.ppt
Application orientated numerical on hev.pptApplication orientated numerical on hev.ppt
Application orientated numerical on hev.pptRamjanShidvankar
 
SOC 101 Demonstration of Learning Presentation
SOC 101 Demonstration of Learning PresentationSOC 101 Demonstration of Learning Presentation
SOC 101 Demonstration of Learning Presentationcamerronhm
 
Unit 3 Emotional Intelligence and Spiritual Intelligence.pdf
Unit 3 Emotional Intelligence and Spiritual Intelligence.pdfUnit 3 Emotional Intelligence and Spiritual Intelligence.pdf
Unit 3 Emotional Intelligence and Spiritual Intelligence.pdfDr Vijay Vishwakarma
 
Single or Multiple melodic lines structure
Single or Multiple melodic lines structureSingle or Multiple melodic lines structure
Single or Multiple melodic lines structuredhanjurrannsibayan2
 
Making communications land - Are they received and understood as intended? we...
Making communications land - Are they received and understood as intended? we...Making communications land - Are they received and understood as intended? we...
Making communications land - Are they received and understood as intended? we...Association for Project Management
 
Google Gemini An AI Revolution in Education.pptx
Google Gemini An AI Revolution in Education.pptxGoogle Gemini An AI Revolution in Education.pptx
Google Gemini An AI Revolution in Education.pptxDr. Sarita Anand
 
General Principles of Intellectual Property: Concepts of Intellectual Proper...
General Principles of Intellectual Property: Concepts of Intellectual  Proper...General Principles of Intellectual Property: Concepts of Intellectual  Proper...
General Principles of Intellectual Property: Concepts of Intellectual Proper...Poonam Aher Patil
 
The basics of sentences session 3pptx.pptx
The basics of sentences session 3pptx.pptxThe basics of sentences session 3pptx.pptx
The basics of sentences session 3pptx.pptxheathfieldcps1
 
HMCS Max Bernays Pre-Deployment Brief (May 2024).pptx
HMCS Max Bernays Pre-Deployment Brief (May 2024).pptxHMCS Max Bernays Pre-Deployment Brief (May 2024).pptx
HMCS Max Bernays Pre-Deployment Brief (May 2024).pptxEsquimalt MFRC
 
Accessible Digital Futures project (20/03/2024)
Accessible Digital Futures project (20/03/2024)Accessible Digital Futures project (20/03/2024)
Accessible Digital Futures project (20/03/2024)Jisc
 
How to Manage Global Discount in Odoo 17 POS
How to Manage Global Discount in Odoo 17 POSHow to Manage Global Discount in Odoo 17 POS
How to Manage Global Discount in Odoo 17 POSCeline George
 
Basic Civil Engineering first year Notes- Chapter 4 Building.pptx
Basic Civil Engineering first year Notes- Chapter 4 Building.pptxBasic Civil Engineering first year Notes- Chapter 4 Building.pptx
Basic Civil Engineering first year Notes- Chapter 4 Building.pptxDenish Jangid
 
Graduate Outcomes Presentation Slides - English
Graduate Outcomes Presentation Slides - EnglishGraduate Outcomes Presentation Slides - English
Graduate Outcomes Presentation Slides - Englishneillewis46
 
FSB Advising Checklist - Orientation 2024
FSB Advising Checklist - Orientation 2024FSB Advising Checklist - Orientation 2024
FSB Advising Checklist - Orientation 2024Elizabeth Walsh
 
Unit-V; Pricing (Pharma Marketing Management).pptx
Unit-V; Pricing (Pharma Marketing Management).pptxUnit-V; Pricing (Pharma Marketing Management).pptx
Unit-V; Pricing (Pharma Marketing Management).pptxVishalSingh1417
 
Holdier Curriculum Vitae (April 2024).pdf
Holdier Curriculum Vitae (April 2024).pdfHoldier Curriculum Vitae (April 2024).pdf
Holdier Curriculum Vitae (April 2024).pdfagholdier
 
UGC NET Paper 1 Mathematical Reasoning & Aptitude.pdf
UGC NET Paper 1 Mathematical Reasoning & Aptitude.pdfUGC NET Paper 1 Mathematical Reasoning & Aptitude.pdf
UGC NET Paper 1 Mathematical Reasoning & Aptitude.pdfNirmal Dwivedi
 
Interdisciplinary_Insights_Data_Collection_Methods.pptx
Interdisciplinary_Insights_Data_Collection_Methods.pptxInterdisciplinary_Insights_Data_Collection_Methods.pptx
Interdisciplinary_Insights_Data_Collection_Methods.pptxPooja Bhuva
 
Jamworks pilot and AI at Jisc (20/03/2024)
Jamworks pilot and AI at Jisc (20/03/2024)Jamworks pilot and AI at Jisc (20/03/2024)
Jamworks pilot and AI at Jisc (20/03/2024)Jisc
 

Kürzlich hochgeladen (20)

Application orientated numerical on hev.ppt
Application orientated numerical on hev.pptApplication orientated numerical on hev.ppt
Application orientated numerical on hev.ppt
 
SOC 101 Demonstration of Learning Presentation
SOC 101 Demonstration of Learning PresentationSOC 101 Demonstration of Learning Presentation
SOC 101 Demonstration of Learning Presentation
 
Unit 3 Emotional Intelligence and Spiritual Intelligence.pdf
Unit 3 Emotional Intelligence and Spiritual Intelligence.pdfUnit 3 Emotional Intelligence and Spiritual Intelligence.pdf
Unit 3 Emotional Intelligence and Spiritual Intelligence.pdf
 
Single or Multiple melodic lines structure
Single or Multiple melodic lines structureSingle or Multiple melodic lines structure
Single or Multiple melodic lines structure
 
Mehran University Newsletter Vol-X, Issue-I, 2024
Mehran University Newsletter Vol-X, Issue-I, 2024Mehran University Newsletter Vol-X, Issue-I, 2024
Mehran University Newsletter Vol-X, Issue-I, 2024
 
Making communications land - Are they received and understood as intended? we...
Making communications land - Are they received and understood as intended? we...Making communications land - Are they received and understood as intended? we...
Making communications land - Are they received and understood as intended? we...
 
Google Gemini An AI Revolution in Education.pptx
Google Gemini An AI Revolution in Education.pptxGoogle Gemini An AI Revolution in Education.pptx
Google Gemini An AI Revolution in Education.pptx
 
General Principles of Intellectual Property: Concepts of Intellectual Proper...
General Principles of Intellectual Property: Concepts of Intellectual  Proper...General Principles of Intellectual Property: Concepts of Intellectual  Proper...
General Principles of Intellectual Property: Concepts of Intellectual Proper...
 
The basics of sentences session 3pptx.pptx
The basics of sentences session 3pptx.pptxThe basics of sentences session 3pptx.pptx
The basics of sentences session 3pptx.pptx
 
HMCS Max Bernays Pre-Deployment Brief (May 2024).pptx
HMCS Max Bernays Pre-Deployment Brief (May 2024).pptxHMCS Max Bernays Pre-Deployment Brief (May 2024).pptx
HMCS Max Bernays Pre-Deployment Brief (May 2024).pptx
 
Accessible Digital Futures project (20/03/2024)
Accessible Digital Futures project (20/03/2024)Accessible Digital Futures project (20/03/2024)
Accessible Digital Futures project (20/03/2024)
 
How to Manage Global Discount in Odoo 17 POS
How to Manage Global Discount in Odoo 17 POSHow to Manage Global Discount in Odoo 17 POS
How to Manage Global Discount in Odoo 17 POS
 
Basic Civil Engineering first year Notes- Chapter 4 Building.pptx
Basic Civil Engineering first year Notes- Chapter 4 Building.pptxBasic Civil Engineering first year Notes- Chapter 4 Building.pptx
Basic Civil Engineering first year Notes- Chapter 4 Building.pptx
 
Graduate Outcomes Presentation Slides - English
Graduate Outcomes Presentation Slides - EnglishGraduate Outcomes Presentation Slides - English
Graduate Outcomes Presentation Slides - English
 
FSB Advising Checklist - Orientation 2024
FSB Advising Checklist - Orientation 2024FSB Advising Checklist - Orientation 2024
FSB Advising Checklist - Orientation 2024
 
Unit-V; Pricing (Pharma Marketing Management).pptx
Unit-V; Pricing (Pharma Marketing Management).pptxUnit-V; Pricing (Pharma Marketing Management).pptx
Unit-V; Pricing (Pharma Marketing Management).pptx
 
Holdier Curriculum Vitae (April 2024).pdf
Holdier Curriculum Vitae (April 2024).pdfHoldier Curriculum Vitae (April 2024).pdf
Holdier Curriculum Vitae (April 2024).pdf
 
UGC NET Paper 1 Mathematical Reasoning & Aptitude.pdf
UGC NET Paper 1 Mathematical Reasoning & Aptitude.pdfUGC NET Paper 1 Mathematical Reasoning & Aptitude.pdf
UGC NET Paper 1 Mathematical Reasoning & Aptitude.pdf
 
Interdisciplinary_Insights_Data_Collection_Methods.pptx
Interdisciplinary_Insights_Data_Collection_Methods.pptxInterdisciplinary_Insights_Data_Collection_Methods.pptx
Interdisciplinary_Insights_Data_Collection_Methods.pptx
 
Jamworks pilot and AI at Jisc (20/03/2024)
Jamworks pilot and AI at Jisc (20/03/2024)Jamworks pilot and AI at Jisc (20/03/2024)
Jamworks pilot and AI at Jisc (20/03/2024)
 

pfSense Installation Slide

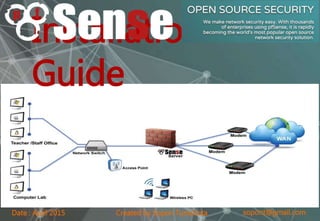
  • 1. sopont@gmail.comCreated by Sopon TumchotaDate : April 2015 Installation Guide
  • 2. sopont@gmail.comCreated by Sopon TumchotaDate : April 2015 Installation Contents • Choose Installation Type • Download pfSense • Prepare Installation Media • Connect to Serial Console (NanoBSD, Memstick-serial) • Performing a Full Install (LiveCD, Memstick) • Embedded / NanoBSD • Assign Interfaces on the Console • pfSense Default Configuration • Post-Install Tasks • Installation Troubleshooting • Additional Information
  • 3. sopont@gmail.comCreated by Sopon TumchotaDate : April 2015 Choose Installation Type • 64-bit vs 32-bit – Does pfSense support 64 bit systems – Is 32-bit or 64-bit pfSense Preferred • Full vs Embedded vs LiveCD – Full Install is performed to an SSD or HDD. – Embedded is used for CF/SD/USB media. – A third, much less used type, is running the LiveCD without installing to disk. • LiveCD vs Memstick vs Memstick Serial – LiveCD (ISO image, CD/DVD disc): Easy and familiar to many. – Memstick: Like the LiveCD, but run from a USB thumb drive. – Serial Memstick: Like the Memstick image, but runs
  • 4. sopont@gmail.comCreated by Sopon TumchotaDate : April 2015 Choose Installation Type • NanoBSD vs NanoBSD+VGA – NanoBSD: Embedded install type using the serial console by default. – NanoBSD+VGA: Like NanoBSD, but uses the VGA console instead. • Virtual Machines Virtual Machines, such as VMware/ESX, should be installed using the ISO image – Installing_pfSense_in_vmware_under_windows – pfSense 2 on VMware ESXi 5
  • 5. sopont@gmail.comCreated by Sopon TumchotaDate : April 2015 Download pfSense • Visit https://www.pfsense.org/download/mirro r.php?section=downloads • Pick the chosen Computer Architecture, Platform, and Console type • Download the MD5 checksum and/or SHA256 checksum files to verify the image later • Pick a mirror and click the link on its row to download the image from there • Wait for the download to complete • Verify Downloaded Files
  • 6. sopont@gmail.comCreated by Sopon TumchotaDate : April 2015 Prepare Installation Media The downloaded image must be written to target media before it can be used. For a Full Install, this media is used to boot and install and then will not be needed again, and for LiveCD it will remain connected to the firewall. For Embedded, the target media is the disk (CF/SD) that will contain the Operating System. • Write the ISO (LiveCD): If the LiveCD .iso file was downloaded, it must be burned to a disc as an ISO image. See Writing ISO Images for assistance. • Writing Memstick or NanoBSD images: This
  • 7. sopont@gmail.comCreated by Sopon TumchotaDate : April 2015 Connect to Serial Console Before attempting to install or boot, if a serial- based image was used, such as NanoBSD or Memstick-Serial, connect to the serial console with a null modem cable and with appropriate terminal options. See Connecting to the Serial Console for specifics.
  • 8. sopont@gmail.comCreated by Sopon TumchotaDate : April 2015 Performing a Full Install (LiveCD, Memstick) • Power on the target system and connect the install media: Place the CD into the drive or plug the Memstick into a USB port. If the BIOS is set to boot from CD/USB, pfSense will start. • For other boot issues, Installation Troubleshooting. • As the operating system boots and pfSense starts, a prompt is presented with some choices and a countdown timer. At this prompt, press i to invoke the installer now.
  • 9. sopont@gmail.comCreated by Sopon TumchotaDate : April 2015 Performing a Full Install (LiveCD, Memstick)
  • 10. sopont@gmail.comCreated by Sopon TumchotaDate : April 2015 Memstick) First, the installer console can be changed to use a different font, screen map, or key map. Most people do not need to change these, but it may help with some international keyboards.
  • 11. sopont@gmail.comCreated by Sopon TumchotaDate : April 2015 Memstick) At the Select Task prompt, choose Quick/Easy Install.
  • 12. sopont@gmail.comCreated by Sopon TumchotaDate : April 2015 Memstick) The Quick/Easy Install option assumes the first located disk is the intended target, so be sure there is only one SSD/HDD is present in the system. NOTE: A GEOM mirror (software RAID) may also be configured by choosing Custom Install and then invoking the option to create the mirror and select the disks. Once that has been completed, then it is possible to return to the Select Task screen and proceed with a Quick/Easy Install Because the next step is destructive to whatever is currently on the
  • 13. sopont@gmail.comCreated by Sopon TumchotaDate : April 2015 Memstick) The install will proceed, wiping the target disk and installing pfSense. Copying files may take some time to finish. After the files have been copied to the target disk, a choice is presented to select the console type. Standard default s to the VGA console. Embedded de faults to serial console.
  • 14. sopont@gmail.comCreated by Sopon TumchotaDate : April 2015 Memstick) Now the system must reboot so that pfSense may start from the target disk. Select Reboot and then press Enter. Be sure to remove the disc or USB Memstick so that the system will not attempt to boot from there next
  • 15. sopont@gmail.comCreated by Sopon TumchotaDate : April 2015 Memstick) After the system reboots, pfSense will be running from the target disk. The next step is to Assign Interfaces on the Console below.
  • 16. sopont@gmail.comCreated by Sopon TumchotaDate : April 2015 Embedded / NanoBSD • Before attempting to boot, if ALIX hardware is being used, ensure the device has the latest BIOS (at least 0.99h) and set CHSmode in the BIOS. See ALIX BIOS Update Procedure for details. • Install the target media into the device, and ensure the BIOS is configured to boot from that disk. • If everything is configured correctly the kernel will begin to load. For serial console images, systems with VGA output will stop displaying with a "/" on the screen or may stop at a "BTX"
  • 17. sopont@gmail.comCreated by Sopon TumchotaDate : April 2015 Assign Interfaces on the Console • The default configuration file on pfSense 2.2 has em0 assigned as WAN, and em1 assigned as LAN. If the target hardware hasem0 and em1, then the assignment prompt is skipped and the install will proceed as usual. • A list of network interfaces and their MAC addresses that were located on the system will appear, along with an indication of their link state if that is supported by the network card. The link state is denoted by "(up)" appearing after the MAC address if a link is detected on that interface. The MAC (Media Access Control) address of a network card is a unique identifier
  • 18. sopont@gmail.comCreated by Sopon TumchotaDate : April 2015 Assign Interfaces on the Console • VLANS The option to assign VLANs is presented first. If VLANs are not required, or they are not known, enter No here. VLANs are optional and are only needed for advanced networking. VLAN-capable equipment is also required if they are to be used. See VLAN Trunking for details.
  • 19. sopont@gmail.comCreated by Sopon TumchotaDate : April 2015 Assign Interfaces on the Console • LAN, WAN, OPTx – The first interface prompt is for the WAN interface. If the interface is known, enter its name, such as igb0 or em0 and press Enter. If the identity of the card is not known, see the next section for the Auto Assign Procedure. – The second interface prompt is for the LAN interface. Enter the appropriate interface, such as igb1 or em1, and press Enter again. If only the WAN interface is to be used, and no LAN, press Enter without giving any other input. – Only one interface (WAN) is required to setup pfSense. If more interfaces are available they may be assigned as LAN and OPTx interfaces. The procedure is the same for additional interfaces: Enter the appropriate interface name, then press Enter. – When there are no more interfaces to add, press Enter. The list of assigned interfaces is displayed. If the mappings are correct, enter y, otherwise enter n and repeat the assignment. – NOTE: If only one NIC is assigned (WAN), This is called Appliance Mode. In this mode, pfSense will move the GUI anti-lockout rule to the WAN interface so the firewall may be accessed from there. The
  • 20. sopont@gmail.comCreated by Sopon TumchotaDate : April 2015 Assign Interfaces on the Console • Auto Assign Procedure For automatic interface assignment, first unplug all network cables from the system, then type a and press Enter. Now plug a network cable into the interface that should connect to the WAN, and press Enter. If all went well, pfSense should know now which interface to use for the WAN. The same process may be repeated for the LAN, and any optional interfaces that will be needed. If a message is displayed such as No link-up detected, see Installation Troubleshooting for more
  • 21. sopont@gmail.comCreated by Sopon TumchotaDate : April 2015 pfSense Default Configuration After installation and interface assignment, pfSense has the following default configuration: • WAN is configured as an IPv4 DHCP client • WAN is configured as an IPv6 DHCP client and will request a prefix delegation • LAN is configured with a static IPv4 address of 192.168.1.1/24 • LAN is configured to use a delegated IPv6 address/prefix obtained by WAN (Track IPv6) if one is available • All incoming connections to WAN are blocked • All outgoing connections from LAN are allowed • NAT is performed on IPv4 traffic leaving WAN from the LAN subnet • The firewall will act as an IPv4 DHCP Server • The firewall will act as an IPv6 DHCPv6 Server if a prefix delegation was obtained on WAN, and also enables SLAAC • The DNS Resolver is enabled so the firewall can accept and respond to DNS queries • SSH is disabled. • WebGUI is running on port 443 using HTTPS • Default credentials are set to a username of admin with password pfsense
  • 22. sopont@gmail.comCreated by Sopon TumchotaDate : April 2015 Post-Install Tasks After installation and assignment, a shell menu is presented on the console with a number of options. pfSense now is ready to be accessed via the network, either on the LAN interface (if one is assigned), or on the WAN
  • 23. sopont@gmail.comCreated by Sopon TumchotaDate : April 2015 Post-Install Tasks • Connect to the GUI – The WebGUI is used to configure the vast majority of items in pfSense. It may be accessed by any modern browser, though Firefox and Chrome are preferred. – Connect a client PC to the LAN of the firewall and ensure it obtained an IP address. If it did not, it may be plugged into the wrong port. – Open a web browser and navigate to https://192.168.1.1/, using the default username admin and password pfsense to login. – The first visit to the WebGUI will be redirected to the setup wizard, which is also accessible at System
  • 24. sopont@gmail.comCreated by Sopon TumchotaDate : April 2015 Installation Troubleshooting If the installation did not proceed as planned, see Installation Troubleshooting for help. pfSense Software Support
  • 25. sopont@gmail.comCreated by Sopon TumchotaDate : April 2015 Additional Information For additional information on Installing pfSense, see the page Category:Installation. Sign up for a Gold Subscription, which gives access to the official pfSense book and monthly hangouts that cover a variety of topics as well as our Auto Config Backup service, a secure place to store and retrieve off-site backups. Get pfSense Book
  • 26. sopont@gmail.comCreated by Sopon TumchotaDate : April 2015 Good Luck https://doc.pfsense.oReference from : Version 2.x