Facebook Timeline Checklist for Business
•
7 gefällt mir•1,679 views

This checklist will help you optimize your new Facebook Timeline page for your small business.

Empfohlen
Weitere ähnliche Inhalte
Was ist angesagt?
Was ist angesagt? (15)
Ähnlich wie Facebook Timeline Checklist for Business
Ähnlich wie Facebook Timeline Checklist for Business (20)
Mehr von ReachLocal
Mehr von ReachLocal (9)
Kürzlich hochgeladen
Kürzlich hochgeladen (20)
Facebook Timeline Checklist for Business
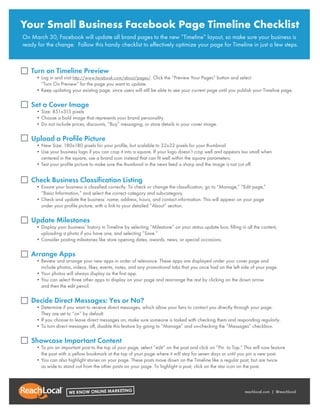
- 1. Your Small Business Facebook Page Timeline Checklist On March 30, Facebook will update all brand pages to the new “Timeline” layout, so make sure your business is ready for the change. Follow this handy checklist to effectively optimize your page for Timeline in just a few steps. Turn on Timeline Preview • Log in and visit http://www.facebook.com/about/pages/. Click the “Preview Your Pages” button and select • “Turn On Preview” for the page you want to update. • Keep updating your existing page, since users will still be able to see your current page until you publish your Timeline page. Set a Cover Image • Size: 851x315 pixels • Choose a bold image that represents your brand personality. • Do not include prices, discounts, “Buy” messaging, or store details in your cover image. Upload a Profile Picture • New Size: 180x180 pixels for your profile, but scalable to 32x32 pixels for your thumbnail • Use your business logo if you can crop it into a square. If your logo doesn’t crop well and appears too small when • centered in the square, use a brand icon instead that can fit well within the square parameters. • Test your profile picture to make sure the thumbnail in the news feed is sharp and the image is not cut off. Check Business Classification Listing • Ensure your business is classified correctly. To check or change the classification, go to “Manage,” “Edit page,” • “Basic Information,” and select the correct category and sub-category. • Check and update the business’ name, address, hours, and contact information. This will appear on your page • under your profile picture, with a link to your detailed “About” section. Update Milestones • Display your business’ history in Timeline by selecting “Milestone” on your status update box, filling in all the content, • • • uploading a photo if you have one, and selecting “Save.” • Consider posting milestones like store opening dates, awards, news, or special occasions. Arrange Apps • Review and arrange your new apps in order of relevance. These apps are displayed under your cover page and • include photos, videos, likes, events, notes, and any promotional tabs that you once had on the left side of your page. • Your photos will always display as the first app. • You can select three other apps to display on your page and rearrange the rest by clicking on the down arrow • and then the edit pencil. Decide Direct Messages: Yes or No? • Determine if you want to receive direct messages, which allow your fans to contact you directly through your page. • They are set to “on” by default. • If you choose to leave direct messages on, make sure someone is tasked with checking them and responding regularly. • To turn direct messages off, disable this feature by going to “Manage” and un-checking the “Messages” checkbox. Showcase Important Content • To pin an important post to the top of your page, select “edit” on the post and click on “Pin to Top.” This will now feature • the post with a yellow bookmark at the top of your page where it will stay for seven days or until you pin a new post. • You can also highlight stories on your page. These posts move down on the Timeline like a regular post, but are twice • as wide to stand out from the other posts on your page. To highlight a post, click on the star icon on the post. reachlocal.com | @reachlocal