young call girls in Hari Nagar,🔝 9953056974 🔝 escort Service
Guía Fifa 09
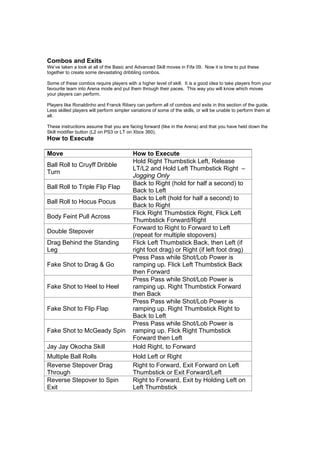
1. Combos and Exits
We’ve taken a look at all of the Basic and Advanced Skill moves in Fifa 09. Now it is time to put these
together to create some devastating dribbling combos.
Some of these combos require players with a higher level of skill. It is a good idea to take players from your
favourite team into Arena mode and put them through their paces. This way you will know which moves
your players can perform.
Players like Ronaldinho and Franck Ribery can perform all of combos and exits in this section of the guide.
Less skilled players will perform simpler variations of some of the skills, or will be unable to perform them at
all.
These instructions assume that you are facing forward (like in the Arena) and that you have held down the
Skill modifier button (L2 on PS3 or LT on Xbox 360).
How to Execute
Move How to Execute
Hold Right Thumbstick Left, Release
Ball Roll to Cruyff Dribble
LT/L2 and Hold Left Thumbstick Right –
Turn
Jogging Only
Back to Right (hold for half a second) to
Ball Roll to Triple Flip Flap
Back to Left
Back to Left (hold for half a second) to
Ball Roll to Hocus Pocus
Back to Right
Flick Right Thumbstick Right, Flick Left
Body Feint Pull Across
Thumbstick Forward/Right
Forward to Right to Forward to Left
Double Stepover
(repeat for multiple stopovers)
Drag Behind the Standing Flick Left Thumbstick Back, then Left (if
Leg right foot drag) or Right (if left foot drag)
Press Pass while Shot/Lob Power is
Fake Shot to Drag & Go ramping up. Flick Left Thumbstick Back
then Forward
Press Pass while Shot/Lob Power is
Fake Shot to Heel to Heel ramping up. Right Thumbstick Forward
then Back
Press Pass while Shot/Lob Power is
Fake Shot to Flip Flap ramping up. Right Thumbstick Right to
Back to Left
Press Pass while Shot/Lob Power is
Fake Shot to McGeady Spin ramping up. Flick Right Thumbstick
Forward then Left
Jay Jay Okocha Skill Hold Right, to Forward
Multiple Ball Rolls Hold Left or Right
Reverse Stepover Drag Right to Forward, Exit Forward on Left
Through Thumbstick or Exit Forward/Left
Reverse Stepover to Spin Right to Forward, Exit by Holding Left on
Exit Left Thumbstick
2. Reverse Stepover to
Right to Forward, Flick Right
McGeady Spin
Stepover Left to Hocus Very quickly spin the Right Thumbstick
Pocus counter clockwise 2x starting at Forward
Stepover to Matthews Forward to Left to Back to Right
We have included a picture sequence of each Combo/Exit below so you will be able to see what they should
look like when executed properly.
Ball Roll to Cruyff Dribble
Ball Roll to Triple Flip Flap
10. Stepover to Matthews
Final Thoughts
There are tons of Exit and Combo moves available in Fifa 09. Spend some time
in the Arena experimenting on your own and see what else you can come up
with.
11. Assistance
Hardcore FIFA gamers will insist that Manual is the only way to play the game. It
is true that turning all of the assists on Manual can result in amazing organic
football. However, for the average gamer, going all Manual is just a bit too hard
to handle.
If you do decide to make the transition to Manual play, do it gradually. Start with
Manual Through ball, move to Manual Crossing, and then take on passing and
shooting. You may need to even drop a difficulty level until you become
comfortable with your new skill set.
Let’s take a quick look at each of the Assistance options in the game and how
they affect the way you play.
Pass Assistance
Assisted (Default) Pass direction and power will be
assisted to help play passes into the
receiver’s path and avoid opponent
players.
Semi Pass power is assisted, but the CPU
will only help you a little with the
direction.
Manual The direction you point is the direction
the pass goes, and the longer you hold
the pass button, the stronger the pass
will be.
Assisted passing is the default setting in the game. You’ll be able to knock it
around pretty much as you please without having to think much about where or
how hard you are hitting the pass. As long as you point in more or less the
correct direction, the ball will reach its target. Semi-assisted passing takes care
of the power for you, but you will need to be a bit more precise with your aiming.
You can’t be totally sloppy here.
Manual can really put your skills to the test. You’ll need to think about pass
weight and direction every single time you hit the ball. Once you master it, you
can put the ball right where you want it. The game flow totally changes when you
go Manual.
Through Pass Assistance
Assisted (Default) Through pass direction and power will
be assisted to help play passes into the
receiver’s path and avoid opponent’s
12. players.
Manual The direction you point is the direction
the pass goes, and the longer you hold
the through pass button, the stronger
the pass will be.
If you are looking to create a more organic experience for yourself, then putting
Through Pass Assistance on Manual is a good choice. Once you get the hang of
it, you’ll actually have some tactical advantages over players that have their
settings on manual. In FIFA 09, every touch that a player takes on the ball
slightly diminishes their speed. If you can play a through ball further ahead of
him, then he can run further without the ball before touching it. With a speedy
player like Cristiano Ronaldo, you can clear your defenders by 15-20 yards by
the time you pick up the ball.
Ronaldo is tearing down the line when he sees Scholes cutting in from the middle
of the field.
13. A standard through pass would result in a ball played into the box in front of
Scholes. This would be right in the teeth of the defence. Since we have Manual
Assistance on, we are able to put the ball down the line instead.
Scholes receives the ball in space and has time to put in a quality cross.
Shot Assistance
14. Assisted (Default) Shot direction will be assisted to
always aim towards the goal.
Semi You have to aim toward the target to
keep your shots on target.
Manual Shot direction will be assisted to
always aim towards the goal.
With Semi and Manual settings, you have to be much more precise with your
aiming. With Assisted shooting, the CPU will pull your aim inside of the post.
With Semi shooting, the CPU will pull your aim in a bit, but if you push the Left
Thumbstick too far to the outside, the shot will go outside of the post. On
Manual, you have to have your aim down perfectly or you will miss the goal. This
can be pretty frustrating, especially if you have worked hard to build up to a
quality chance. We recommend Assisted or Semi for most gamers.
Cross Assistance
Assisted Cross direction will be assisted towards
a teammate. Cross power will be
assisted to front or back post areas and
there will be no power bar on the cross.
Semi (Default) You have to choose the right power,
but the cross will be assisted to front
and back post areas.
Manual The direction you point is the direction
the pass goes, and the longer you hold
the button to perform crosses, the
stronger the cross will be.
By default, FIFA 09 defaults to the Semi Assisted crossing setting. For most
purposes this is perfect. You can pick out where in the box you want the ball to
go by adjusting the power of your kick. 50 percent power results in a front post
ball. 70 percent power will put the ball on the back post. Manual control will
allow you to control both power and location, but this can be tricky to master.
15. Lob Pass Assistance
Assisted (Default) Lob pass direction and power will be
assisted so that lob passes will be
played towards a teammate.
Manual The direction you point is the direction
the lob pass goes, and the longer you
hold the lob pass button, the stronger
the pass will be.
Manual versus Assisted Lob Pass Assistance works very much like the through
ball mechanism. You’ll have more control over your lob passes and can drop the
ball into dangerous spaces. Manual settings as a whole give the game a more
organic texture and allow you to play with more creativity. As we have said all
along, being unpredictable is a big plus when attacking in football.
16. Throw-ins
Throw ins are not really rocket science, and usually do not involve a lot of
trickery. However, it is a good idea not to aim at the player you want to throw the
ball to right away; try to provide at least a little deception for your opponent. One
good tip to use especially if there is a lot of player traffic around is to not aim at
the intended target player until the last second before throwing, thus giving your
opponent the least amount of time to react.
Throw Direction
The direction you aim is the direction in which the ball will be thrown. As
mentioned above, try not to be too predictable. Attempt to fake out your opponent
to committing to a player you do not intend to throw the ball to, and then change
direction. Hit your target player and build the attack once
again.
Short Throw
Use the X button on the PS3 and the A button on the XBOX 360 to hit the closest
player in the direction your player is facing. A good tip if the player is marked is to
immediately pass the ball back to the thrower to build the attack up once again.
17. Manual Short Throw
A manual short throw throws the ball into space rather than to a player to allow
one of your players to run on to the space to get the ball on the fly rather than
receiving the throw from a standing position. Press the Triangle button on the
PS3 or the Y button on XBOX 360 to trigger this short
throw.
18. Long Throw
Press and hold the Square button on the PS3 or the X button on the XBOX 360
to achieve the desired distance to hit the intended player. The longer you hold
the button, the further he will throw the ball. Again, make sure you are not
obvious right away where you are aiming, so you do not give your opponent
much time to set
up.
Move Receiver
Tap the L1 button on the PS3 or the LB button on the XBOX 360 to gain control of a receiving player closest
to the throw. Move the player where you want him to go, preferably to the most open space, and then tap
the same button a second time to regain control of the thrower put the ball back in
play.
19. Tactics
Tactics are performed down using the D-pad. These are simple strategies that
can make quick changes to the way your team plays.. You can use this strategy
to override some game defaults based on what you notice in the game to really
assist your team in being successful either on the attack or in defending. There
are six basic tactics that are listed below.
CB Attack
Press up on the D-pad to trigger your CB to join in with your next attack. If you
find the opposing defence constantly has you outnumbered, this is a simple way
to add another attacker without actually changing your formation. Your opponent
may not be expecting another attacker, so oftentimes this can give you an
advantage.
Opposing Wing Attack
Press left on the D -pad to trigger a player on the opposite side of the pitch to
move forward to join the attack. Like the CB attack, this is a great way to
increase your attacking numbers and make your team a little tougher to defend.
You can use this to make him a target for a big switch or a cross. Even if you
don’t switch the ball, he can pull defender out so that another player can exploit
the vacated
20. space.
Offside Trap
Press down on the D-pad to trigger your defensive line to pull up towards midfield
to try and catch a possible opposing target player offside. Look for the forwards
making high runs and use this to keep those cherry pickers honest. Once they
are caught, they are more conservative next time. Timing is crucial as you do not
want to give your opponent a breakaway,
either.
21. Team Press
Press right on the D pad to give your team a stronger pressing mentality. This will
make your team push for the ball harder to win it back and make them much
more physical. This is a good idea if time is running out and the other team is in
possession mode, killing the
clock.
Decrease Mentality
No, this does not mean you remove intelligence from your players! By pressing
left on the D -pad, it does, however, decrease your team’s attacking mentality
and put them into a more defensive posture. This is best used to hold onto a lead
against a very tough team late in the game.
Increase Mentality
Pressing right on the D-pad increases your team’s attacking mentality causes
them to press to create turnovers and scoring attempts. Again this is usually
used late in the game to try and get a much needed goal. More players will go
forward into the attack. On the Ultra Offensive setting, pretty much everybody by
the keeper and centerbacks will go forward.
22. Penalties
Once you are given a penalty kick, it is time to select your best option to bury the
ball in the net. Refer to the “Penalty Target Zone Diagram” to pick the zone you
think will surprise the keeper. Obviously, the corners of the goal are the most
difficult for the keeper to get to the ball. If the tendency of the keeper is to dive,
sometimes right down the middle works really well, but it is risky because if the
keeper does not dive it is about the easiest save possible. It is important to note
that the longer you hold the shot button, the further the ball will travel in that
direction.
Try not to do the same thing twice in a row, mix up what you do, and remain
unpredictable.
Aiming
Use the screen center as your aiming target. The colored zones listed break
down the percentage of chance you have to score when you hit each zone, Red
a guaranteed to score, Orange you have a high percentage, Green is a 50/50 (
the keeper guesses right he should get it) chance, and yellow is very
risky.
Driven Shot
Taken with the laces of the boot, this is a hard shot where you hope to
overwhelm the keeper with paces. Again, remember to be careful of the shot
meter as the ball can rise very quickly, missing the goal altogether if the correct
power is not
23. applied.
Placed Shot
Hit with the instep of the boot, this is a more controlled shot with less pace on the
ball but is more accurate. Remember that the longer you hold the shot button, the
further towards the post in the direction you pulled the stick the ball will travel. If
you hold the button too long, you could pull a John Terry from Chelsea at the
Champions league final in 2008 in Moscow against Manchester United, and miss
the goal wide altogether. Not a good feeling.
24. Chip Shot
This is a cheeky little shot that is very risky, but if successful, really makes your
opponent look foolish. Remember when doing this that it is guaranteed that only
one of you is coming away looking silly. This is just your best guess at what the
keeper might do and is usually placed right down the middle, counting heavily on
the fact that the keeper will pick a direction and make a strong committed dive in
one direction. If not, once you stop blushing from embarrassment, regain your
composure and retreat to position for the keeper to distribute the
ball.
Penalty Saving
This is a total guess, no doubt about it. However, look at the favoured foot of the
kicking player, and sometimes that helps when he approaches the ball to make a
correct guess. Be aware as well that he may go right down the middle, so make a
strong decision and watch what he does. More than likely, he will not do that
same direction the next time, especially in an overtime shootout. Remember
what he did last and commit to moving your keeper in another direction the next
time.
Move GK
Use the Right Stick to select a direction you want the keeper to move in left or
right along the line. You might want to cheat your keeper in one direction along
the line before the kick is taken to try and provoke your opponent to hit the shot
to the opposite side of the
25. goal.
Dive
Use the left stick to tell your keeper what direction you want him to dive. If you
have cheated him to one direction, then when the kick is taken, dive in the
opposite direction and hope for the best! Again, just make your best call; you are
expected to miss so you have nothing to lose, and if you save it you just became
a hero. Again, take note of what your opponent did the previous time, and
assume he will do something different the next
time.
26.
27. Juggling
Unless you are beating your opponent very badly and just want to rub it in his
face a bit, you won’t have too many opportunities to juggle in game. However,
juggling is a fun way to pass the time in Arena mode as there are numerous
tricks that you have at your disposal.
These instructions assume that you are facing forward (like in the Arena) and
that you have held down the Skill modifier button (L2 on PS3 or LT on Xbox 360).
How to Execute
Move How to Execute
Flick Up Tap R1/RB – Less Skilled Players
Ronaldinho Flick Up Tap R1/RB – Advanced Players
Laces Flip Up Hold R1/RB – Advanced Players
Juggling/Kick Ups Tap R1/RB repeatedly
Hold Left Thumbstick back while juggling
Sombrero Stall Flick Back
– Advanced Players
Hold Left Thumbstick back while juggling
Sombrero Flick Back
– Less Skilled Players
Back to Left to Forward to Right
Around the World
(5,6,7,8,1,2,3) – Advanced Players
Back to Right to Forward to Left
Around the World Alternate
(5,4,3,2,1,8,7) – Advanced Players
AkKa/In Air Flip Flap Flick Right, Left (3,7) – Advanced Players
Sombrero Flick Left Hold Left Thumbstick left while juggling
28. Sombrero Flick Right Hold Left Thumbstick right while juggling
Hold Left Thumbstick forward while
Knock it High for Bicycle
juggling
Hold L3 and Triple Tap R3 – Advanced
Chest Flick
Players
Hold L3, Right Thumbstick Back to Right
Hop the World Trick – Right
to Forward to Left (L3,5,4,3,2,1,8,7) –
Foot
Advanced Players
Hold L3, Right Thumbstick Back to Left to
Hop the World Trick – Left
Forward to Right (L3, 5,6,7,8,1,2,3) –
Foot
Advanced Players
We have included a picture sequence of each Juggling Skill below so you will be
able to see what they should look like when executed properly
Ronaldinho Flick Up
33. Hop the World
Final Thoughts
While the Juggling moves are not typically useful in game situations, they can be
a good way to improve your timing and stick skills in the game.
34. Goalkeeper Controls
It goes without saying that the goalkeeper is a crucial position on the field. He
can be used as the 11th player on the field and can assist the defence in being
the relief player for the big clear on a pass back. His positioning is crucial to the
success of the team. Once he is in possession of the ball, there are several
things he can do depending on what is happening in the game. A balanced
keeper will be alert for back passes and get a good feel for how to best cut down
a shooter’s angle.
Rush
This is always a calculated risk and should only be used as a last resort in
preventing a breakaway goal. It is a very tough skill to master because if your
keeper comes out too fast, the attacker can put one good move on and be in on
an open goal. Likewise, if he holds back too long, the attacker can get a good
look at the goal and pick his target. The following two diagrams will show you the
importance of picking an angle that cuts down the attacker’s shooting options.
With the keeper back on his line, Rooney has plenty of target space to either side
of the goal.
35. In this example Peter Cech rushes out to cut down Rooney’s angle. Rooney still
might be able to hit the far post, but his finish has been made much more difficult.
Also be aware that the attacker may choose a chip shot. Some good advice is to
make a strong commitment and go for it. You will learn as you play the timing of
what works best and it does indeed depend highly on the ratings of your player.
Drop Kick
The drop kick is the best way to get the ball down field quickly. Check the radar
before you let it fly. Make sure you target a player. Also, this is a good tool if
36. when you gain possession of the ball you see a lot of your opponent’s players
around you; it might be a good idea to hit the ball up field and possibly trigger a
counter attack. However, unless you have a clear target player, it puts the ball up
for a 50/50 challenge to maintain possession.)
Throw
The throw is the best way to accurately get the ball onto the feet of your team
member right away. A good tip unless time is running out and you are behind is
to let the keeper hold the ball for a few seconds and allow your opponent to clear
out. Once the area is clear, you can target a defender to start to build your attack.
Make sure you are aiming at the right player before you release the ball; the
default player that is chosen is not always the best choice. Also, the longer you
hold the pass button, the further he will throw the ball. If you check the radar and
see a player open or on your goal’s side of the opponent, judge the distance,
face his direction and launch the throw. This is a very accurate way to send a
player on a quick counter attack. Take note of how many defenders your
opponent is running and you may get a chance at a long throw to break away.
37. Drop the Ball
Dropping the ball is a risky move, but can be used effectively to get the ball down
and start the possession right away or make a big clearance. The biggest tip for
this is to take a very good look around your player and the radar to make sure
you are not wrapping up a gift goal for your opponent. If your opponent’s
defenders seem to play be playing far back, this might work well.
38. Goal Kicks
Goal Kicks is the keeper’s mechanism for restarting the game after the offense
knocks it over the endline. Here are some good tips to remember: if time is
running out, then a short kick is not an option. If time is not a concern, it is a good
idea to use the short pass.
Short Pass
This is almost always the best option just because it almost assures that you will
regain possession. Target the best defender with the most open space and start
your build up from there. You often will need to take control of the receiving
player and bring him back to the ball once the pass is made.
Lob Pass
There is no guarantee that you will win this one, but your best shot is to check
your radar and find the best potential target player. Make sure you go up strong
with that player to get to it first. This is best done if there is a hard press on your
goal by the opposition, as it can give you the potential of a quick counter attack.
39.
40. Free Kicks
There is a built in feature in the arena mode that allows you to work on your free kicks, and it is
strongly recommended that you take advantage of it to hone your skills. Simply move your
chosen arena player anywhere on the pitch and hit the D-pad in any direction, and you will
immediately be set up to take the free kick from that spot. If you are anywhere in the penalty box,
you will immediately be set up to hit a penalty kick. When aiming, use the exact screen center as
your aiming point and target. Play with various types of power on the meter to judge distances.
Also, the Left Thumbstick can be used to put spin on the ball while the mater is powering up.
Holding the Thumbstick left/right will create maximum curl on the ball. Holding the Thumbstick to
the Upper/Left or Upper/Right will create a shot shaped with topspin. You can hold down on the
Thumbstick to create backspin.
Play with how long to hold the stick over to hit that sweet spot on the goal. Hold the stick all the
way over until the player strikes the ball; you can put a seriously nasty arc on the ball, catching
the keeper completely unaware it will even be on goal and usually catching him flatfooted. Other
types of free kicks are mentioned below.
41. Short Pass
This is a simple touch pass restart which allows your team to maintain possession and continue on to the
attack. Keep an eye on the positioning of the opposition’s players to determine where best to hit the short
pass.
Lob Pass
The lob pass is used to hit target players to continue the attack a little further down field. Use the radar to
notice which of your players has the best position and is under the least threat by the defending team.
Shot
If the free kick is within target range for a shot on goal, sometimes a direct shot is a possibility. This shot is
more of a controlled instep shot for deadly accuracy, aimed usually at one of the upper corners of the goal.
Take time in the arena to really practice from various locations. Remember to use the screen dead center to
aim, and practice distances to learn how much to power up the meter. Also while the meter is powering up,
lean the Left Thumbstick either left or right to put curve on the shot and catch the keeper off guard. There is
42. the possibility of putting a dramatic arc on the ball if you hold the stick all the way over until the ball is struck.
You can also push the stick upper/left or upper/right for a topspin blast. Again, practice in the arena until you
become a deadly sniper.
Driven Shot
The driven shot is a straight powerful shot directly at the goal taken full force with the laces of the
boot. This takes some planning to avoid the wall, so scan the area carefully before choosing the
best angle to hit the shot. Also, see the “Shot Power/Elevation Chart” in the Attacking Controls
section to determine how to power up the meter.. Once again, use the arena to practice various
distances and get comfortable with what works best for you.
Call Lay-off Player
Simply put, you can bring another player right next to you to confuse the defence as to which player is
actually going to hit the shot. Usually, one player will approach from the right and one from the left, and each
has the potential to hit opposite arcs on the ball. You will see below that you can choose either player to hit
the shot. By adding curve to the ball on power up, it will be tough for your opponent to tell which way the ball
43. will go. It is a good idea to bring the second player in; even if you do not intend to use him, it creates
confusion for your opponent and adds to your unpredictability.
Lay-off Player Pass
Once you bring in the second player depending upon your range from goal, see if you have a close by
player that could receive a simple pass and start a quick attack again. Again, check the radar and what you
see on the screen to find the right target player.
Lay-off Player Shot
Use the layoff player to strike the shot on goal. Switch between your original player and the added target
player randomly throughout the game so your opponent never knows who will play the ball. Locate your best
angle with the best look at goal. Note the preferred foot of the shot taker and which player has the best
angle to hit a critical target area on the goal. Judge your power on the meter carefully and add enough arc
on the ball so it is difficult for the keeper to judge where the final path of your shot might end up. Take note
of the positioning of the keeper and what location (near post or far post) looks like the best option.
44. Free Kick Defence/Wall
By default, the correct amount of players to go in the wall will be determined for you and is based on
distance from your goal. To judge if you should have the wall jump, stay where it is or have a player rush the
wall is based solely on where you feel the kick taker has the best opportunity to take a shot or lay off a pass.
A good tip is to determine what you would do based on the players available to take the shot and work from
there.
Jump
If you look at how your opponent is set up and it looks like from the position of the ball he might have a good
shot at goal, or if further out might have a target player where he will more than likely play the ball over the
wall with a lower trajectory, a jump might be a good option. Time it so that right as he strikes the ball, you
jump the entire wall to try and stop the ball from making it to its target.
45. Wall Player Charge
With the selected player you can charge the wall again to try and keep the kick taker from getting the ball to
its target. Take a look at what angle looks best for the shot taker to take, and switch to the right player to try
and cut that off. Watch for potential lay off players and you could possibly be better served to charge a
possible target player as well. Press and hold the X button on the PS3 and the A button on the XBOX 360 to
perform this control.
46. Defending Controls
Your best offence is a great defence! Since the only way to win is to prevent
more goals from going in your own net than your opponent’s, a great defensive
understanding is crucial. Discipline is the key to great defence; don’t panic and
use common sense. Knowing your attackers and their tendencies is very helpful
in planning your defence.
The defending controls work a lot like the sport in real life, so get to know when
to “jockey” and not “stab in” and you will find your keeper getting a lot of “clean
sheets.” Once possession is lost, all team members are now defenders, starting
with the forwards to do their best to prevent the ball even getting into their own
half. The first line of defence are not the stoppers; they are the forwards and
midfielders. Listed in this section are nine types of basic defending controls as
well as how to best use them.
Jockey
The jockey is a technique of “containment” rather than actually taking the ball
back. This works well when the attacker is especially good with his feet. Usually,
the jockey is used to allow you to size up your opponent’s skill and allow
reinforcements to arrive if need be. This can be done running right next to the
attacker, corralling him where you want him to go or running backwards (or back
pedaling) with the attacker coming right at you. Like in other aspects of this
game, timing is everything. You cannot wait too long to step in or your opponent
might get a look at goal or shake you loose; likewise, you cannot go in too early
or he will leave you in the dust. A good tip is to watch the ball and see if it gets
slightly ahead of your opponent and go in then. You will get a good feel for this
the more you play.
47. Running Jockey
Much like the jockey, only performed at high speeds. Rather than just sizing him
up, this technique allows you to stay on the attacker and contain him at a full
sprint if need be. This can be very effective to slow down a quick counter attack
and give your team time to get back into position.
Switch Players
This is a very basic part of the game but really makes you successful if you learn
when to switch to the right player. It is usually helpful to leave the “automatic
switching” in the game set up just a couple notches, since it really assists you in
taking control of the right player at the right time. It is also useful if you like to play
a very quick possession game. It does some of the thinking for you and allows
you to focus on other tasks at hand.
Switch Players Manual
Unlike the simple “switch players” function above, this tool allows you to press
the right stick in the direction of the player you want to take over. The best time
to use it is when you see a player on a run that is unmarked. For example, you
are covering out on the wing when you see a striker move into the box and look
for a cross. My performing a manual switch, you can take control of a defender
in the box and move in better position to defend the cross.
48. Press
A press is a very aggressive attempt at getting the ball back ASAP. Usually done
in very close proximity, it involves your players using every tool at their disposal
to dispossess the opponent. Your player will only perform a standing tackle with
the press, not a sliding tackle. The goal is to restrict the opponent from any
further threat to your half of the field and try to regain possession for your team.
Because it is so aggressive, failure can result in your player getting beaten if you
make a mistake or are up against a stronger jostling player. FIFA 09 is very
specific in using the player’s strength and balnce ratings to determine who would
comes out on the winning end of the battle. If you commit to a hard challenge
and come away without the ball, the opposing team suddenly has the advantage
in the attack. Because of this it is best that the hard press is performed with your
midfield if at all possible so the next layer (the defenders) can be used as a back
up. Remember to use layers of players when defending. If the opponent gets by
one of your guys, quickly survey the next closest man and start again!
49. Jockey Press
This move will allow you to contain your opponent and then quickly transition into
a tackle. Release the LT/L2 button to initiate the challenge. This tool is a great
diversion to prevent your opponent from getting the ball into an even more
threatening position. Be careful, because as we all know, the referee can lose his
mind at any minute and call you for too strong a challenge if you end up tackling
the opponent.
50. Teammate Press
Very simply, “Secondary Pressing” will call a nearby teammate in assist your
player in dispossessing an attacker. Now two players work in tandem to box in
the attacker by both watching him and performing standing tackles to really get
his attention. Usually this is done on a player who is a serious threat for creating
opportunities for his team, so watch the game and look for your opponent’s
playmaker. When you are able to pick him out, use the teammate press to help
shut him down.
Slide Tackle
A very dynamic aspect to defending that can either send you to the showers
early or put you on a highlight reel. The two keys you need to remember with
slide tackles are to make sure you do not attempt it from behind and make sure
you touch the ball as much as possible. If you get the player and the ball, you will
more than likely get a yellow card. If you miss the ball and just get the player, we
hope you enjoyed your game, because your day is done!
Try to watch the player you are coming in to attack and time it so the ball is out in
front of him on a sprint as much as possible. Try to avoid a slide tackle on a
player in a jog or moving slowly, as it will be seen as aggressive by the referee
and can very quickly get you a card. However, when performed correctly and
cleanly, it can win you the ball, stop the attacker, and just make you feel warm
and fuzzy inside as you see your player sprints away in possession.
51. Clearance
This one pretty much speaks for itself. Sometimes you just have to hit the panic
button and get the ball out of any immediate danger, no matter what. A good tip
for this is to glance at your radar right before you clear the ball and see if there
happens to be a teammate further up field that you might be able to target, rather
than just potentially giving the ball away. If time is of the essence, then just knock
it into next week and regroup! If you have a lot of players out of position, then a
good solution sometimes is to clear the ball out of bounds and let the game reset
your players for a throw in.
52.
53. Corners
Corner kicks are an extremely effective dead ball opportunity to get a high
percentage chance at a goal. The power meter is the key to hitting your target
player, so a “Corner Distance Chart” has been provided to give you an average
range for the power you select. Other types of crosses can catch your opponent
off guard and give you a quick chance at a goal. See the list below for tips on
when to use these most effectively.
Lob Cross
The lob cross is a high arcing corner kick that is best suited to picking out
teammates inside the penalty area, either around the penalty spot or the front or
back post. How much you charge up the power meter determines how far the
cross goes in. A rule of thumb is the front post is a 50% power up on the meter
and the back post is a 70% power up. With that in mind, pick out your target,
determine the distance aim and let it go. Also, while powering up the right stick
can be used to put a curve on the ball. This works well for in-swinging cross
because the keeper thinks the ball is too far out, which often will freeze him on
the line and prevent him for coming out and making a simple grab, ending your
scoring chance.
54. Low Cross
The low cross is a very effective tool to catch your opponent off guard. The low
cross is more of a driven cross that is usually one touched on for another team
mate or a direct shot on the net. This cross is usually whipped in with a lot more
pace than the typical high arcing cross, and can really cause your opponent
problems. A good tip to remember if you are on the receiving end of this is to look
around as you see it coming in, and if you do not have a strike at goal, then look
to one touch or “flick” the ball onto another player. Use the receiver to change the
direction of the ball and set up some interesting opportunities, or just go in with a
full volley or header and stretch the old onion bag!
55. Ground Cross
This is much like the low cross, but is passed in with pace along the ground. The
best way to do this is to look at your closest player and see where the defender is
marking him. If the defender is playing off of him, then aim at him and strike a
firm cross to see if he has a look at the net or can pass again to a teammate in a
better position to finish. The ground cross is extremely effective in setting up for a
quick attempt on goal and your opponent is usually not expecting it.
56. Short Corner
Sometimes the best chance you might have is to play the ball short to a player
running up from the back, who then launches his own cross from the crossing
zone or passes the ball to another target player. This tends to catch most teams
off guard, and can force them to rush the player and may leave some key target
players inside the box for a possible
goal.
57. Attacking Controls
Trapping
There is a popular saying that is so true in FIFA 09: “First touch will kill you.”
Control over the ball when receiving is crucial to being successful. Trapping is
the skill where you collect the ball instead of it merely hitting you and hoping for
the best. How the player first touches the ball when it comes in his direction can
make all the difference between handing it over to your opponent and
maintaining possession. There are three fundamental concepts used in FIFA 09
for trapping.
Trap
Trapping is the art of receiving the ball and bringing it under control. This is a
very basic concept but can be used to gain quick control over the ball and be
ready for what you do next. Whether standing in a crowded space or on a full
sprint down the wing, a good trap is essential to gaining and maintaining
possession. There are several types, all with various parts of your player’s body,
from the chest to the thigh to the foot and even the head. All of them accomplish
the same thing: to get the ball with any momentum it might be traveling in
immediately into your possession so that you can be effective with your next
move.
First Touch
There is no more effective moment in the game than when your player first
touches the ball. If not controlled, it can be a quick turnover leading to disaster, or
58. give your player a huge advantage to move into open space. Use the right stick
and bump it away from your opponent and sprint onto the ball. It is a simple quick
moment, but can be a key to successful possession. In a crowd of players, use
this to avoid having the opponent make a quick steal by giving yourself some
room to work.
Cancel Trap
Cancel Trap is a very effective way to take a player off of this default run and
redirect him to intercept a pass. A good example of this is if your team mate
attempts to hit you on a through ball and an opponent looks like he is going to cut
off the pass if the target player stays on the default run. This function allows you
to cancel out of the run and cut in front of the opponent and collect the ball before
he intercepts it. This is a great function to adjust your player off of the default
path and adjust the path a more strategic path. You can also use it to cancel a
shot attempt or cross as long as you hit the buttons before the shooting
animation starts.
59. Our midfielder receives the ball and spots a wing player making a run.
If the ball and pass receiver continue on their current track, there is a high
likelihood that the Croatian defender will pick off the pass.
60. We press the Cancel Trap button and swerve into the pass of the ball.
Our player receives the pass in front of the defender and can continue the play
down the pitch.
Dribbling
Controlling your player’s possession of the ball is a key component to success in
FIFA 09. Dribbling is basically the set up for everything else you do in the game.
If you are on a full sprint down the field, the ball will tend to be pushed out in front
61. of you a little further and you basically run onto it each time. In a jog, it is a little
closer and at a walk it is right at your player’s feet. Take careful note of the
opponent saround you to know which pace you should be at so as not to give the
ball away.
A good tip is to remember not to be predictable to your opponent. Change
directions, stop the ball and then immediately continue; change your pace from a
walk to a sprint instantly, knock the ball upon receiving it away from your
opponent, and of course spend time in the arena polishing your tricks!
FIFA 09 has a ton of signature tricks your player can do and each has the ability
to leave your opponent wondering where you went. For a complete breakdown of
the tricks, see our sections devoted specifically to skill moves. Below is a quick
breakdown of the dribbling techniques available to you and some tips on how to
use them to your advantage.
Stop the Ball
A great tip is to use this skill in combination with an explosive exit move. It can
really give you an advantage to shake loose from an opponent. You can make a
hard stop anywhere on the field. If you hold on to the R2/RT as you stop, your
player will transition into a shield move.
Stop the Ball – Facing Goal
This is a great little skill that can really shake your opponent and give you a good
look at the goal or just give you some space to work in. Not many are aware of
the advantage you can gain by simply stopping and squaring your shoulders
towards the goal. In the arena, work on this skill before taking a finishing touch
62. and watch your accuracy greatly improve. In the passing section, a graphic
shows how you can increase your when passing in the 10 to 2 o’clock position of
the direction you are facing. The shooting accuracy is heavily dependent on your
player’s motion and direction, so if you are coming in off balance at full pace and
more than likely feel you will just launch the ball over the net, use this skill to
increase your chances of getting the ball on goal.
Pace Control
Pace control basically does just what it says. It gives you the ability to have a
much more managed movement velocity for your player with the ball. This
function does slow down your player, but gives them a bit more control over the
ball. The dribbling rating of your player does affect his ability to control the ball
effectively.
63. Pace Control – Facing Goal
The same basic concept but turns your player to face the goal. So now not only
is your player moving at a good pace to maintain control of the ball, but is also
positioned to greatly increase the accuracy of his next movement.
Sprinting
This sounds obvious, but when in possession of the ball you really have to think
about how to elude your opponent. Besides always moving in a sprint, be sure to
64. mix it up, from jog to quick burst of speed. Remember that on a sprint you have
the ball further away from you, and when shooting, your accuracy is greatly
diminished. A good rule of thumb is to let go of the button to break out of a sprint
and into a jog to really increase your accuracy for shooting and other skill moves.
Do not forget to mix up your movement; the less predictable you are, the tougher
it is for your opponent to get possession.
Knock On
The Knock on is very simple but also very effective. It gives you just enough
advantage that makes a big difference in your ability to maintain possession.
When moving with the ball, instead of just using the default dribble (which can be
easily read by your opponent), be creative and knock the ball in a direction and
then change your player’s pace and move quickly in that direction. It is very
tough for a player to get back in front of you once you have moved beyond them.
Use this to set yourself up for other things to transition into like that big shot (or
fake shot), a skill move, or a great pass.
65. Tricks
Refer to our Skill Moves section for details on each and every trick in the game.
Fundamentally, it is an awesome tool to not only create that highlight reel to send
to your friend, but also is designed to really get you by your opponent. The key
to successful tricks is to always keep your player unpredictable to the opponent.
A little body feint, or even small gestures might just give you enough advantage
to get beyond him and through to your next task at hand. Of course it is even
more fun to humiliate your opponent and watch it in slow motion on the instant
replay screen. With practice, every gamer has the potential to throw down
Ronaldinho-type skills on the ball.
66. Instigate a Forward Run
This is a very effective tool to open up a target man for a pass, or even just to
draw an opponent out of some very attractive looking field space to set up for an
attack. One trick is to trigger your teammate on a run and then immediately sprint
to the space they just left (which usually is wide open since the attention was on
the man making the run). You have to get in the habit of using this to make it
effective, so experiment with it in your practice games and see how you can best
use it to your advantage. Watch how the opponent reacts to the run and use that
against him.
67. PASSING
“The Beautiful Game” is only as beautiful as your skill mastery of the passing
game FIFA 09 offers. The right choice at the right time and there you have it,
Joga Bonita! To be successful, the best tip is to keep one eye on the game and
another on your radar. Sometimes the best pass is to the player just outside of
your vision on the screen, so using the radar will really help you in finding that
target player. There are five basic types of passes you can use to successfully
create a scoring opportunity, get out of severe pressure in the back, or just plain
frustrate your opponent.
Short Pass
The short pass is a successful method that really makes this sport beautiful.
Brazil is the first team that comes to mind when discussing the short pass. This is
a very effective pass that can be done in very tight traffic to find a way through
your opponent. When a teammate is in front of your player it is extremely
accurate, and as the player moves around your periphery the accuracy drops.
Try to adjust your player’s body position to give him the most accurate attempt to
be successful. The diagram below clearly shows how the direction your player is
tacing affects the accuracy of the pas. Assume the direction you are always
facing is true 12 o’clock on a typical clock. Everything from 10 – 2 o’clock is
pretty accurate, but from 2-5 & from 7-10 accuracy is diminished greatly. From 5-
7, you better be Ronaldinho to attempt that pass, and only after you make sure
your radar is clear!
Long Pass
68. The long pass is a favourite weapon of David Beckham, as we all know. It can
turn a minor attacking threat into a goal scoring opportunity in the blink of an eye.
Having your players make great runs off the ball is the key. Watch the radar for
that target player heading to open space, and then judge the power you strike the
ball with carefully: too hard and it’s an easy ball for the keeper, too light and you
might find yourself defending a quick counter attack. Use this when you want to
“open up the play.” The further away the player gets, the less accurate your pass.
The amount of time you hold down the pass button will determine the length of
the pass. For best results, make sure you attempt to lead your player and not fire
the pass at him. Allowing him to run onto the pass in stride could give him all the
distance he needs to get a chance on goal.
Through Pass
This is one of the most deadly weapons in the game, and when done correctly,
can rival the beauty of any goal. The key to being successful is your ability to
look beyond your player to the space your teammates can hit quickly. You have
to think one step ahead. This pass is typically used to get a player threaded
through the defence and in on goal. Once again, how long you hold the pass
button will determine the strength and distance of your pass. On Manual Through
ball Assistance you are in charge of both direction and power. Be sure to play the
ball to the space ahead of your player and let him run onto it. Some high level
rated players can also perform a swerving through ball that makes it very tough
for a defender to judge. Often times he will find himself diving in and leaving the
striker with nothing left to do but test his finishing skills.
69. Lobbed Through Pass
The Lobbed Through Pass takes the beauty of the through ball and forces your
opponent’s defenders to think three dimensionally. The angles are endless to
feed a teammate. This is a very effective tool on an attack or counter attack when
used to completely switch fields to the opposite side. Use this pass to hit a
teammate who is making diagonal run, as it can really get you some great
opportunities to get in on your opponent’s goal.
One-Two Pass
Also known as the wall pass, this is used to create space to shake a defender
with the assistance of another team member. Upon approaching an opponent,
time the pass so the defender commits to you, and then pass the ball to a team
member while holding the L1/LB button. Your player will immediately sprint
beyond your opponent to get a one touch pass back. It can quickly provide some
open space in front of you. Be careful of using it too many times in a row as you
will create holes in your defence.
70. Crossing
Crossing can be used either to switch the field of play into a more open field to
start the attack again, or to launch a ball into the middle of the field to create a
goal scoring opportunity. Many factors play into how accurate the cross is, such
as body position, speed, and player rating. This can be a deadly aerial assault in
your opponent’s third of the field leading to a goal scoring opportunity. The other
use for switching field of play can be to get the ball out of a congested area to an
open player that can build an attack much more effectively at that moment.
You can also have some control over the curve put on a cross with the right stick.
Just lean the stick in the direction you want to curve the ball when the meter is
powering up. When they hear the term “cross,” most players think of a high
arcing ball into the opposing team’s box, when in fact that is just the tip of the
iceberg. The basics of what type of cross to hit is realizing whether you are in the
crossing zone or not (area from the top of the 18 yard box to the end line and
from the 18 yard box to the side touchline). If not, then the arsenal of early
crosses listed below is your best option. This section covers five other types of
crosses in FIFA 09 that can be used to best your opponent.
Low Cross
The low cross is a very effective tool to catch your opponent off guard. The low
cross is more of a driven cross that is usually one touched on for a shot or to
another player for an attacking opportunity. This cross is usually whipped in with
a lot more pace than the typical high arcing cross and can really catch your
adversary by surprise. A good tip to remember if you are on the receiving end of
this is to look around as you see it coming in, and if you do not have a strike at
71. goal, then look to one touch or “flick” the ball onto another play. Use the receiver
to change the direction of the ball and set up some interesting opportunities.
Ground Cross
Much like the low cross but is passed in with pace along the ground. This is not
to be confused with the through ball. The through ball is designed to lead a
teammate on to goal, threading the ball through the defenders; the ground cross
is used to deceptively feed a team member outside the expected target area of
your opponent. The ground cross is extremely effective in setting up for a one
time strike. It also catches your opposition off guard when you hit the crossing
zone and they prepare to see a long high ball, but then have to scramble when
the target player is running up from the back for a strike.
72. Early Cross / Early Low Cross / Early Ground Cross
The term “early” refers directly to striking in the cross outside the crossing zone
(area from the top of the 18 yard box to the end line and from the 18 yard box to
the side touchline). Simply refer to the descriptions of what the cross is used for
mentioned above and just know it is hit prior to entering that zone. This is a great
tool that can really surprise the teams you are playing since they think they still
have time to set up for the big cross, when in fact the threat is coming much
sooner for them!
73. Shooting
This is one of the most dynamic aspects of the game, and understanding how it
works in FIFA 09 can determine just how much success you will have. Many
factors determine the accuracy of the shot such as player momentum, speed,
rating, and of course how far you power up the shot meter. In the “Shot
Power/Elevation Chart,” you can clearly see there is a direct correlation between
shot speed and ball elevation based just on the how much you power up the shot
meter. Also keep in mind that your player’s accuracy is greatly diminished if he is
on a full sprint while shooting, as well as his lateral momentum at the time. A
74. really good tip here is to let go of the sprint button, control your pace to gain
composure, get the ball on your player’s preferred foot, and then let it rip. This is
not always possible and sometimes you just have to wing it!
However, this would be a good place to also use the various “Face the Goal”
options mentioned in the dribbling section. The shot can be very frustrating if not
practiced, so take some time in the arena to get it down from various locations.
When you get comfortable with it, you can create some great highlight reels.
Oone tip that works very well if your player is right footed, is to head directly at
the goal about 5 yards off of dead center and as soon as you see the keeper,
start to move left. Flick the left stick and just barely tap the shot button, and sit
back and watch the ball rip into the opposite side netting for a goalaso!
Obviously, the opposite movement should be done if your player’s favoured foot
is left.
Shot
This refers to the out and out strike on goal with maximum speed, also known as
a “driven shot.” This is what puts fans in the stands and makes this game so
much fun to play. Refer to the “Shot Power/Elevation Chart” to see what factors
come in to play to make the shot go where you want it to. You can greatly control
the rise of the ball and speed based on what is shown in the chart.
75. Finesse Shot
This is a very effective tool to help assist your player in gaining composure while
striking the shot. A direct shot is hit with the boot laces, whereas the finesse shot
is usually taken with the side of the foot. This is a placement shot versus a driven
shot. You get much more accuracy in putting the ball in the net where the keeper
least expects it. If you have to approach the goal at pace due to pressure and/or
slightly off balance, then just get in the habit of hitting a finesse shot and your
chances will be pretty good to get the shot on net.
76. Chip Shot
The chip is a cheeky little shot that totally fools and humiliates the keeper in one
simple lofted scoop shot. Much like the same term in golf, it basically is a shot hit
under the ball with the foot stopping upon impact to loft the ball with a high
trajectory in the air for a short distance. Usually this is right out of the keeper’s full
stretch, and is best performed the second you see the keeper start off his line.
Practice this in the arena as it is very effective when coming at the keeper one-
on-one. And remember, timing is indeed everything with this one.
77. Advanced Skill Moves
Certain skill moves in Fifa 09 require players with a higher level of skill. It is a
good idea to take players from your favourite team into Arena mode and put
them through their paces. This way you will know which moves your players can
perform. It’s not a good idea to get into the midst of a competitive game and
have a trick fail because you used the wrong player.
Players like Ronaldinho and Franck Ribery can perform all of the tricks and skills
in this section of the guide. Less Skilled players will perform simpler variations of
some of the skills.
In order to best explain how the moves work, we use a numbering system
corresponding with the directions on the Right Thumbstick.
These instructions assume that you are facing forward (like in the Arena) and
that you have held down the Skill modifier button (L2 on PS3 or LT on Xbox 360).
How to Execute
Move How to Execute
Flip Flap/Elastico Right to Back to Left (3,4,5,6,7)
Right to Back to Left (3,4,5,6,7) –
Feint Right & Exit Left
Sprinting
Right to Back to Left (3,4,5,6,7) – Less
Fake Right and Go Left
Skilled Players
Stanley Matthews Feint Left to Back to Right (7,6,5,4,3)
Left to Back to Right (7,6,5,4,3) –
Feint Left & Exit Right
Sprinting
78. Left to Back to Right (7,6,5,4,3) – Less
Fake Left and Go Right
Skilled Players
Blanco Hop Tap R3 – Standing Only
Flick Ball Over Slide Tackle Tap R3 - Less Skilled Players
Flick Diagonal Back/Left 2x (6,0,6,0) –
Ronaldo Chop Left
Jogging Only
Flick Diagonal Back/Right 2x (4,0,4,0) –
Fake Kick Chop Right
Less Skilled Players
Flick Diagonal Back/Right 2x (4,0,4,0) –
Ronaldo Chop right
Jogging Only
Flick Diagonal Back/Right 2x (4,0,4,0) –
Fake Kick Chop Left
Less Skilled Players
Flick Diagonal Back/Left 2x (6,0,6,0) –
Scoop Turn Left
Standing Only
Flick Diagonal Back/Left 2x (6,0,6,0) –
Fake Kick Chop Left
Less Skilled Players
Flick Diagonal Back/Right 2x (4,0,4,0) –
Scoop Turn Right
Standing Only
Flick Diagonal Back/Right 2x (4,0,4,0) –
Fake Kick Chop Right
Less Skilled Players
Flick Back, Forward – Then Forward
Rainbow Flick
again with timing (5,1,0) – (0,1)
Flick Back, Hold Forward – Then Forward
Rainbow Flick v. 2
again with timing (5,1) – (0,1)
Heel to Heel Flick Flick Forward, Back (1,5)
Flick Forward, Back (1,5) – Less Skilled
Heel Flick
Players
Back to Left to Back to Right
Hocus Pocus
(5,6,7,6,5,4,3)
Back to Right to Back to Left
Triple Flip Flap
(5,4,3,4,5,6,7)
Hold Right, Flick Diagonal Forward/Left
Ball Roll Flick Left
(3,8) – Jogging Only
Hold Left, Flick Diagonal Forward/Right
Ball Roll Flick Right
(7,2) – Jogging Only
Flick Forward, Forward, Back (1,0,1,5) –
Ronaldinho Sombrero Flick
Standing Only
McGeady Spin Left Flick Forward, Flick Left (1,0,7)
McGeady Spin Right Flick Forward, Flick Right (1,0,3)
Press Pass button while Shot/Lob power
Rabona Fake bar is ramping up + hold back on Left
Thumbstick – Sprinting Only
Scoop Pass Tap Lob Pass Button – Standing Only
79. Flip Flap/Elastico
Ronaldinho has popularized this move, although he was not the inventor. The move begins with the player
pushing the ball to the outside with the outside of his foot. He then snaps the ball back across his body with
the inside of the same foot. The movement is quick and fluid with the ball moving like it is on a string or
rubber band, hence the name Elastico.
Fake Right & Go Left/Fake Right & Go Left (Less Skilled Players)
When Less Skilled players attempt to use the Flip Flap move, they get a different variation. They perform a
body fake to the right and then take the ball with an explosive step to the left using the outside of their left
foot. Not as flashy as the Elastico, but still effective. If you attempt the Stanley Matthews Feint as a Less
Skilled player, you will get the Fake Right & Go Left
move.
80. Stanley Matthews Feint
Known as one of the greatest dribblers ever, Sir Stanley Matthews developed this change of pace move to
punish defenders who committed too quickly to tackles. The player begins by leaning to the left as if he is
going to go in that direction as he touches it slightly with the inside of his right foot. He then quickly takes
the ball with the outside of the same foot and explodes to his right.
Feint Left & Exit Right/Feint Right & Exit Left
If you attempt to perform the Stanley Matthews Feint while Sprinting, you will get this move instead. The
player makes a hard step to the left and then quickly explodes to the right with the outside of the right foot. If
you attempt a Flip Flap while Sprinting, you’ll get the opposite effect…a hard fake to the right and an
explosive exit to the left.
81. Blanco Hop
Mexican player Cuauhtémoc Blanco is given credit for being the first player to use the move. It must be
performed from a standing position, and is best used when a defender is rushing in to slide tackle. The
player will grab the ball between his two feet and quickly lift it up and over the would-be tackler. You will
most likely stumble a bit as the tackle comes through, but you’ll have time to accelerate away while the
defender lies on his back and wonders what happened.
Flick Ball Over Slide Tackle (Less Skilled Players)
Less Skilled players will execute this move instead of the Blanco Hop. This move is very effective if you
anticipate the slide tackle well. It is especially useful if you are playing a human opponent who has a
tendency to slide a great deal.
82. Ronaldo Chop Left/Right
Patented by Cristiano Ronaldo, the Ronaldo chop is a quick 90 degree change of direction move. While
jogging, our player will quickly throw one leg forward and chop the ball behind that leg with the inside of his
other foot. This move is most effective when you have a defender running next to you down the sideline. It
works best if he is slightly ahead of you.
Fake Kick Chop Right/Left (Less Skilled Players)
This move is performed as an alternative to the Ronaldo Chop and/or Scoop Turn. The player will fake a
shot with one foot and then chop the ball to the opposite direction. This move can be effective in front of the
goal to create space for a shot.
83. Scoop Turn Left/Right
This skill move is more of a flair move and has less in game application. The player turns his body in one
direction and then uses the inside of his foot to scoop the ball around 180 degrees to the other side of his
body. It can be effective if a defender is coming straight at you as long as he isn’t flying into the tackle.
Rainbow Flick
There are two versions of the Rainbow flick in the game, but the principle is basically the same. The player
will flick the ball up over his head while either standing or on the run. This is definitely a flair move, but it can
be used in open field, or even to beat the keeper. It doesn’t get much prettier than finishing a Rainbow flick
off with a scorching volley.
Version 1
84. Version 2
Heel to Heel Flick
One of our favourites, the Heel to Heel Flick is a stop-n-go skill move that is most effective when used along
the sidelines. It is best used when a defender is approaching you from straight on. Your player will step
forward and back heel the ball to himself. He then will use the heel of his rear foot to flick the ball forward at
a slight angle to go around his opponent.
85. Heel Flick (Less Skilled Players)
With a Less Skilled player, you will get a Heel Flick. The usage and results are similar to the Heel to Heel
Flick, but the move is a bit simpler.
Hocus Pocus
This move has a great deal of flair to it, but it can be effective when combined with other moves like the
Stepover. The player takes his right foot and pulls the ball around his standing leg and off to the front at a
45 degree angle. This is a very cool move, but not one that will beat a defender all by itself.
86. Triple Flip Flap
A derivative of the Elastico, the Triple Flip Flap fakes a move to the outside before cutting the ball back
across from right to left. The ball pops further ahead than the standard Flip Flap, so if you do beat your man
you’ll have a good head of steam coming out of the move.
Ball Roll Flick Left/Right
This particular move can only be performed while jogging. The nice feature about this skill move is the
double change of direction. Your player begins by rolling the ball to one side and then quickly switching legs
to flick the ball at a 45 degree angle in the opposite direction. You’ll need plenty of space between your
player and the defender to beat him, but this flashy move can be rewarding to pull off in game.
87. Ronaldinho Sombrero Flick
This move has to be executed from a standing position. Your player will flick the ball up and then back over
his head. It can be used to beat a defender that is approaching from your back; however, it is often a better
strategy to just lay the ball off and pass it back after the player makes a run.
McGeady Spin Left/Right
This move is one of the more effective ones in Fifa 09 when it comes to getting space for your player. It also
can be used in combination with several other Skill Moves. In the McGeady spin, the player reaches
forward and pulls the ball back. He then twists and hits the ball with the outside of his opposite foot to take
off in a 90 degree angle. You can use this move with a defender on your back, or even while facing a
defender.
88. Rabona Fake
When just a simple 180 turn or Cruyff just won’t suffice, you can pull out the Rabona Fake. This move is
difficult to pull off and will test your stick skills. At the same time, it looks really cool and can be used to slam
on the brakes so you can get your cross in. Your player sprints and fakes a Rabona pass. Instead, he
stops the ball and exits the opposite direction. If you are really fast, you can pull off a Rabona Fake to
Rabona chip combination.
Scoop Pass
This move can only be used from a standing position. It is definitely a flair move, as you won’t have many
opportunities to pull it off in game. Your player will put his foot under the ball and flick it up in the air over a
defender. If you can get enough time to come to a stop in the penalty box, it is money against a charging
Keeper.
89. Final Thoughts
If you like to play with lots of flair and attitude in your game, then you’ll want to
work hard for these moves to become second nature to you. Some of the moves
are purely for show, but others (like the McGeady Spin) can create dangerous
space for your attackers to get scoring chances.