1. Images taken from: http://vectips.com/tutorials/creating-seamless-textures/
CREATING A GRAPHIC USING TEXTURE
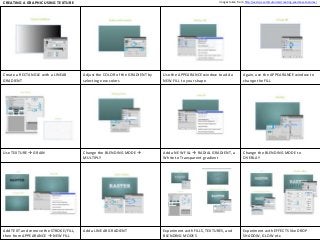
Create a RECTANGLE with a LINEAR
GRADIENT
Adjust the COLOR of the GRADIENT by
selecting new colors
Use the APPEARANCE window to add a
NEW FILL to your shape
Again, use the APPEARANCE window to
change the FILL
Use TEXTURE GRAIN
Change the BLENDING MODE
MULTIPLY
Add a NEW FILL RADIAL GRADIENT, a
White to Transparent gradient
Change the BLENDING MODE to
OVERLAY
Add TEXT and remove the STROKE/FILL,
then from APPEARANCE NEW FILL
Add a LINEAR GRADIENT
Experiment with FILLS, TEXTURES, and
BLENDING MODES
Experiment with EFFECTS like DROP
SHADOW, GLOW etc.
2. CREATING A GRAPHIC USING NEGATIVE SPACE
Images taken from: http://www.gomediazine.com/tutorials/illustrator/creating-an-illustrative-monogram/
Create a set of solid SHAPES
Create negative space SHAPES
Add more negative space shapes to fill
out the final form
Use the PEN TOOL and TRANSFORM
TOOLS to finish the shape
Create additional shapes using positive
and negative space
Use the PEN TOOL and different BRUSH
SETTINGS to create embellishments
Use different WEIGHTED brushes to
finalize the embellishments
Use the pen tool to create more shapes
and add a GRADIENT OR MESH
BEND, TRANSFORM and WARP the
gradients to fit the shapes
Repeat the first SEVEN steps to create a
complimentary graphic
Repeat the steps for creating a
GRADIENT or MESH
Place the pieces together to create a
strong composition and harmony
3. CREATING A GRAPHIC USING LINES for 3-Dimensional SPACE
Images taken from: http://vectips.com/tutorials/create-a-3d-text-effect-in-adobe-illustrator/
Create an “empty” text (no fill/stroke)
and then add a NEW FILL GRADIENT
From APPEARANCE use TRANSFORM
EFFECT to create an OFFSET PATH
Repeat the last step and create a darker
colored OFFSET PATH (shadow)
Repeat the last step and use a lighter
colored OFFSET PATH (outline)
Repeat the last step and create a new
OFFSET PATH off centered (highlights)
Repeat the last step and create an
outline around the whole graphic
Repeat the last step for a bolder outline
Repeat the last step and create an off
centered OFFSET PATH (bevel)
Use STYLIZE DROP SHADOW
Repeat the last step for other FILL
LAYERS (text itself, not the outline)
Finalize with EFFECTS
Experiment with colors, overlays and
textures