Create Canopic Jars Using Sculpting Techniques
•Als PPT, PDF herunterladen•
2 gefällt mir•7,975 views


Empfohlen
Weitere ähnliche Inhalte
Was ist angesagt?
Was ist angesagt? (20)
Andere mochten auch
Andere mochten auch (20)
Ähnlich wie Create Canopic Jars Using Sculpting Techniques
Ähnlich wie Create Canopic Jars Using Sculpting Techniques (20)
Mehr von Melanie Powell
Mehr von Melanie Powell (20)
Kürzlich hochgeladen
Kürzlich hochgeladen (20)
Create Canopic Jars Using Sculpting Techniques
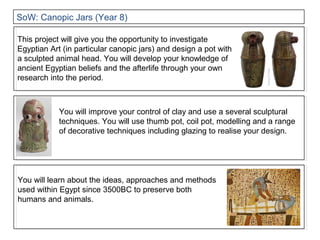
- 1. You will improve your control of clay and use a several sculptural techniques. You will use thumb pot, coil pot, modelling and a range of decorative techniques including glazing to realise your design. This project will give you the opportunity to investigate Egyptian Art (in particular canopic jars) and design a pot with a sculpted animal head. You will develop your knowledge of ancient Egyptian beliefs and the afterlife through your own research into the period. You will learn about the ideas, approaches and methods used within Egypt since 3500BC to preserve both humans and animals. SoW: Canopic Jars (Year 8)
- 2. Step1: Introduction to clay Learning objectives. By the end of the session you will: Develop an understanding of the properties and potential of clay; Use the correct words to describe clay techniques and processes. Learning outcomes. By the end of the session you will: Know how to wedge clay to remove any air trapped inside. Glossary: Clay moist earth of decomposed rock Wedge technique to take the air out of clay. Greenware dried out, unfired clay. Firing baking clay at a high temperature. Bisque clay after first firing. Kiln furnace that fires the clay. Glaze finely ground mineral solution, turns to glass when fired Part 1: Clay tile
- 3. Preparing your clay for sculpting Wedging removes air pockets
- 4. Step 2: Rolling a clay tile Learning objectives. By the end of the session you will: Develop an understanding of the properties and potential of clay; Use the correct words to describe clay techniques and processes. Learning outcomes. By the end of the session you will: Have created a slab. Rolling pin Clay guides Clay mat Clay- don’t forget to keep turning it over while you roll it out.
- 5. Creating a slab. Roll out a slab using the guides to control the thickness of the clay. Use the sharp knife to cut around the template. Initial your tile discreetly. Flatten the clay a little to start you off.
- 6. Step 3: Decorative techniques Learning objectives. By the end of the session you will: Understand how to use techniques effectively to decorate your tile and, ultimately, your pot; Use the correct words to describe decorative clay techniques and processes. Learning outcomes. By the end of the session you will: Have attempted four, different decorative techniques- 1. Impress an object or textured surface into one quarter. 2. Score and slip a shape cut from the left over clay to the next quarter. 3. Cut shapes through the third quarter. 4. Carefully scratch away a design or layers of clay from the final quarter. BEWARE: If you draw directly into clay you create clay burs. These are the small pieces of clay displaced by the line in the clay. These are unsightly and must be smoothed down if they appear. If this smudges your line, simply draw it back in and repeat the process until you have no burs and the line is clear.
- 7. Impress Build up decorative layer Engraving and scratching Piercing and cutting Your teacher will fire these for you to use later in the project. Once you have rolled out your clay tile cut it into a square and divide it into 4.
- 8. Step 4: Thumb pot and coils Learning objectives. By the end of the lesson you will feel confident in using two sculpting techniques: creating a thumb pot and building with coils. You will also learn how to join two pieces of clay together using the score and slip technique. Learning outcomes. By the end of two lessons you will have created a thumb pot as a base and added at least two coils. Glossary: Clay moist earth of decomposed rock Wedge technique to take the air out of clay. Slab a piece of clay that has been rolled out to a specific thickness. Score scratch into the surface of the clay. Slip a mixture of clay and water. Pinch / thumb pot A pot created by pushing your thumb into a ball of clay and pinching the walls out. Coil clay rolled into a sausage shape approximately the thickness of your thumb.
- 9. Modeling clay into a pinch pot.
- 10. Make sure that your pot builds straight up. If it becomes wider as you build it you might end up with a bowl! If this happens, call your teacher immediately.
- 11. Step 5: Coil pot stage 2 Learning objectives: Develop your control of the media; Use tools and techniques confidently to make sure that your pot builds up vertically; Understand how to trouble shoot any problems should your pot start to become narrower or wider as you add coils. Learning outcomes. By the end of each lesson you should attempt to add two or three coils to your clay pot. Glossary: Slab a piece of clay that has been rolled out to a specific thickness. Score scratch into the surface of the clay. Slip a mixture of clay and water. Pinch / thumb pot A pot created by pushing your thumb into a ball of clay and pinching the walls out. Coil clay rolled into a sausage shape approximately the thickness of your thumb. Clay kidney Tool used to smooth the surface of the clay.
- 12. Step 6: Moulding the animal head Learning objectives. By the end of the session you will: Understand how to sculpt clay into a recognisable animal head; Have developed your design so that the head is positioned appropriately on the pot. Learning outcomes. By the end of the session you will have: Made the head of your animal and hollowed it out; Connected the head to the pot using the score and slip technique. Glossary: Slab a piece of clay that has been rolled out to a specific thickness. Score scratch into the surface of the clay. Slip a mixture of clay and water. Pinch / thumb pot a pot created by pushing your thumb into a ball of clay and pinching the walls out. Coil clay rolled into a sausage shape approximately the thickness of your thumb. Clay kidney tool used to smooth the surface of the clay. Wire ended tool Tool used for hollowing out clay.
- 13. Click on the separate images to see how you can make: A jackal and the falcon and ……………..the human and the baboon. Think carefully how your head is positioned on your pot. Snakes, tentacles, ears and tails can wrap around the body of the pot.
- 14. Step 6: Decorating your clay pot. Remember this? Use a combination of these techniques to decorate your pot Learning objectives. By the end of the session you will: Be able to use a combination of decorative techniques to add texture and pattern to your sculpture. Learning outcomes. By the end of the session you will have: Covered your pot in patterns that show both an Egyptian reference and the texture of the animal you created.
- 18. Step 7: Glazing your pot. Remember this #2? Experiment with the glazes on the tile you made earlier in the project. Investigate mixing new colours or limiting your palette. Learning objectives. By the end of the session you will: Be confident in mixing glazes and recreating the textures you hope to use on your final pot. Learning outcomes. By the end of the session you will have: Experimented with different brush marks, layering and colours; Annotated your experiments in your sketchbook so that you remember what you did when your fired tile is returned to you.
- 19. Step 8: Paint your canopic jar. Learning objectives. By the end of the session you will: Use the knowledge from glazing your ceramic tile to recreate the colours and textures in your design. Learning outcomes. By the end of the session you will have painted your pot accurately, adding detail carefully and using black SPARINGLY! Glossary: Clay moist earth of decomposed rock Wedge technique to take the air out of clay. Slab a piece of clay that has been rolled out to a specific thickness. Leatherhard unfired clay not quite dry but firm enough to carve. Greenware dried out, unfired clay. Firing baking clay at a high temperature. Bisque clay after first firing. Kiln furnace that fires the clay. Glaze finely ground mineral solution, turns to glass when fired
Hinweis der Redaktion
- Use the ‘First ceramics lesson’ in the Autumn 2011 folder in the project folder in Art Resources (MLE). The aim is to allow students to interact with the clay and make a thumb pot. If these can be kept moist students can impress the objects they bring in later on to see how effecive they are. Understanding can be assessed using the clay jeopardy game. (same folder as the one mentionned above.)
- This may take two lessons to do it really well. You could start the second lesson by students demonstrating the technique to the rest of the class. Play the clay jeopardy for AfL. Or test them on the words in the glossary.
- This may take two lessons to do it really well. You could start the second lesson by students demonstrating the technique to the rest of the class. Play the clay jeopardy for AfL. Or test them on the words in the glossary.
- This may take two lessons to do it really well. You could start the second lesson by students demonstrating the technique to the rest of the class. Play the clay jeopardy for AfL. If you feel you have too many groups to do two slabs just do one. You could try this idea from art attack. However, because of the nature of it it couldn’t then be part of the permanent wall display outside: http://teapot3.multiply.com/video/item/1/art_attack-_making_clay_faces