The 7 Things I Know About Cyber Security After 25 Years | April 2024
Free easyburner
1. HELP
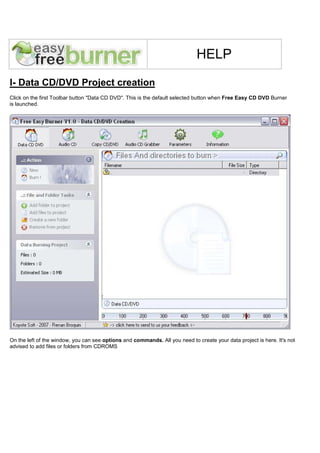
I- Data CD/DVD Project creation
Click on the first Toolbar button "Data CD DVD". This is the default selected button when Free Easy CD DVD Burner
is launched.
On the left of the window, you can see options and commands. All you need to create your data project is here. It's not
advised to add files or folders from CDROMS
2. New : Click on this item to create a new Data project. Warning, if you have already added
files and directories in the window, all will be cleared.
Burn! : Once you have added all your files and and directories that you want to burn,
click on this item to go to the Burning dialog of Free Easy CD DVD Burner.
Add folder to project : Click on this item to add a directory. A dialog will appear and
will let you select a directory on your hard disk.
Add files to project : Click on this item to add files. A dialog will appear and will let you
select files from your hard disk.
Create new folder : Click on this item to create a new folder in your project. This folder
will be created at the level selected in the listview. You will be able to rename this
directory with a right click on the item in the listview and then click on "Rename".
Remove from project : Click here to remove selection (selection are made in the
listview). the files and directories selected on the listview will be removed from the
project.
Another way to add files or directories to your data project is to drag and drop directly from explorer.
WARNING :
• It's not advised to add files or folders from CDROMS.
• Do not try to create a video DVD by Adding VIDEO_TS and AUDIO_TS directory directly in this window.
In this first version of Free Easy CD DVD Burner, you can only create DATA DVD (not VIDEO). Your DVD
with VIDEO_TS content burned with Free CD DVD Burner will not be played by DVD-VIDEO player.
4. II- Burn your DATA project
Once you have clicked on "Burn !" in the DATA CD/DVD creation window, a new window appear to let you
configure your burn.
The first thing to do is to check that the device selected in the combobox is the correct burner on wich you want to burn.
If it's not the correct burner, select the one on wich you will burn your data CD/DVD project.
The "Action " content depends on the inserted disc in your burning device.
If no disc is inserted in the selected device, all you will be able to do is :
Finish : Go Back to the Data CD/DVD Project creation window.
Refresh CD/DVD view : Read the content of the selected device. Analyse if there's a cd
or dvd inserted and read the information of the media.
Eject Disc : Eject the selected device
Create an image : Click here if you don't want to burn your data project but create an
ISO image file from your project. (output format can be ISO and Bin/Cue).
5. Here is the burning window when a cd or dvd is present in the selected burning device. As you can see, The disc information
part show you the disc type (here is a CD-R, but can be DVD-R, DVD+R, DVD-RW, DVD+RW, CD-RW, DVD+R DL etc..).
You can also see the disc status, here our disc is not empty and is appendable (mean that we can still burn on it on the
available space). The sessions show you the sessions's number on the disc.
As you can see, the "Action"Part have a new item in his list : "Burn Now !" .
Speed Write : Select in the list the speed that you want for your burn. This list contains all the available speed
concerning the disc inserted and your burner.
CD Name : enter here the name of your disc.
Buffer Size : you can select the size of the fifo buffer in wich Free Easy CD DVD burner will cache your
files during the burning process to avoid buffer underrun problems. By Default, 32 MB is selected.
Priority : This is the system priority of the burning process. You can select "High" for a high priority, in that case,
other applications can be slower during the burn (because the priority given to the burning process).
Burn Proof : This is n option to avoid Buffer underrun problems. Selected by default, if your burner is compatible
with the burn proof technology, it's better to burn with this option.
Simulation : This option allow you to realize a burning test. Your disc will not be written. The simulation option is
not available with all disc type (some DVDs are not compatible with the Simulation Option), if not, the Simulation
will be disabled.
Close Disc : Option to close the disc after the burning process. If you choose this option, your disc will
be finalized and your disc will be no more writable. (for ReWritable disc, you will must erase the disc first to burn
again on it).
Import last session : this option let you continue a multisession disc. When a disc is not closed, you can add
new sessions on it. This "Import Last session" option will read the last session and add your new files to it.
6. This is all the actions available on the burning window.
When your disc is not writable, the "Burn now !" action will not appear.
When your disc is not ReWritable, the "Erase disc" action will not appear.
if your disc is a CD-RW or a DVDRW, this option will appear to let you erase the
content of your disc. click on it and wait (it can take a little time according to your disc
and burner speed capacity).
Click on Burn Now! when you are ready to burn.
This picture show you the burning process. At the left side of the window, the "Cancel" action is available to cancel the
current burning process. Be carefull, if you cancel the burn, your disc will be not readable...
7. At the end of the burning process, your disc is automatically ejected. and the window will be updated to show
you only actions available when there is no disc in your burner.
8. III- Audio CD Project creation
With Free Easy CD DVD Burner, you can create Audio CD from your favorite audio songs. You can create Audio CD from
MP3, WMA, OGG VORBIS, WAV, APE, FLAC, AAC, M4A.
You will be able to deal with WMA format only if the WMA runtime from microsoft is installezd on your computer. Free CD
DVD Burner during his installation offers to install it.
WARNING : Free CD DVD Burner don't deal with DRM protected audio songs... DRM is an anti-copy protection. So it's
illegal to try to remove this protection.
Click on the "AUDIO CD" button in the toolbar :
9. This is all the available "Actions" for the CD AUDIO Creation :
New : Create a new audio project. All the files added in the list will be removed when
you click on it.
Burn! : When you are ready to burn your audio files, click on it. The decoding process
of your files will start. (You will be able to cancel the decoding process and go back to
the Audio cd creation window).
Note that only CD-R and CD-RW are usuable for the Audio CD Creation.
Add files to project : click to select the files that you want to burn.
Remove from project : will remove the selected track in the list.
Move up & Move Down : Change song's order in the list.
10. Now click on "Burn !" to start the decoding process and go to the burning window.
The decoded files will be temporary created on "C:Program filesFree Easy BurnerWav". But you can configure the location
of the folder (go to Parameters -> Audio CD).
This window will appear under the main window to show you the current decoding process. Wait until all the files are
decoded. A new window will appear like that :
Options and commands are the same for DATA or AUDIO. for explanation look at "II- Burn your DATA project". The only
differences are :
- You can only burn AUDIO on CD-R or CD-RW.
- You can't set a name to your CD because in AUDIO mode, there's no name...
- The "Create image" action will only create Bin/Cue image file from my project. ISO format is only for data project.
Insert a compatible disc in your burner with enough available space on it and click on "Burn now !"
11. Note : As you can see, here, my disc is a CD-R with 5 sessions on it. The disc status is "Appendable", but my project is
larger than the capacity of my disc... used space 79min 25sec andthe total space of my disc is 79min 59sec ... so i can
only burn 34 seconds on this disc! so if i try to burn on it, i will have this error : "Not enough space on this disc".
The "Finish" Action will makes me go back to the Audio CD Project creation window.
12. III- Audio CD Grabber
Free Easy CD DVD Burner is able to rip your favorite audio CD to mp3 on your hard disk. Click on "Audio CD Grabber"
on the toolbar of the window to get it ready.
If it's the first time you run the grabber, you must configure the way you want to grabb your music. So click on
"Ripper Configuration" .
13. The first thing to do is to configure the output path. This is the path
in wich your files will be be saved. Click on the yellow button (with
folder icon) to select a directory on your disc.
Title configuration : you can configure what information you want
in the title of your ripped files. By default, it's the Track number and
the title, but you can add more information like album, artist or even
the year of the album. All you have to do is to click on the little
buttons.
here, the files will be saved like this "Title - Artist - Year.mp3".
Save in the directory Artist / Album : artist and album folders will
be created if they don't exists %Output
Path%%Artist%%Album%Your song.mp3
If you want configure the Mp3 output format : click on
You can configure a lot of option for the mp3 format. The
bitrate, channel, VBR or not.
By default, the bitrate is confured on 128 and join-stereo
channel.
If you want more information about the mp3 format go to the
net and search articles.
Note : the mp3 encoder is L.A.M.E
Once your AUDIO CD is in your device (you can select your device)
the tracks will appear in the list. A free CDDB request will be automatically send to get information about your
disc. You will be able to retieve information like the artist and album name, the year, the genre and the track's title.
14. Here is the available "Actions" :
Rip now in mp3 : Launch the rip of the selected tracks in mp3 format
Rip now in WAV : Launch the rip of the selected tracks in WAV format.
Save as image file : this action let you save your audio cd in Bin/Cue format on your
hard disc. An image is an exact copy of your disc.
Eject Media : Eject the disc of the selected device.
The options let you configure the ripper except for "Info from FreeCDDB" who launch a
request to the famous database on internet.
When you right click on a track in the list, a popupMenu appears :
You can with this menu select or unselect all the tracks. And you can cancel the rip of the current track (only when a rip is
in progress).
Click on "Rip Now ..." when you are ready :
15. the ripped files will be in the output folder configured. (By default, the ouput folder is
"c:Program filesFreeC:Program FilesFree Easy BurnerMy Music").
16. IV- Copy CD/DVD (ISO Creation and ISO burn)
Free Easy CD DVD Burner can create iso or bin/cue image from your cd and DVD.
Note : This software don't deal with protected DVD video.
The first thing to do is to select your device with your CD/DVD in it.
If your CD or DVD is not empty, all you will be able to do is to copy your disc as image file on your hard disc (ISO
or Bin/Cue format). After you iso image file created, you will be able to burn it on an Empty CD/DVD.
Click on "Copy on your hard disk" to start the copy. A dialog will appear to select the destination path.
17. Burn an ISO image file :
If you want to burn an ISO image file, you must insert an empty CD or DVD in your device. Wait a little the refresh.
If your disc is empty, you will have the option to burn an image file on your disc.
So just click on "Burn an image file" to select your image on your hard disk. Confirm to start !