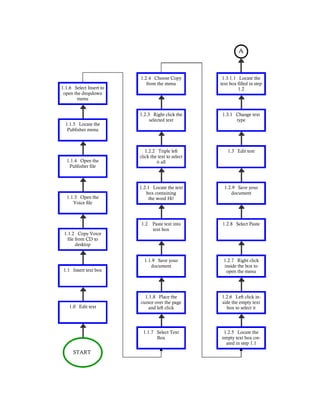
1. A
1.2.4 Choose Copy 1.3.1.1 Locate the
from the menu text box filled in step
1.1.6 Select Insert to 1.2
open the dropdown
menu
1.2.3 Right click the 1.3.1 Change text
selected text type
1.1.5 Locate the
Publisher menu
1.2.2 Triple left 1.3 Edit text
click the text to select
1.1.4 Open the it all
Publisher file
1.2.1 Locate the text 1.2.9 Save your
box containing document
1.1.3 Open the the word Hi!
Voice file
1.2 Paste text into 1.2.8 Select Paste
text box
1.1.2 Copy Voice
file from CD to
desktop
1.1.9 Save your 1.2.7 Right click
document inside the box to
1.1 Insert text box open the menu
1.1.8 Place the 1.2.6 Left click in-
cursor over the page side the empty text
1.0 Edit text and left click box to select it
1.1.7 Select Text 1.2.5 Locate the
Box empty text box cre-
ated in step 1.1
START
2. 1.3.2.1 Locate the
B
text box changed in
step 1.3.1
1.3.3.1 Locate the
text box used in step
1.3.2 Edit text color 1.3.2
1.3.3 Edit text size
1.3.1.7 Save your
document
1.3.2.6 Save your
document
1.3.1.6 Click the
page outside of the
text box
1.3.2.5 Select the
black button on the
1.3.1.5 Select the top line
Calisto MT font
1.3.2.4 Select the
dropdown menu for
1.3.1.4 Open the text color
dropdown menu
1.3.2.3 Locate the
dropdown menu for
1.3.1.3 Locate the text color
dropdown menu
saying Times
1.3.2.2 Triple left
click the text to select
1.3.1.2 Triple left it all
click the text to select
it all
A
3. 2.1.6 Right click the 2.2.1 Locate page
first page of the tem- four of the template
plate
D
2.1.5 Select Copy 2.2 Equidistant spac-
ing of elements
2.2.6 Mouse over
the edge for the four-
headed cursor
2.1.4 Right click to 2.1.12 Repeat steps
open the menu 2.1.1-2.1.10 for pages
2, 3, and 4
2.2.5 Click the
cursor on the grey
part of the screen
2.1.3 Left click to 2.1.11 Click the icons
select the group to switch pages
2.2.4 Click the
Group/Ungroup
icon to ungroup
Mouseover the edge 2.1.10 Align the
for the four-headed edges of the group
cursor with the blue lines
2.2.3 Locate the
Group/Ungroup
icon below the image
2.1.1 Locate the 2.1.9 Drag the new
elements for page 1 group onto the first
page of the template
2.2.2 Click the
grouped elements to
select them
2.1 Elements are 2.1.8 Mouseover
within boundary the new group
margins
2.0 Element align- 2.1.7 Choose Paste
ment
C
4. F
3.1.6 Choose Clip
Art to open the
ClipArt window
3.2.3 Left double click
to open the Format
Picture window
3.1.5 Choose Pic-
ture to open the fly
out menu
3.2.2 Mouse over a cor-
ner of the image for the
four-headed cursor
3.1.4 Select Insert to
open the dropdown
menu
3.2.1 Select image
from step 3.1.7
3.1.3 Locate the
menu at the top of
the Publisher screen
3.2 Adjust size of
image
3.1.2 Left click in-
side any cell in the
table to select it
3.1.9 Save your
document
3.1.1 Locate the
table on the third
page of the template
3.1.8 Close the Clip
Art window
3.1 Insert image
3.1.7 Double click
any image in the top
row
3.0 Edit graphics
E
5. 4.7 Select More
Colors
4.6 Open the
dropdown menu
for Color
4.5 Locate the drop- H
down menu
for Color
4.10 Left click the
OK button in the
4.4 Double click to Color Window
open the Format
Object window
4.9 Enter the RGB
for one of the CMC
4.3. Mouse over the edge of colors
the selected square for the
four-headed cursor
4.8 Left click the
Custom tab in the
4.2 Left click the Colors window
first square from the
left to select it
4.1 Locate the im-
age at the bottom of
page one
4.0 Colors used are chosen
from the CMC
web site’s palette
G
6. J
5.6 Select the
appropriate choice
5.5 Examine the
available correction
choices
5.4 Choose Spelling
to open the check
Spelling window
5.3 Choose Spelling
to open the fly out
menu
5.2 Select Tools to
open the dropdown
menu
5.1 Locate the
menu at the top of
the Publisher screen
5.0 Spell Check
I
7. Goal: Statement: after successful completion of the lesson, Associated Students of Copper Mountain College
members will be able to use Microsoft Office 2003's Publisher to produce a four-page template of The Voice with
100% accuracy in 59 minutes or less.
1.0 Edit text 2.0 Edit 3.0 Element 4.0 CMC 5.0 Spell
graphics alignment palette Check tool
C E G I
1.3.3.5 Save your 2.2.9 Save your 3.2.7 Save your 4.14 Save your 5.9 Save your
document document document document document
1.3.3.4 Open it and 2.2.8 Continue dragging the 4.13 Repeat steps 4.1 5.8 Left click the
image to the bottom 3.2.6 Click the OK
select 11 button through 4.12 for the Close button
of the page until the
distance between the image and
the table is equal to the
distance between the image and
the bottom blue line
1.3.3.3 Locate the 3.2.5 Change height 4.12 Double click the 5.7 Repeat steps 5.5
dropdown menu for to 50% in the Scale third square from the left and 5.6 until all red-
2.2.7 Click and drag the
image so that the
1.3.3.2 Triple left vertical edges 4.11 Left click the OK 5.6 Select the
3.2.4 Select the
click the text to select are aligned over the blue button in the Format appropriate choice
lines Size tab
B D F H J