Log managementforthecloudwithlogstash installationguide
•
0 gefällt mir•525 views

Opensource, Highly available and Scalable solution that can accommodate your Log Management needs with a centralized Dashboard with Filtering capabilities using elastic search

Empfohlen
Weitere ähnliche Inhalte
Andere mochten auch
Andere mochten auch (16)
Kürzlich hochgeladen
Kürzlich hochgeladen (20)
Log managementforthecloudwithlogstash installationguide
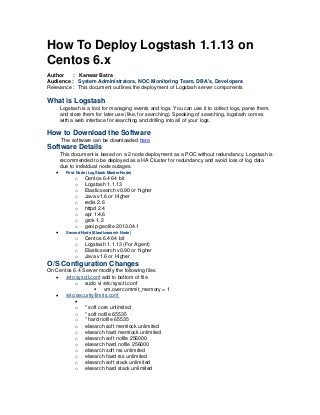
- 1. How To Deploy Logstash 1.1.13 on Centos 6.x Author : Kanwar Batra Audience : System Administrators, NOC Monitoring Team, DBA's, Developers Relevance : This document outlines the deployment of Logstash server components What is Logstash Logstash is a tool for managing events and logs. You can use it to collect logs, parse them, and store them for later use (like, for searching). Speaking of searching, logstash comes with a web interface for searching and drilling into all of your logs. How to Download the Software The software can be downloaded here Software Details This document is based on a 2 node deployment as a POC without redundancy. Logstash is recommended to be deployed as a HA Cluster for redundancy and avoid loss of log data due to individual node outages. First Node (LogStash Master Node) o Centos 6.4 64 bit o Logstash 1.1.13 o Elasticsearch v0.90 or higher o Java v1.6 or Higher o redis 2.6 o httpd 2.4 o apr 1.4.6 o grok 1.2 o geoip-geolite 2013.04.1 Second Node (Elasticsearch Node) o Centos 6.4 64 bit o Logstash 1.1.13 (For Agent) o Elasticsearch v0.90 or higher o Java v1.6 or Higher O/S Configuration Changes On Centos 6.4 Server modify the following files /etc/sysctl.conf add to bottom of file o sudo vi /etc/sysctl.conf vm.overcommit_memory = 1 /etc/security/limits.conf o * soft core unlimited o * soft nofile 65535 o * hard nofile 65535 o elsearch soft memlock unlimited o elsearch hard memlock unlimited o elsearch soft nofile 256000 o elsearch hard nofile 256000 o elsearch soft rss unlimited o elsearch hard rss unlimited o elsearch soft stack unlimited o elsearch hard stack unlimited
- 2. o elsearch soft cpu unlimited o elsearch hard cpu unlimited o elsearch soft nproc unlimited o elsearch hard nproc unlimited o elsearch soft as unlimited o elsearch hard as unlimited /etc/sysctl/selinux o SELINUX=disabled /etc/sysconfig/iptables & ip6tables o Modify the files and add relevant ports. This document is created based on iptables being disabled. o service iptables stop o service ip6tables stop o chkconfig iptables off o chkconfig ip6tables off Reboot the Host after above Changes Pre-Install Checks o service iptables status ( output - iptables: Firewall is not running) o service ip6tables status ( output - ip6tables: Firewall is not running) o sestatus ( output - SELinux status: disabled) Software Install Logstash Node (Install rpm's in the following order ) sudo yum install java-1.6.0-sun-1.6.0.32-1jpp.x86_64.rpm sudo yum install elasticsearch-0.90.2-1.el6.x86_64.rpm logstash-1.1.13-1.el6.noarch.rpm redis-2.6.13-1.el6.x86_64.rpm grok-1.20110708.1-1.el6.x86_64.rpm sudo yum install geoip-geolite-2013.04-1.el6.noarch.rpm Backup the default Logstash file logstash.conf in /etc/logstash directory to logstash.conf.default Create logstash.conf Modify the elastic search yml file also and update it with relevant node details if you are using GeoIP license change the logstash GOIP to ls /usr/share/GeoIP/GeoIPCity.dat if using lite us the value in the attached logstash.conf Install sudo yum install httpd-* apr-* Create a link to /usr/lib64 in /etc/httpd Modify the httpd.conf Please pay special attention to the LoadModules . Unzip the kibana software downloaded earlier and move the directory to /var/www/html Change directory to location of your kibana (/var/www/html/kibana3), copy kibana3.conf to /etc/httpd/conf.d kibana conf should be configured config.js is updated as To have all services startup at boot run chkconfig o chkconfig httpd on o chkconfig elasticsearch on o chkconfig logstash on This completes the setup of Logstash software on the First Host. The second host is configured as an elastic search server. Elasticsearch Node (Install rpm's in the following order ) sudo yum install java-1.6.0-sun-1.6.0.32-1jpp.x86_64.rpm sudo yum install elasticsearch-0.90.2-1.el6.x86_64.rpm logstash-1.1.13- 1.el6.noarch.rpm grok-1.20110708.1-1.el6.x86_64.rpm sudo yum install geoip-geolite-2013.04-1.el6.noarch.rpm
- 3. Backup the default Logstash file logstash.conf in /etc/logstash directory to logstash.conf.default Create logstash.conf as for the agent Update the elastic search yml as To have all services startup at boot run chkconfig o chkconfig httpd on o chkconfig elasticsearch on o chkconfig logstash on Now we have a running Logstash environment. At this time you can access the Kibana frontend Run the curl command for template mapping from logstash server. Configuration Files for references https://drive.google.com/folderview?id=0B2jSbXbYuSe_MVotR3ZDdzlwaFE&usp=sharing Disclaimer: The install of this product and opinions are listed above are solely based on my experience in the implementation of Logstash for a Customer and is a working solution copy from that experience.. You can reference and use this document and send questions which I can answer based on my experience. This however is not an official document from Logstash team and they have not evaluated this document for it’s accuracy.