Creating tables in word
•
1 gefällt mir•331 views

This is an assignment to walk students through creating a table in Word.

Empfohlen
Weitere ähnliche Inhalte
Was ist angesagt?
Was ist angesagt? (19)
Andere mochten auch
Andere mochten auch (14)
Ähnlich wie Creating tables in word
Ähnlich wie Creating tables in word (20)
Mehr von Jennifer Spann
Kürzlich hochgeladen
Kürzlich hochgeladen (20)
Creating tables in word
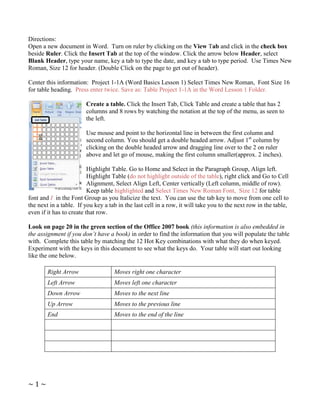
- 1. Directions: Open a new document in Word. Turn on ruler by clicking on the View Tab and click in the check box beside Ruler. Click the Insert Tab at the top of the window. Click the arrow below Header, select Blank Header, type your name, key a tab to type the date, and key a tab to type period. Use Times New Roman, Size 12 for header. (Double Click on the page to get out of header). Center this information: Project 1-1A (Word Basics Lesson 1) Select Times New Roman, Font Size 16 for table heading. Press enter twice. Save as: Table Project 1-1A in the Word Lesson 1 Folder. Create a table. Click the Insert Tab, Click Table and create a table that has 2 columns and 8 rows by watching the notation at the top of the menu, as seen to the left. Use mouse and point to the horizontal line in between the first column and second column. You should get a double headed arrow. Adjust 1st column by clicking on the double headed arrow and dragging line over to the 2 on ruler above and let go of mouse, making the first column smaller(approx. 2 inches). Highlight Table. Go to Home and Select in the Paragraph Group, Align left. Highlight Table (do not highlight outside of the table), right click and Go to Cell Alignment, Select Align Left, Center vertically (Left column, middle of row). Keep table highlighted and Select Times New Roman Font, Size 12 for table font and I in the Font Group as you Italicize the text. You can use the tab key to move from one cell to the next in a table. If you key a tab in the last cell in a row, it will take you to the next row in the table, even if it has to create that row. Look on page 20 in the green section of the Office 2007 book (this information is also embedded in the assignment if you don’t have a book) in order to find the information that you will populate the table with. Complete this table by matching the 12 Hot Key combinations with what they do when keyed. Experiment with the keys in this document to see what the keys do. Your table will start out looking like the one below. Right Arrow Moves right one character Left Arrow Moves left one character Down Arrow Moves to the next line Up Arrow Moves to the previous line End Moves to the end of the line ~1~
- 2. Add 2 More Rows to top of table. o Highlight the first two rows of the table o Click on the Layout Tab under the Table tools Contextual tab. In the Rows and Column Group, click Insert Above. This will insert 2 new rows at the top of your table o Highlight the two new rows, and right click to Go to Cell Alignment, Select Align Center. (2nd Choice in the middle of 2nd Column). Merge the first row into one cells in order to type a heading as shown below. o Highlight the first row. Make sure the Layout Tab is selected. Under the Merge Group, Select Merge Cells. While still in the first row, click the Home tab and Click Center in the Paragraph Group. Now type in All Caps: KEYBOARD SHORTCUTS FOR MOVING THE INSERTION POINT (Times New Roman, Size 14 is the font size that should be used for heading). In the 2nd row, type: PRESS. Make sure it is aligned to the left in Italicized Times New Roman, 12 pt font. Tab to get to the next column, type and italicize in all caps: TO MOVE THE INSERTION POINT, Size 12. Spell Check your work. Hit F7, or go to Review tab and look at the far left and click . Finally, the cursor must be in the table in order to get the Table Tools Contextual Tab above the Design Tab. To select a professional looking table style, Click the Design Tab and change your basic table to a preferred style of your choice. Under Table styles to the right, there is a More drop down arrow for more table styles. The table should be one page. Adjust (light grey box at end of table) table to full sheet, pull box to approximately 9 inches on ruler on left. Submit completed table to the teacher using the DropBox feature in e-chalk. KEYBOARD SHORTCUTS FOR MOVING THE INSERTION POINT PRESS TO MOVE THE INSERTION POINT Right Arrow Moves right one Character Left Arrow Moves left one Character Down Arrow Moves to the next line Up Arrow Moves to the previous line End Moves to the end of the line ~2~