1. Wireless
Button
QuickGuide to Speedlite 600EX-RT
Optical Wireless Flash Setup
INTRODUCTION
The Speedlite 600EX-RT allows you to set up multiple
Speedlites which can be wirelessly controlled and synchronized by a single master unit. This QuickGuide will
describe how do this via the traditional Canon “optical”
wireless flash method. Optical wireless flash control
allows you to integrate the 600EX-RT with non-radio compatible Speedlite models, even some discontinued ones,
for multiple flash set-ups with full E-TTL auto exposure.
Your setup options include:
•
Automatic E-TTL with equal output from all
firing groups
•
Automatic Ratio E-TTL with unequal (ratio)
output between firing groups
•
Manually-set power output with a different flash
output for each unit or firing group, if desired
A “master” flash unit attached to the camera controls one
or more off-camera “slave units.”
It is also possible to have two or more cameras, each with
a master unit attached, and to switch from one to another
during a wireless flash shooting session. The slave lighting setup remains the same. The following Canon units
have master capability with the optical wireless system:
•
Speedlites 600EX-RT, 580EX II, 580EX, 550EX,
and newly-introduced 90EX
•
Speedlite Transmitter ST-E2
1
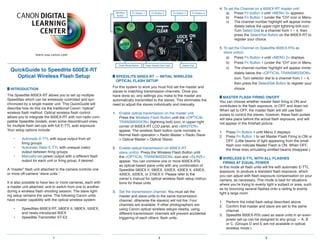
Fn Button 1
Flash Mode Button
Fn Button 2
Flash Ready/Test Flash
Fn Button 3
Fn Button 4
Select Dial
S
PEEDLITE 600EX-RT — INITIAL WIRELESS
OPTICAL FLASH SETUP
For this system to work you must first set the master and
slaves to matching transmission channels. Once you
have done so, any settings you make to the master are
automatically transmitted to the slaves. This eliminates the
need to adjust the slaves individually and manually.
1.
Enable optical transmission on the master unit.
Press the Wireless Flash Button until the OPTICAL
TRANSMISSION (lightning bolt) icon, in upper-right
corner of 600EX-RT LCD panel, and MASTER
appear. The wireless flash button cycle normally is:
Normal flash operation Radio Master Radio Slave
Optical Master Optical Slave)
2. nable optical transmission on 600EX-RT
E
slave unit(s). Press the Wireless Flash Button until
the OPTICAL TRANSMISSION icon and SLAVE
appear. You can combine one or more 600EX-RTs
as optical-based slave units with any combination of
Speedlite 580EX II, 580EX, 550EX, 430EX II, 430EX,
420EX, 320EX, or 270EX II. Please refer to the
owner’s manual for optical wireless flash setup instructions for these units.
3.
Set the transmission channel. You must set the
master and slave units to the same transmission
channel, otherwise the slave(s) will not fire. Four
channels are available. If other photographers are
using Canon optical wireless setups nearby, using
different transmission channels will prevent accidental
triggering of each others’ flash units.
2
4. To set the Channel on a 600EX-RT master unit:
a) Press Fn button 4 until MENU 3 appears.
b) Press Fn Button 1 (under the “CH” icon in Menu
c)
The channel number highlight will appear immediately below the upper-right lightning bolt icon.
Turn Select Dial to a channel from 1 – 4, then
press the Select/Set Button on the 600EX-RT to
register your choice.
5. o set the Channel on Speedlite 600EX-RTs as
T
slave unit(s):
a) Press Fn Button 4 until MENU 2 displays.
b) Press Fn Button 1 (under the “CH” icon in Menu
c)
The channel number highlight will appear immediately below the OPTICAL TRANSMISSION
icon. Turn selector dial to a channel from 1 – 4,
then press the Select/Set Button to register your
choice.
MASTER FLASH FIRING ON/OFF
You can choose whether master flash firing is ON and
contributes to the flash exposure, or OFF and does not.
When set to OFF, the master flash will still use flash
pulses to control the slaves, however, these flash pulses
will take place before the actual flash exposure, and will
not appear in the finished picture.
1. Press Fn Button 4 until Menu 2 displays.
2.
Press Fn Button 1 to set Master Flash Firing to ON or
OFF. (Little beams of light appearing from the small
flash icon indicate Master Flash is ON. When OFF,
the three lines simulating emitted beams disappear.)
W
IRELESS E-TTL WITH ALL FLASHES
FIRING AT EQUAL POWER
In this mode all flash units will fire with automatic E-TTL
exposure, to produce a standard flash exposure, which
you can adjust with flash exposure compensation on your
camera, as necessary. This mode is best for situations
where you’re trying to evenly light a subject or area, such
as by bouncing several flashes onto a ceiling to evenly
light a large room.
1. Perform the initial flash setup described above.
2.
Confirm that master and slave are set to the same
channel.
3.
Speedlite 600EX-RTs used as slave units in an evenpower set-up can be assigned to any group — A, B
or C. (Groups D and E are not available in optical
wireless mode.)
3
2. 4.
Position the camera and slave unit(s) within the
correct operating range (10 meters/33 feet indoors),
and so that the flash sensors on the front of the slave
units (under the Canon logo) are pointed toward the
master.
5.
Press Fn 4 Button on the master unit until Menu 2
appears. Press Fn 2 Button (under “Ratio”, in Menu
2) repeatedly until ALL appears. Each press toggles
you through ALL, A:B or A:B C. (You will
also see Ratio Off in small letters on the Speedlite
600EX-RT’s LCD panel).
6.
Press the MODE button on the master unit to set
the master to E-TTL. This will automatically set the
slave to E-TTL as well.
7.
Press the Test Flash Button on the master flash to
check operation. If a slave does not fire, make sure
it is within the operating range and that its sensor is
pointed toward the master.
8.
Take the picture. The green flash exposure confirmation lamp on the master unit will light for 3 seconds to
confirm standard flash exposure.
OPTICAL WIRELESS E-TTL WITH RATIO CONTROL
This mode enables you to divide the slave units into different firing groups (A:B or A:B C) and control the flash
ratio (relative output) between them so that different
groups have different output. Overall flash exposure will
still be automatically controlled by your camera’s E-TTL
system. You can also use flash exposure compensation
(FEC) on your camera to adjust the overall exposure, as
necessary. This mode ideal for set-ups where you want
distinct shadows, or want to direct more light to some
areas of a scene than others.
1. Perform the initial flash setup described above.
2. set each slave unit’s firing group:
To
With Menu 1 on the LCD panel of each slave unit,
Press Fn Button 3 on each slave (under the “GR”
icon). Set at least one unit to A and at least one
other to B.
3. To set the ratio on the master unit:
a. Press Fn Button 4 to display Menu 2.
b.
Press Fn Button 2 (under the RATIO icon). Each
press toggles you through ALL, A:B or
A:B C. Note: A:B requires a minimum of two
units. A:B C requires a minimum of three. In
either case, you can adjust the power ratio only
between groups A and B. Group C is independent of A and B and is best used for lighting the
background or for accent lighting, rather than
lighting your main subject.
4
c. Press Fn Button 3, under the GR icon.
d.
Press Fn Button 3 again to display A:B ±, and
highlight the ratio scale on the 600EX-RT’s LCD
panel.
e.
Turn the Select Dial to set the flash ratio, then
press the Select/Set button.
f.
Press Fn Button 4 to return to shoot-ready mode.
All flash ratios are expressed as A relative to B and as
relative amounts of exposure. For example, “1:1” means
firing groups A and B will produce equal exposure, “2:1”
means A will produce twice as much exposure as B, “1:4”
means B will produce four times (2 stops) as much exposure as A, and “8:1” means A will produce eight times (3
stops) as much exposure as B.
E-TTL General Notes
1.
Flash coverage for optical wireless flash operation is
set to 24mm by default. You can manually change the
flash zoom coverage if you wish.
2.
Press the depth-of-field preview button on the camera
if you want to preview the lighting by firing a modeling
flash.
3. “Master Flash ON” is active, the master unit is
If
always part of the “A” group — no exceptions.
4.
During optical-based wireless E-TTL, a master unit
will enter sleep mode (Auto Power Off) after about 90
seconds of inactivity. Activative Speedlite 600EX-RT
Custom Function 01-1 if you wish to disable sleep
mode on the master unit.
5. a slave enters sleep mode, press the master unit’s
If
test flash button to turn the slave back on. Slave units,
by default, stay active for 60 minutes before going to
sleep mode. You can use Flash C.Fn 10-1 to change
this to 10 minutes to conserve slave unit battery
power.
6.
The following flash settings are available in E-TTL
mode (all set on the master unit):
•
Flash exposure compensation
•
Flash exposure bracketing
•
Flash exposure lock
•
High-speed sync
•
Manual flash
•
Stroboscopic flash
WIRELESS MANUAL FLASH
In this mode you set each slave unit to a fixed output and
set the camera exposure manually. You can set each unit
to the same or a different output. This mode is ideal for
lighting setups where the flash-to-subject distance is fixed
and you want your exposure setting to be consistent from
5
one shot to the next—for example, when you are
photographing subjects in the same scene whose color
and reflectivity are variable.
1. Perform the initial flash setup described above.
2.
Use the Mode Button on a 600EX-RT master unit to
set the flash mode to M.
3. et firing group ratio: While MENU 1 is displayed
S
on the master unit, press Fn Button 2 to the output
ratio of your choice. Your options are:
a. ALL (NO RATIO — EQUAL OUTPUT)
b. A/B (RATIO A:B)
c. A/B/C (RATIO A:B:C)
All ratios are between firing groups.
4.
Select a firing group: Press Fn Button 3 on the master unit, under the GR icon, then turn the Select Dial
and select the group for which you want to set the
flash output. Select A, B, or C. (It’s not possible to set
a slave unit to groups D or E during optical wireless
operation.)
5.
Set the flash output: Press Fn Button 3 * ± again,
and with the power level scale highlighted, turn the
Select Dial to set the flash output, then press the
Select/Set Button.
6.
Repeat steps 3 and 4 on the master unit to select and
set additional flash groups.
600EX-RT MEMORY FUNCTION
You can save one set of wireless settings to memory and
recall them later. This not only saves time during wireless setups, it’s also a quick way to switch from standard
flash-on-camera to a commonly-used wireless set-up.
The settings vary slightly depending on whether you are
setting a master or slave.
1. To access the Memory menu:
a. the master unit: Press Fn Button 4 to display
On
MENU 3.
b. the slave unit: Press Fn Button 4 to display
On
MENU 2.
2. To save the settings to Memory:
a. Press Fn Button 3 MEMORY.
b. Press Fn Button 1 SAVE.
3. To apply the settings from Memory:
a. Press Fn Button 2 LOAD.
6