SlideShare ist ein Scribd-Unternehmen logo
1 von 16
Introduction to Microsoft Access
                                 Part 3 - Reports

Someone once claimed that the computer revolution would do away with the need for
paper. Needless to say that person was wrong! Using Reports you can do your bit to
    transform the rainforest into some very impressive thousand-page printouts.


1. Using AutoReport


Once you have created a table or a query, you can always press Ctrl+P and it will
print out. Creating a report, however, can make the printout more attractive and you
can control what is printed. Like a query, a report takes information from other parts
of the database (i.e. tables and queries) and organises that information according to
your instructions. Like queries, reports are stored as distinct objects in your database.

AutoReport is a simple report wizard. Its limitation is that you can only produce a
report using one table or query.

1. To use the AutoReport feature, you select the Reports Tab of your Database
Window and click the New button.

2. You have a choice between a Columnar and a Tabular report.

3. You have to choose the table or query that you want to base the report on.


Your Task

Using the Products Table, create and save both a Columnar and a Tabular report.
What are the differences between the two types of reports?


Page 1 of 16                                                                    7/4/2012
2. Your First Report


Now you have created your first report, let us see what you can do with it. When the
report is first created, it will be opened for you in Print Preview. You get the
following buttons on your toolbar:


Your Task

Experiment with the buttons and see what they do.

1. View more than one page at a time. Why is it sometimes useful to do this before
printing?

2. Export your report to Word. Alter the layout, as desired and print it

Other options are hidden away in the Page Setup. Get there via the File Menu.
There are three tabs for Margin, Page and Column settings.


Margin Settings are displayed in
metric or Imperial measure, depending
on how Access is set up.

Print Data Only will only print out the
data, not the field headings.

Page Settings is where you choose
Portrait or Landscape orientation.
You can also choose your paper size
(usually A4) and your printer.

Column Settings controls how many
columns you will have and the width
between columns.


For Discussion

1. What difference does changing the Column Layout settings make?

2. Why should you avoid Landscape mode for columnar reports?


Page 2 of 16                                                               7/4/2012
3. Creating Labels


Access can help you generate labels for mailing lists and other purposes.

1. Start the Label Wizard and choose a table or query.

2. If you are using Avery Labels, you can choose your labels by product number.
Otherwise, click the Customise button and set your label dimensions. You can name
a custom label and save it for future use.

3. Once you have the correct label type, you can modify the appearance of the labels.
You can make the text bold, italic or underlined and you can select a font. The
formatting you choose affects the whole label. Unfortunately, you cannot choose, for
example, to have one field italic and the rest normal.

4. Next, choose which fields to have on the label. Usually this will be the fields that
make up the customer's address. If you want the fields on separate lines, press the
Enter key. If you want to add characters to the label (for example a comma at the
end of each address line), enter this character in the place where you want it to appear.

5. You then decide how you want to sort the labels (mailing lists are usually sorted by
postal code).


Your Task

Create a set of mailing lists for Northwind customers. Add a comma at the end of
each line and sort the labels by postal code.

Your labels should look like this:


Name and Save your Report


Page 3 of 16                                                                   7/4/2012
4. Creating a Chart


If a table or query has a numeric field, you can produce a graph using the Chart
Wizard.

1. Select the Chart Wizard from the New Report list.

2. Choose a table or query on which to base the graph.

3. Decide what type of chart you
want. Click each chart type to see a
description of how that chart is used.


4. Decide which fields you want in your chart. At least one field must be numeric.

5. Preview how you want your chart to appear.

6. Decide whether or not you want a Legend (a key). Name and save the report.

7. If your chart does not appear as you wanted, switch to Design View and alter the
chart's dimensions. Double click the Chart to open the chart in Microsoft Graph.


Your Task

In the Northwind Database create a chart based on the Category Sales for 1995
query. Your chart should look something like this:


Page 4 of 16                                                                7/4/2012
5. Advanced Reports


Use the Report Wizard if you want to include fields from more than one table or
query.

1. Select Report Wizard from the New Report list. There is no need to select a
table or query. Click OK.

2. Now you can choose various fields from more than one table or query. The screen
is almost identical to the Simple Query Wizard.


3. Access then guesses how you want your data to appear by looking at the
relationships between the fields you have selected. You can change the layout of the
information and you see an on-screen preview.

4. You can then arrange your information into groups. The grouping will insert a
series of headers in your report.


Page 5 of 16                                                               7/4/2012
5. You can the Sort the ungrouped information. Click the Summary Options button
if you want calculations made:


6. Choose a layout style for your report


Your Task

Create a report that lists products by category. Consider your grouping carefully. Get
the wizard to calculate the average price for each product in each category. Your
report should end up looking something like this:


Page 6 of 16                                                                 7/4/2012
6. Formatting a Report


Very often the wizards do not produce a perfect layout and creative types find the
finished products rather uninspiring. This is where you need to switch to Design
View and customise the layout.


                                                                     Sections


                Text label          Data Box

You will notice that you have two kinds of text markers. Data Boxes are boxes,
which display a field's data in the final report. Labels are simple text markers to
describe the corresponding data box.

You will also notice markers that organise the report into Sections. These Sections
represent the different parts of your report. The sections you will always see are:

Report Header       Prints at the very start of the first page of the report.
 Page Header        Prints at the start of each page, except on the first page of the
                    report where it will print immediately after the Report Header.
     Detail         This is the main body of the report. The Detail section will be
                    repeated for every record in the report.
  Page Footer       When each page is nearly full, Access will finish it off by printing
                    the Page Footer at the bottom of the page.
 Report Footer      This section is printed at the very end of the last page of the
                    report, immediately following the Page Footer.

Your Task

Select a text box. You should notice that the following toolbar appears:


1. Experiment with these tools and beautify a report.
2. Locate the Format Painter and work out what it does.


Page 7 of 16                                                                    7/4/2012
7. Moving Things Around


When you click on a text box, the selection handles appear. These are black squares
that you can click on to move or re-size the box. To move a text box, follow the
following steps:

1. Click the item you want to move.

2. Move the mouse pointer to any edge of the selected item.

3. Click and hold the Left Mouse Button and drag the item to a new position.

4. Release the mouse button when the item is properly placed.

5. Press CTRL+Z (undo) if you want to start again.

If you try to move an object in a Columnar Report, you will notice that the data
boxes and labels are stuck together. When you select one, selection handles appear
around both, as below:


You will notice that there are two handles that are larger than the others. Click and
drag one on the left to move the label. Click the large handle between the two boxes
to move the data box. If you click on the smaller handles, you can move both the
label and the data box together.

To re-size an object, move the mouse over the selection handles again until the cursor
changes to a double-headed arrow. Click and drag to re-size the box.

Your Task

1. Create a Columnar Report using
AutoReport.

2. Change to Design View.

3. Use the Format Painter to turn all the
labels red.

4. Increase the space between the labels
and the data boxes.

5. Align both the labels and the data
boxes, so the columns are straight.   Align objects by selecting Align from the
                                                    Format menu


Page 8 of 16                                                                 7/4/2012
8. Lines and Borders


1. You should remember that your report is divided into Sections. It is sometimes a
good idea to divide these sections by adding lines to the report. If the Wizard hasn't
added any lines in your report, add one by clicking the Line Button, which is in the
Toolbox. Practice moving and re-sizing the line

If you can't see the Toolbox, select
Toolbox from the View menu.


2. Select your line and change its colour by clicking the arrow next to the
Line/Border Colour button. You are presented with a rainbow of colours to choose
from.

3. Change the width of the line by clicking the arrow next to the Line/Border Width
button. You have seven widths to choose from.

4. Add special effects to a line by clicking the down arrow next to the Special Effects
button. Experiment with these special effects and see what they do. Holding the
mouse over each, will identify the six different effects, which are Shadowed, Sunken,
Flat, Etched, Raised and Chiselled.


                                                                The Special Effects
                                       The Line/Border
                                                                      button
The Line/Border Colour button           Width button


Your Task

You can change the borders of both labels and data boxes in exactly the same way as
you can change lines. Change the borders of your text boxes and look at the result in
Print Preview mode.


Page 9 of 16                                                                  7/4/2012
9. Lining Everything Up


When you move things around in a report, you can easily end up with objects that are
out of alignment.

The background grid can help you line things up.
By selecting Snap to Grid from the Format
Menu, all objects that are moved will always
align with the dots on the grid.


If you want to align objects with each other,
select a group of objects and then choose an
Align option from the Format Menu.


If you select Size from the Format Menu, you can change the size of objects, as
follows:

Size To Fit makes the boxes large enough to display all the
information they contain.

Size To Shortest resizes all the boxes to the same size as
the smallest box.

Size To Tallest resizes all the boxes to the same size as the
tallest box.

Increase or decrease Horizontal Spacing or
Vertical Spacing to change the spacing between
objects.

Make Equal ensures that the spacing between all
objects is the same.


Your Task

1. Open a report and align the objects in the Detail section of the report.
2. Increase the horizontal and vertical spacing between the objects and make sure all
objects are equally spaced.
3. Export your report to an Excel Spreadsheet and save the new document.


Page 10 of 16                                                               7/4/2012
10. OLE Objects


OLE stands for Object Linking and Embedding. This allows you to create a file in
another application (e.g. a picture or an Excel spreadsheet) and import it into
Publisher. If you want to edit the object, you can do so in the application that
originally created it.

You can add a picture to the
report by clicking        the
Unbound Object Frame
button in the Toolbox. Click
on the section of the report
where you want the picture to
appear. Then select Create
From File and click the
Browse button to locate your
picture.


You can insert all sorts of other objects such as sound files or entire Spreadsheets.

For Discussion

Why should objects be put in headers and footers but not into the Detail section? Try
entering a picture into the Detail section and see what happens when you go to Print
Preview.

If you insert an image in a header or footer, you may find that the section needs to be
heightened in order to display the whole object. Move the mouse pointer over the top
of the grey bars that separate sections until the pointer changes to a double-headed
arrow. Hold down the Left Mouse Button and drag to resize the section.

Your Task

1. Insert an Excel Spreadsheet into your report.

2. Edit the spreadsheet in Excel by clicking the Right Mouse Button on the object
and selecting Worksheet Object ► Open:


3. When you have finished editing the spreadsheet, select Update from the File
Menu and then exit from Excel. The spreadsheet should now be updated in Access.


Page 11 of 16                                                                   7/4/2012
11. Headers and Footers


If you remember, data in tables can be grouped (see section 5).

If you want to change the sorting and grouping, select View ► Sorting and
Grouping.

To add a grouping level,
click on a blank line under
Field/Expression        and
choose the field that you
want to use for the group.
Decide      between      an
Ascending Sort and a
Descending Sort.


Turn the Group Header property to Yes to ensure that you have a properly labelled
header.

To remove a group, select the line by clicking on the grey button to the left of the line
and press the Delete key on the keyboard.

                What can you put in each section of your Report?
     Report Header            Here you put general information about the report e.g.
                              title, date, version etc. You might also like to insert the
                              company logo.
      Page Header             Any information you want to appear at the top of every
                              page.
Header for Each Group         Summary information such as group and field names.
Footer for Each Group         Summary information such as counts and calculations.
     Page Footer              The page footer appears at the bottom of every page, so
                              you might like to insert page numbers.
      Report Footer           This appears at the very end of the report, so you might
                              like to print information about the report, such as contact
                              details.


Your Task

1. Open a report with several grouping levels and switch to Design View.

2. Open the Sorting and Grouping dialog box. Try changing the order of the
grouping by dragging the groups to new positions. Select Print Preview and note
how your report has been altered.

3. What does the Keep Together property do?


Page 12 of 16                                                                  7/4/2012
12. Formatting Individual Sections of the Report


When in Design View you will find that, if you Double Click on just about anything,
you will get a Properties dialog box. This is because Access regards almost
everything as an Object that can be controlled individually.

If you Double Click on a blank space in a report section, you will get the Properties
that control the appearance of the entire section. For example, if you click on the
Report Header you get the Report Header Properties:


Your Task

1. Open the Report Header Properties and change the background colour.

2. What does Force New Page do?

3. Switch to Print Preview and check the results.

Each field and each label is also an object that has its own Properties box. Double
click on a data box or a label and you will be able to control that object.


Your Task

1. Double click on a number field and alter the number of decimal places that will be
displayed. Make sure you click on the data box and not on the label.

2. Change the background colour of the data box

3. Alter the border colour.

4. Experiment with some of the other properties and switch to Print Preview to see
the results when you've finished.


Page 13 of 16                                                               7/4/2012
13. Customising Footers


To insert the current date and/or time, select Date and Time from the Insert Menu.

To insert Page Numbers, select Page Numbers from the Insert Menu.

Your Task

1. Create a blank report.

2. Add the Date (but not the time) to the Report Footer.

3. Add a page number to the top of each page. You want the Page Header to say
"Page 1 of 3", "Page 2 of 3", and so on. Preview the results in Print Preview

You will notice that, in Design View, page numbers and date/time are displayed as
Expressions:


You have encountered Expressions before in Queries and Tables. You may
remember that the Expression Builder can help you build expressions, or you can
write your own. Expressions enable you to have counts and calculations in your
report. For example, you might want summary information in a footer to provide a
total. Common functions are:

=Sum([FieldName])           Adds up all the values in a field
=Max([FieldName])           Finds the largest value
=Min([FieldName])           Finds the lowest value
 =Avg([FieldName])          Finds the average value
=Count([FieldName]          Counts up how many values there are
         )

Things to remember about expressions:
   • Field names must be put in squared brackets
   • Expressions must be put in the same report section as the figures they are
       calculating
   • To write an expression, first add a Data Box to the report from the Toolbox

Your Task

1. Open any report with sales figures and create a new Text Box in the Report
Footer and label it Total Sales.

3. Open the Properties for the data box and write an expression that will find the
total of the sales figures in the report.

4. Format the box as currency, so that the figure will be displayed with a £ sign.


Page 14 of 16                                                              7/4/2012
Preview the results
14. Keyboard Shortcuts


F2              Select an entire field
Ctrl+;          Insert the Current Date
Ctrl+:          Insert the Current Time
Ctrl+Enter      Insert a Line Break (use it in a memo or large text field)
Ctrl++          Add New Record
Ctrl+-          Delete the Current Record
Shift+Enter     Save the Record
Ctrl+Z          Undo the last change you made (don't rely on this)
Ctrl+Enter      Open the selected object in Design View
Alt+F4          Quit Access


15. Summary (from the Access Help file)


Page 15 of 16                                                                7/4/2012
Page 16 of 16   7/4/2012

Weitere ähnliche Inhalte

Was ist angesagt?

Water resources class 10
Water resources  class 10Water resources  class 10
Water resources class 10udn2310
 
Forests and wildlife resources Class 10 Geography
Forests and wildlife resources Class 10 GeographyForests and wildlife resources Class 10 Geography
Forests and wildlife resources Class 10 Geographybtkamlait
 
Class 10 ppt on ch federalism By Vishal kumar
Class 10 ppt on ch federalism By Vishal kumar Class 10 ppt on ch federalism By Vishal kumar
Class 10 ppt on ch federalism By Vishal kumar Vishal Kumar
 
Development of indian economy
Development of indian economyDevelopment of indian economy
Development of indian economyanamika sharma
 
Chapter - 4, Agriculture, Geography, Social Science, Class 10
Chapter - 4, Agriculture, Geography, Social Science, Class 10Chapter - 4, Agriculture, Geography, Social Science, Class 10
Chapter - 4, Agriculture, Geography, Social Science, Class 10Shivam Parmar
 
India after independence
India after independenceIndia after independence
India after independence123dhivya
 
Class X Geography Agriculture
Class X Geography AgricultureClass X Geography Agriculture
Class X Geography AgricultureRamjee Nagarajan
 
Social Science Geography Chapter 4 Class 10 Agriculture PPT
Social Science Geography Chapter 4 Class 10 Agriculture PPTSocial Science Geography Chapter 4 Class 10 Agriculture PPT
Social Science Geography Chapter 4 Class 10 Agriculture PPTTutalege
 
Pranavi verma-class-9-digital-presentation
Pranavi verma-class-9-digital-presentationPranavi verma-class-9-digital-presentation
Pranavi verma-class-9-digital-presentationPranaviVerma
 
Microsoft Office Package: Practical Questions
Microsoft Office Package: Practical QuestionsMicrosoft Office Package: Practical Questions
Microsoft Office Package: Practical QuestionsMakaha Rutendo
 
Ms word Presentation
Ms word PresentationMs word Presentation
Ms word PresentationMadhab Behera
 
Water resource ppt
Water resource pptWater resource ppt
Water resource pptMukund Ingle
 
Module 6 component of excel chart
Module 6 component of excel chartModule 6 component of excel chart
Module 6 component of excel chartDr. Shalini Pandey
 
Biology forest and wildlife project
Biology forest and wildlife projectBiology forest and wildlife project
Biology forest and wildlife projectCredMaster1
 
age of industrialisation
age of industrialisationage of industrialisation
age of industrialisationDaisy Joy
 
Chapter - 3, Water Resources, Geography, Social Science, Class 10
Chapter - 3, Water Resources, Geography, Social Science, Class 10Chapter - 3, Water Resources, Geography, Social Science, Class 10
Chapter - 3, Water Resources, Geography, Social Science, Class 10Shivam Parmar
 
OUTCOMES OF DEMOCRACY CLASS X 10
OUTCOMES OF DEMOCRACY CLASS X 10 OUTCOMES OF DEMOCRACY CLASS X 10
OUTCOMES OF DEMOCRACY CLASS X 10 Mahendra SST
 
Land & agricultural resourse
Land & agricultural resourseLand & agricultural resourse
Land & agricultural resoursesavitanarayan29
 

Was ist angesagt? (20)

Water resources class 10
Water resources  class 10Water resources  class 10
Water resources class 10
 
Forests and wildlife resources Class 10 Geography
Forests and wildlife resources Class 10 GeographyForests and wildlife resources Class 10 Geography
Forests and wildlife resources Class 10 Geography
 
Class 10 ppt on ch federalism By Vishal kumar
Class 10 ppt on ch federalism By Vishal kumar Class 10 ppt on ch federalism By Vishal kumar
Class 10 ppt on ch federalism By Vishal kumar
 
Ms excel
Ms excelMs excel
Ms excel
 
Development of indian economy
Development of indian economyDevelopment of indian economy
Development of indian economy
 
Chapter - 4, Agriculture, Geography, Social Science, Class 10
Chapter - 4, Agriculture, Geography, Social Science, Class 10Chapter - 4, Agriculture, Geography, Social Science, Class 10
Chapter - 4, Agriculture, Geography, Social Science, Class 10
 
India after independence
India after independenceIndia after independence
India after independence
 
Class X Geography Agriculture
Class X Geography AgricultureClass X Geography Agriculture
Class X Geography Agriculture
 
Social Science Geography Chapter 4 Class 10 Agriculture PPT
Social Science Geography Chapter 4 Class 10 Agriculture PPTSocial Science Geography Chapter 4 Class 10 Agriculture PPT
Social Science Geography Chapter 4 Class 10 Agriculture PPT
 
Pranavi verma-class-9-digital-presentation
Pranavi verma-class-9-digital-presentationPranavi verma-class-9-digital-presentation
Pranavi verma-class-9-digital-presentation
 
Class: 10 Political party ppt
Class: 10 Political party pptClass: 10 Political party ppt
Class: 10 Political party ppt
 
Microsoft Office Package: Practical Questions
Microsoft Office Package: Practical QuestionsMicrosoft Office Package: Practical Questions
Microsoft Office Package: Practical Questions
 
Ms word Presentation
Ms word PresentationMs word Presentation
Ms word Presentation
 
Water resource ppt
Water resource pptWater resource ppt
Water resource ppt
 
Module 6 component of excel chart
Module 6 component of excel chartModule 6 component of excel chart
Module 6 component of excel chart
 
Biology forest and wildlife project
Biology forest and wildlife projectBiology forest and wildlife project
Biology forest and wildlife project
 
age of industrialisation
age of industrialisationage of industrialisation
age of industrialisation
 
Chapter - 3, Water Resources, Geography, Social Science, Class 10
Chapter - 3, Water Resources, Geography, Social Science, Class 10Chapter - 3, Water Resources, Geography, Social Science, Class 10
Chapter - 3, Water Resources, Geography, Social Science, Class 10
 
OUTCOMES OF DEMOCRACY CLASS X 10
OUTCOMES OF DEMOCRACY CLASS X 10 OUTCOMES OF DEMOCRACY CLASS X 10
OUTCOMES OF DEMOCRACY CLASS X 10
 
Land & agricultural resourse
Land & agricultural resourseLand & agricultural resourse
Land & agricultural resourse
 

Andere mochten auch

Doublebookings1
Doublebookings1Doublebookings1
Doublebookings1JTHSICT
 
Literacy glossary
Literacy glossaryLiteracy glossary
Literacy glossaryJTHSICT
 
Doublebookings2
Doublebookings2Doublebookings2
Doublebookings2JTHSICT
 
Provably secure nested one time secrete key
Provably secure nested one time secrete keyProvably secure nested one time secrete key
Provably secure nested one time secrete keysalaimamani
 
E book example
E book exampleE book example
E book exampleJTHSICT
 
Kpn questionnaire
Kpn questionnaireKpn questionnaire
Kpn questionnairesalaimamani
 
5 things every retailer should know
5 things every retailer should know5 things every retailer should know
5 things every retailer should knowLeavs Ltd
 
Validation
ValidationValidation
ValidationJTHSICT
 
Carbon report-slideshow
Carbon report-slideshowCarbon report-slideshow
Carbon report-slideshowLeavs Ltd
 
It4 Coursework Help
It4 Coursework HelpIt4 Coursework Help
It4 Coursework HelpJTHSICT
 

Andere mochten auch (19)

Doublebookings1
Doublebookings1Doublebookings1
Doublebookings1
 
Access1
Access1Access1
Access1
 
Finance report
Finance reportFinance report
Finance report
 
Access2
Access2Access2
Access2
 
Access4
Access4Access4
Access4
 
Literacy glossary
Literacy glossaryLiteracy glossary
Literacy glossary
 
Doublebookings2
Doublebookings2Doublebookings2
Doublebookings2
 
Provably secure nested one time secrete key
Provably secure nested one time secrete keyProvably secure nested one time secrete key
Provably secure nested one time secrete key
 
Access5
Access5Access5
Access5
 
E book example
E book exampleE book example
E book example
 
Access1
Access1Access1
Access1
 
Kpn questionnaire
Kpn questionnaireKpn questionnaire
Kpn questionnaire
 
Access2
Access2Access2
Access2
 
5 things every retailer should know
5 things every retailer should know5 things every retailer should know
5 things every retailer should know
 
Macros
MacrosMacros
Macros
 
Validation
ValidationValidation
Validation
 
Carbon report-slideshow
Carbon report-slideshowCarbon report-slideshow
Carbon report-slideshow
 
It4 Coursework Help
It4 Coursework HelpIt4 Coursework Help
It4 Coursework Help
 
Globalization
GlobalizationGlobalization
Globalization
 

Ähnlich wie Access3

Lesson 18 Creating Pivot Tables
Lesson 18 Creating Pivot TablesLesson 18 Creating Pivot Tables
Lesson 18 Creating Pivot Tablesguevarra_2000
 
Introduction to Microsoft Access2.ppt
Introduction to Microsoft Access2.pptIntroduction to Microsoft Access2.ppt
Introduction to Microsoft Access2.pptJoshCasas1
 
B.sc i agri u 4 introduction to ms access
B.sc i agri u 4 introduction to ms accessB.sc i agri u 4 introduction to ms access
B.sc i agri u 4 introduction to ms accessRai University
 
B.sc i micro bio u 4 introduction to ms access
B.sc i micro bio u 4 introduction to ms accessB.sc i micro bio u 4 introduction to ms access
B.sc i micro bio u 4 introduction to ms accessRai University
 
B.sc i bio tech u 4 introduction to ms access
B.sc i bio tech u 4 introduction to ms accessB.sc i bio tech u 4 introduction to ms access
B.sc i bio tech u 4 introduction to ms accessRai University
 
B.sc i bio chem u 4 introduction to ms access
B.sc i bio chem u 4 introduction to ms accessB.sc i bio chem u 4 introduction to ms access
B.sc i bio chem u 4 introduction to ms accessRai University
 
B.sc i cs u 4 introduction to ms access
B.sc i cs u 4 introduction to ms accessB.sc i cs u 4 introduction to ms access
B.sc i cs u 4 introduction to ms accessRai University
 
ACTG Tableau intro labDownload the TableauLab file and look ov.docx
ACTG   Tableau intro labDownload the TableauLab file and look ov.docxACTG   Tableau intro labDownload the TableauLab file and look ov.docx
ACTG Tableau intro labDownload the TableauLab file and look ov.docxnettletondevon
 
MS Access - Supriya.pptx
MS Access - Supriya.pptxMS Access - Supriya.pptx
MS Access - Supriya.pptxShivansh725543
 
Computer application lab file
Computer application lab fileComputer application lab file
Computer application lab fileDr. Prashant Vats
 
Form4 cd4
Form4 cd4Form4 cd4
Form4 cd4smktsj2
 
Excel creating pivot table
Excel creating pivot tableExcel creating pivot table
Excel creating pivot tablesamikshaa sinha
 
Microsoft word features
Microsoft word featuresMicrosoft word features
Microsoft word featuresSaira Randhawa
 
chapter1computers2-160923133049.pdf
chapter1computers2-160923133049.pdfchapter1computers2-160923133049.pdf
chapter1computers2-160923133049.pdfjhoncarlvaldez
 
Microsoft Word 2010
Microsoft Word 2010Microsoft Word 2010
Microsoft Word 2010home
 
Create a basic performance point dashboard epc
Create a basic performance point dashboard   epcCreate a basic performance point dashboard   epc
Create a basic performance point dashboard epcEPC Group
 

Ähnlich wie Access3 (20)

Lesson 18 Creating Pivot Tables
Lesson 18 Creating Pivot TablesLesson 18 Creating Pivot Tables
Lesson 18 Creating Pivot Tables
 
Introduction to Microsoft Access2.ppt
Introduction to Microsoft Access2.pptIntroduction to Microsoft Access2.ppt
Introduction to Microsoft Access2.ppt
 
B.sc i agri u 4 introduction to ms access
B.sc i agri u 4 introduction to ms accessB.sc i agri u 4 introduction to ms access
B.sc i agri u 4 introduction to ms access
 
B.sc i micro bio u 4 introduction to ms access
B.sc i micro bio u 4 introduction to ms accessB.sc i micro bio u 4 introduction to ms access
B.sc i micro bio u 4 introduction to ms access
 
B.sc i bio tech u 4 introduction to ms access
B.sc i bio tech u 4 introduction to ms accessB.sc i bio tech u 4 introduction to ms access
B.sc i bio tech u 4 introduction to ms access
 
B.sc i bio chem u 4 introduction to ms access
B.sc i bio chem u 4 introduction to ms accessB.sc i bio chem u 4 introduction to ms access
B.sc i bio chem u 4 introduction to ms access
 
B.sc i cs u 4 introduction to ms access
B.sc i cs u 4 introduction to ms accessB.sc i cs u 4 introduction to ms access
B.sc i cs u 4 introduction to ms access
 
Introduction to Microsoft Access2.ppt
Introduction to Microsoft Access2.pptIntroduction to Microsoft Access2.ppt
Introduction to Microsoft Access2.ppt
 
ACTG Tableau intro labDownload the TableauLab file and look ov.docx
ACTG   Tableau intro labDownload the TableauLab file and look ov.docxACTG   Tableau intro labDownload the TableauLab file and look ov.docx
ACTG Tableau intro labDownload the TableauLab file and look ov.docx
 
MS Access - Supriya.pptx
MS Access - Supriya.pptxMS Access - Supriya.pptx
MS Access - Supriya.pptx
 
MS Excel 2013
MS Excel 2013MS Excel 2013
MS Excel 2013
 
Computer application lab file
Computer application lab fileComputer application lab file
Computer application lab file
 
Form4 cd4
Form4 cd4Form4 cd4
Form4 cd4
 
Exp31sp1 at a-glance-en
Exp31sp1 at a-glance-enExp31sp1 at a-glance-en
Exp31sp1 at a-glance-en
 
Excel creating pivot table
Excel creating pivot tableExcel creating pivot table
Excel creating pivot table
 
Print18
Print18Print18
Print18
 
Microsoft word features
Microsoft word featuresMicrosoft word features
Microsoft word features
 
chapter1computers2-160923133049.pdf
chapter1computers2-160923133049.pdfchapter1computers2-160923133049.pdf
chapter1computers2-160923133049.pdf
 
Microsoft Word 2010
Microsoft Word 2010Microsoft Word 2010
Microsoft Word 2010
 
Create a basic performance point dashboard epc
Create a basic performance point dashboard   epcCreate a basic performance point dashboard   epc
Create a basic performance point dashboard epc
 

Mehr von JTHSICT

Year 8 sow 2012 2013
Year 8 sow 2012 2013Year 8 sow 2012 2013
Year 8 sow 2012 2013JTHSICT
 
Lookup table
Lookup tableLookup table
Lookup tableJTHSICT
 
Password
PasswordPassword
PasswordJTHSICT
 
Naming conventions
Naming conventionsNaming conventions
Naming conventionsJTHSICT
 
Normalization
NormalizationNormalization
NormalizationJTHSICT
 
Calendar
CalendarCalendar
CalendarJTHSICT
 

Mehr von JTHSICT (6)

Year 8 sow 2012 2013
Year 8 sow 2012 2013Year 8 sow 2012 2013
Year 8 sow 2012 2013
 
Lookup table
Lookup tableLookup table
Lookup table
 
Password
PasswordPassword
Password
 
Naming conventions
Naming conventionsNaming conventions
Naming conventions
 
Normalization
NormalizationNormalization
Normalization
 
Calendar
CalendarCalendar
Calendar
 

Kürzlich hochgeladen

Introduction to ArtificiaI Intelligence in Higher Education
Introduction to ArtificiaI Intelligence in Higher EducationIntroduction to ArtificiaI Intelligence in Higher Education
Introduction to ArtificiaI Intelligence in Higher Educationpboyjonauth
 
microwave assisted reaction. General introduction
microwave assisted reaction. General introductionmicrowave assisted reaction. General introduction
microwave assisted reaction. General introductionMaksud Ahmed
 
Web & Social Media Analytics Previous Year Question Paper.pdf
Web & Social Media Analytics Previous Year Question Paper.pdfWeb & Social Media Analytics Previous Year Question Paper.pdf
Web & Social Media Analytics Previous Year Question Paper.pdfJayanti Pande
 
URLs and Routing in the Odoo 17 Website App
URLs and Routing in the Odoo 17 Website AppURLs and Routing in the Odoo 17 Website App
URLs and Routing in the Odoo 17 Website AppCeline George
 
1029-Danh muc Sach Giao Khoa khoi 6.pdf
1029-Danh muc Sach Giao Khoa khoi  6.pdf1029-Danh muc Sach Giao Khoa khoi  6.pdf
1029-Danh muc Sach Giao Khoa khoi 6.pdfQucHHunhnh
 
mini mental status format.docx
mini    mental       status     format.docxmini    mental       status     format.docx
mini mental status format.docxPoojaSen20
 
Arihant handbook biology for class 11 .pdf
Arihant handbook biology for class 11 .pdfArihant handbook biology for class 11 .pdf
Arihant handbook biology for class 11 .pdfchloefrazer622
 
1029 - Danh muc Sach Giao Khoa 10 . pdf
1029 -  Danh muc Sach Giao Khoa 10 . pdf1029 -  Danh muc Sach Giao Khoa 10 . pdf
1029 - Danh muc Sach Giao Khoa 10 . pdfQucHHunhnh
 
Advanced Views - Calendar View in Odoo 17
Advanced Views - Calendar View in Odoo 17Advanced Views - Calendar View in Odoo 17
Advanced Views - Calendar View in Odoo 17Celine George
 
SOCIAL AND HISTORICAL CONTEXT - LFTVD.pptx
SOCIAL AND HISTORICAL CONTEXT - LFTVD.pptxSOCIAL AND HISTORICAL CONTEXT - LFTVD.pptx
SOCIAL AND HISTORICAL CONTEXT - LFTVD.pptxiammrhaywood
 
Software Engineering Methodologies (overview)
Software Engineering Methodologies (overview)Software Engineering Methodologies (overview)
Software Engineering Methodologies (overview)eniolaolutunde
 
Beyond the EU: DORA and NIS 2 Directive's Global Impact
Beyond the EU: DORA and NIS 2 Directive's Global ImpactBeyond the EU: DORA and NIS 2 Directive's Global Impact
Beyond the EU: DORA and NIS 2 Directive's Global ImpactPECB
 
Call Girls in Dwarka Mor Delhi Contact Us 9654467111
Call Girls in Dwarka Mor Delhi Contact Us 9654467111Call Girls in Dwarka Mor Delhi Contact Us 9654467111
Call Girls in Dwarka Mor Delhi Contact Us 9654467111Sapana Sha
 
CARE OF CHILD IN INCUBATOR..........pptx
CARE OF CHILD IN INCUBATOR..........pptxCARE OF CHILD IN INCUBATOR..........pptx
CARE OF CHILD IN INCUBATOR..........pptxGaneshChakor2
 
“Oh GOSH! Reflecting on Hackteria's Collaborative Practices in a Global Do-It...
“Oh GOSH! Reflecting on Hackteria's Collaborative Practices in a Global Do-It...“Oh GOSH! Reflecting on Hackteria's Collaborative Practices in a Global Do-It...
“Oh GOSH! Reflecting on Hackteria's Collaborative Practices in a Global Do-It...Marc Dusseiller Dusjagr
 
Paris 2024 Olympic Geographies - an activity
Paris 2024 Olympic Geographies - an activityParis 2024 Olympic Geographies - an activity
Paris 2024 Olympic Geographies - an activityGeoBlogs
 
The basics of sentences session 2pptx copy.pptx
The basics of sentences session 2pptx copy.pptxThe basics of sentences session 2pptx copy.pptx
The basics of sentences session 2pptx copy.pptxheathfieldcps1
 
Mastering the Unannounced Regulatory Inspection
Mastering the Unannounced Regulatory InspectionMastering the Unannounced Regulatory Inspection
Mastering the Unannounced Regulatory InspectionSafetyChain Software
 
Measures of Central Tendency: Mean, Median and Mode
Measures of Central Tendency: Mean, Median and ModeMeasures of Central Tendency: Mean, Median and Mode
Measures of Central Tendency: Mean, Median and ModeThiyagu K
 

Kürzlich hochgeladen (20)

Introduction to ArtificiaI Intelligence in Higher Education
Introduction to ArtificiaI Intelligence in Higher EducationIntroduction to ArtificiaI Intelligence in Higher Education
Introduction to ArtificiaI Intelligence in Higher Education
 
microwave assisted reaction. General introduction
microwave assisted reaction. General introductionmicrowave assisted reaction. General introduction
microwave assisted reaction. General introduction
 
Web & Social Media Analytics Previous Year Question Paper.pdf
Web & Social Media Analytics Previous Year Question Paper.pdfWeb & Social Media Analytics Previous Year Question Paper.pdf
Web & Social Media Analytics Previous Year Question Paper.pdf
 
Staff of Color (SOC) Retention Efforts DDSD
Staff of Color (SOC) Retention Efforts DDSDStaff of Color (SOC) Retention Efforts DDSD
Staff of Color (SOC) Retention Efforts DDSD
 
URLs and Routing in the Odoo 17 Website App
URLs and Routing in the Odoo 17 Website AppURLs and Routing in the Odoo 17 Website App
URLs and Routing in the Odoo 17 Website App
 
1029-Danh muc Sach Giao Khoa khoi 6.pdf
1029-Danh muc Sach Giao Khoa khoi  6.pdf1029-Danh muc Sach Giao Khoa khoi  6.pdf
1029-Danh muc Sach Giao Khoa khoi 6.pdf
 
mini mental status format.docx
mini    mental       status     format.docxmini    mental       status     format.docx
mini mental status format.docx
 
Arihant handbook biology for class 11 .pdf
Arihant handbook biology for class 11 .pdfArihant handbook biology for class 11 .pdf
Arihant handbook biology for class 11 .pdf
 
1029 - Danh muc Sach Giao Khoa 10 . pdf
1029 -  Danh muc Sach Giao Khoa 10 . pdf1029 -  Danh muc Sach Giao Khoa 10 . pdf
1029 - Danh muc Sach Giao Khoa 10 . pdf
 
Advanced Views - Calendar View in Odoo 17
Advanced Views - Calendar View in Odoo 17Advanced Views - Calendar View in Odoo 17
Advanced Views - Calendar View in Odoo 17
 
SOCIAL AND HISTORICAL CONTEXT - LFTVD.pptx
SOCIAL AND HISTORICAL CONTEXT - LFTVD.pptxSOCIAL AND HISTORICAL CONTEXT - LFTVD.pptx
SOCIAL AND HISTORICAL CONTEXT - LFTVD.pptx
 
Software Engineering Methodologies (overview)
Software Engineering Methodologies (overview)Software Engineering Methodologies (overview)
Software Engineering Methodologies (overview)
 
Beyond the EU: DORA and NIS 2 Directive's Global Impact
Beyond the EU: DORA and NIS 2 Directive's Global ImpactBeyond the EU: DORA and NIS 2 Directive's Global Impact
Beyond the EU: DORA and NIS 2 Directive's Global Impact
 
Call Girls in Dwarka Mor Delhi Contact Us 9654467111
Call Girls in Dwarka Mor Delhi Contact Us 9654467111Call Girls in Dwarka Mor Delhi Contact Us 9654467111
Call Girls in Dwarka Mor Delhi Contact Us 9654467111
 
CARE OF CHILD IN INCUBATOR..........pptx
CARE OF CHILD IN INCUBATOR..........pptxCARE OF CHILD IN INCUBATOR..........pptx
CARE OF CHILD IN INCUBATOR..........pptx
 
“Oh GOSH! Reflecting on Hackteria's Collaborative Practices in a Global Do-It...
“Oh GOSH! Reflecting on Hackteria's Collaborative Practices in a Global Do-It...“Oh GOSH! Reflecting on Hackteria's Collaborative Practices in a Global Do-It...
“Oh GOSH! Reflecting on Hackteria's Collaborative Practices in a Global Do-It...
 
Paris 2024 Olympic Geographies - an activity
Paris 2024 Olympic Geographies - an activityParis 2024 Olympic Geographies - an activity
Paris 2024 Olympic Geographies - an activity
 
The basics of sentences session 2pptx copy.pptx
The basics of sentences session 2pptx copy.pptxThe basics of sentences session 2pptx copy.pptx
The basics of sentences session 2pptx copy.pptx
 
Mastering the Unannounced Regulatory Inspection
Mastering the Unannounced Regulatory InspectionMastering the Unannounced Regulatory Inspection
Mastering the Unannounced Regulatory Inspection
 
Measures of Central Tendency: Mean, Median and Mode
Measures of Central Tendency: Mean, Median and ModeMeasures of Central Tendency: Mean, Median and Mode
Measures of Central Tendency: Mean, Median and Mode
 

Access3

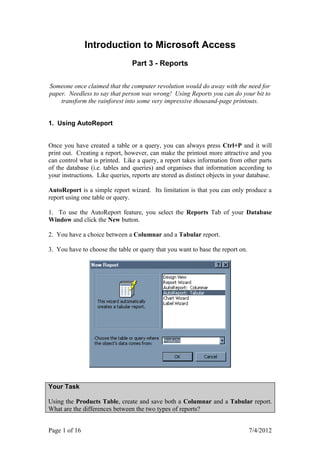
  • 1. Introduction to Microsoft Access Part 3 - Reports Someone once claimed that the computer revolution would do away with the need for paper. Needless to say that person was wrong! Using Reports you can do your bit to transform the rainforest into some very impressive thousand-page printouts. 1. Using AutoReport Once you have created a table or a query, you can always press Ctrl+P and it will print out. Creating a report, however, can make the printout more attractive and you can control what is printed. Like a query, a report takes information from other parts of the database (i.e. tables and queries) and organises that information according to your instructions. Like queries, reports are stored as distinct objects in your database. AutoReport is a simple report wizard. Its limitation is that you can only produce a report using one table or query. 1. To use the AutoReport feature, you select the Reports Tab of your Database Window and click the New button. 2. You have a choice between a Columnar and a Tabular report. 3. You have to choose the table or query that you want to base the report on. Your Task Using the Products Table, create and save both a Columnar and a Tabular report. What are the differences between the two types of reports? Page 1 of 16 7/4/2012
  • 2. 2. Your First Report Now you have created your first report, let us see what you can do with it. When the report is first created, it will be opened for you in Print Preview. You get the following buttons on your toolbar: Your Task Experiment with the buttons and see what they do. 1. View more than one page at a time. Why is it sometimes useful to do this before printing? 2. Export your report to Word. Alter the layout, as desired and print it Other options are hidden away in the Page Setup. Get there via the File Menu. There are three tabs for Margin, Page and Column settings. Margin Settings are displayed in metric or Imperial measure, depending on how Access is set up. Print Data Only will only print out the data, not the field headings. Page Settings is where you choose Portrait or Landscape orientation. You can also choose your paper size (usually A4) and your printer. Column Settings controls how many columns you will have and the width between columns. For Discussion 1. What difference does changing the Column Layout settings make? 2. Why should you avoid Landscape mode for columnar reports? Page 2 of 16 7/4/2012
  • 3. 3. Creating Labels Access can help you generate labels for mailing lists and other purposes. 1. Start the Label Wizard and choose a table or query. 2. If you are using Avery Labels, you can choose your labels by product number. Otherwise, click the Customise button and set your label dimensions. You can name a custom label and save it for future use. 3. Once you have the correct label type, you can modify the appearance of the labels. You can make the text bold, italic or underlined and you can select a font. The formatting you choose affects the whole label. Unfortunately, you cannot choose, for example, to have one field italic and the rest normal. 4. Next, choose which fields to have on the label. Usually this will be the fields that make up the customer's address. If you want the fields on separate lines, press the Enter key. If you want to add characters to the label (for example a comma at the end of each address line), enter this character in the place where you want it to appear. 5. You then decide how you want to sort the labels (mailing lists are usually sorted by postal code). Your Task Create a set of mailing lists for Northwind customers. Add a comma at the end of each line and sort the labels by postal code. Your labels should look like this: Name and Save your Report Page 3 of 16 7/4/2012
  • 4. 4. Creating a Chart If a table or query has a numeric field, you can produce a graph using the Chart Wizard. 1. Select the Chart Wizard from the New Report list. 2. Choose a table or query on which to base the graph. 3. Decide what type of chart you want. Click each chart type to see a description of how that chart is used. 4. Decide which fields you want in your chart. At least one field must be numeric. 5. Preview how you want your chart to appear. 6. Decide whether or not you want a Legend (a key). Name and save the report. 7. If your chart does not appear as you wanted, switch to Design View and alter the chart's dimensions. Double click the Chart to open the chart in Microsoft Graph. Your Task In the Northwind Database create a chart based on the Category Sales for 1995 query. Your chart should look something like this: Page 4 of 16 7/4/2012
  • 5. 5. Advanced Reports Use the Report Wizard if you want to include fields from more than one table or query. 1. Select Report Wizard from the New Report list. There is no need to select a table or query. Click OK. 2. Now you can choose various fields from more than one table or query. The screen is almost identical to the Simple Query Wizard. 3. Access then guesses how you want your data to appear by looking at the relationships between the fields you have selected. You can change the layout of the information and you see an on-screen preview. 4. You can then arrange your information into groups. The grouping will insert a series of headers in your report. Page 5 of 16 7/4/2012
  • 6. 5. You can the Sort the ungrouped information. Click the Summary Options button if you want calculations made: 6. Choose a layout style for your report Your Task Create a report that lists products by category. Consider your grouping carefully. Get the wizard to calculate the average price for each product in each category. Your report should end up looking something like this: Page 6 of 16 7/4/2012
  • 7. 6. Formatting a Report Very often the wizards do not produce a perfect layout and creative types find the finished products rather uninspiring. This is where you need to switch to Design View and customise the layout. Sections Text label Data Box You will notice that you have two kinds of text markers. Data Boxes are boxes, which display a field's data in the final report. Labels are simple text markers to describe the corresponding data box. You will also notice markers that organise the report into Sections. These Sections represent the different parts of your report. The sections you will always see are: Report Header Prints at the very start of the first page of the report. Page Header Prints at the start of each page, except on the first page of the report where it will print immediately after the Report Header. Detail This is the main body of the report. The Detail section will be repeated for every record in the report. Page Footer When each page is nearly full, Access will finish it off by printing the Page Footer at the bottom of the page. Report Footer This section is printed at the very end of the last page of the report, immediately following the Page Footer. Your Task Select a text box. You should notice that the following toolbar appears: 1. Experiment with these tools and beautify a report. 2. Locate the Format Painter and work out what it does. Page 7 of 16 7/4/2012
  • 8. 7. Moving Things Around When you click on a text box, the selection handles appear. These are black squares that you can click on to move or re-size the box. To move a text box, follow the following steps: 1. Click the item you want to move. 2. Move the mouse pointer to any edge of the selected item. 3. Click and hold the Left Mouse Button and drag the item to a new position. 4. Release the mouse button when the item is properly placed. 5. Press CTRL+Z (undo) if you want to start again. If you try to move an object in a Columnar Report, you will notice that the data boxes and labels are stuck together. When you select one, selection handles appear around both, as below: You will notice that there are two handles that are larger than the others. Click and drag one on the left to move the label. Click the large handle between the two boxes to move the data box. If you click on the smaller handles, you can move both the label and the data box together. To re-size an object, move the mouse over the selection handles again until the cursor changes to a double-headed arrow. Click and drag to re-size the box. Your Task 1. Create a Columnar Report using AutoReport. 2. Change to Design View. 3. Use the Format Painter to turn all the labels red. 4. Increase the space between the labels and the data boxes. 5. Align both the labels and the data boxes, so the columns are straight. Align objects by selecting Align from the Format menu Page 8 of 16 7/4/2012
  • 9. 8. Lines and Borders 1. You should remember that your report is divided into Sections. It is sometimes a good idea to divide these sections by adding lines to the report. If the Wizard hasn't added any lines in your report, add one by clicking the Line Button, which is in the Toolbox. Practice moving and re-sizing the line If you can't see the Toolbox, select Toolbox from the View menu. 2. Select your line and change its colour by clicking the arrow next to the Line/Border Colour button. You are presented with a rainbow of colours to choose from. 3. Change the width of the line by clicking the arrow next to the Line/Border Width button. You have seven widths to choose from. 4. Add special effects to a line by clicking the down arrow next to the Special Effects button. Experiment with these special effects and see what they do. Holding the mouse over each, will identify the six different effects, which are Shadowed, Sunken, Flat, Etched, Raised and Chiselled. The Special Effects The Line/Border button The Line/Border Colour button Width button Your Task You can change the borders of both labels and data boxes in exactly the same way as you can change lines. Change the borders of your text boxes and look at the result in Print Preview mode. Page 9 of 16 7/4/2012
  • 10. 9. Lining Everything Up When you move things around in a report, you can easily end up with objects that are out of alignment. The background grid can help you line things up. By selecting Snap to Grid from the Format Menu, all objects that are moved will always align with the dots on the grid. If you want to align objects with each other, select a group of objects and then choose an Align option from the Format Menu. If you select Size from the Format Menu, you can change the size of objects, as follows: Size To Fit makes the boxes large enough to display all the information they contain. Size To Shortest resizes all the boxes to the same size as the smallest box. Size To Tallest resizes all the boxes to the same size as the tallest box. Increase or decrease Horizontal Spacing or Vertical Spacing to change the spacing between objects. Make Equal ensures that the spacing between all objects is the same. Your Task 1. Open a report and align the objects in the Detail section of the report. 2. Increase the horizontal and vertical spacing between the objects and make sure all objects are equally spaced. 3. Export your report to an Excel Spreadsheet and save the new document. Page 10 of 16 7/4/2012
  • 11. 10. OLE Objects OLE stands for Object Linking and Embedding. This allows you to create a file in another application (e.g. a picture or an Excel spreadsheet) and import it into Publisher. If you want to edit the object, you can do so in the application that originally created it. You can add a picture to the report by clicking the Unbound Object Frame button in the Toolbox. Click on the section of the report where you want the picture to appear. Then select Create From File and click the Browse button to locate your picture. You can insert all sorts of other objects such as sound files or entire Spreadsheets. For Discussion Why should objects be put in headers and footers but not into the Detail section? Try entering a picture into the Detail section and see what happens when you go to Print Preview. If you insert an image in a header or footer, you may find that the section needs to be heightened in order to display the whole object. Move the mouse pointer over the top of the grey bars that separate sections until the pointer changes to a double-headed arrow. Hold down the Left Mouse Button and drag to resize the section. Your Task 1. Insert an Excel Spreadsheet into your report. 2. Edit the spreadsheet in Excel by clicking the Right Mouse Button on the object and selecting Worksheet Object ► Open: 3. When you have finished editing the spreadsheet, select Update from the File Menu and then exit from Excel. The spreadsheet should now be updated in Access. Page 11 of 16 7/4/2012
  • 12. 11. Headers and Footers If you remember, data in tables can be grouped (see section 5). If you want to change the sorting and grouping, select View ► Sorting and Grouping. To add a grouping level, click on a blank line under Field/Expression and choose the field that you want to use for the group. Decide between an Ascending Sort and a Descending Sort. Turn the Group Header property to Yes to ensure that you have a properly labelled header. To remove a group, select the line by clicking on the grey button to the left of the line and press the Delete key on the keyboard. What can you put in each section of your Report? Report Header Here you put general information about the report e.g. title, date, version etc. You might also like to insert the company logo. Page Header Any information you want to appear at the top of every page. Header for Each Group Summary information such as group and field names. Footer for Each Group Summary information such as counts and calculations. Page Footer The page footer appears at the bottom of every page, so you might like to insert page numbers. Report Footer This appears at the very end of the report, so you might like to print information about the report, such as contact details. Your Task 1. Open a report with several grouping levels and switch to Design View. 2. Open the Sorting and Grouping dialog box. Try changing the order of the grouping by dragging the groups to new positions. Select Print Preview and note how your report has been altered. 3. What does the Keep Together property do? Page 12 of 16 7/4/2012
  • 13. 12. Formatting Individual Sections of the Report When in Design View you will find that, if you Double Click on just about anything, you will get a Properties dialog box. This is because Access regards almost everything as an Object that can be controlled individually. If you Double Click on a blank space in a report section, you will get the Properties that control the appearance of the entire section. For example, if you click on the Report Header you get the Report Header Properties: Your Task 1. Open the Report Header Properties and change the background colour. 2. What does Force New Page do? 3. Switch to Print Preview and check the results. Each field and each label is also an object that has its own Properties box. Double click on a data box or a label and you will be able to control that object. Your Task 1. Double click on a number field and alter the number of decimal places that will be displayed. Make sure you click on the data box and not on the label. 2. Change the background colour of the data box 3. Alter the border colour. 4. Experiment with some of the other properties and switch to Print Preview to see the results when you've finished. Page 13 of 16 7/4/2012
  • 14. 13. Customising Footers To insert the current date and/or time, select Date and Time from the Insert Menu. To insert Page Numbers, select Page Numbers from the Insert Menu. Your Task 1. Create a blank report. 2. Add the Date (but not the time) to the Report Footer. 3. Add a page number to the top of each page. You want the Page Header to say "Page 1 of 3", "Page 2 of 3", and so on. Preview the results in Print Preview You will notice that, in Design View, page numbers and date/time are displayed as Expressions: You have encountered Expressions before in Queries and Tables. You may remember that the Expression Builder can help you build expressions, or you can write your own. Expressions enable you to have counts and calculations in your report. For example, you might want summary information in a footer to provide a total. Common functions are: =Sum([FieldName]) Adds up all the values in a field =Max([FieldName]) Finds the largest value =Min([FieldName]) Finds the lowest value =Avg([FieldName]) Finds the average value =Count([FieldName] Counts up how many values there are ) Things to remember about expressions: • Field names must be put in squared brackets • Expressions must be put in the same report section as the figures they are calculating • To write an expression, first add a Data Box to the report from the Toolbox Your Task 1. Open any report with sales figures and create a new Text Box in the Report Footer and label it Total Sales. 3. Open the Properties for the data box and write an expression that will find the total of the sales figures in the report. 4. Format the box as currency, so that the figure will be displayed with a £ sign. Page 14 of 16 7/4/2012
  • 15. Preview the results 14. Keyboard Shortcuts F2 Select an entire field Ctrl+; Insert the Current Date Ctrl+: Insert the Current Time Ctrl+Enter Insert a Line Break (use it in a memo or large text field) Ctrl++ Add New Record Ctrl+- Delete the Current Record Shift+Enter Save the Record Ctrl+Z Undo the last change you made (don't rely on this) Ctrl+Enter Open the selected object in Design View Alt+F4 Quit Access 15. Summary (from the Access Help file) Page 15 of 16 7/4/2012
  • 16. Page 16 of 16 7/4/2012