1. Assignment 4 Instructions
Image Research:
How to find textures for Assignment 4
Type a key word into the search bar on Google
Select >images in the menu that appears at the top of the screen.
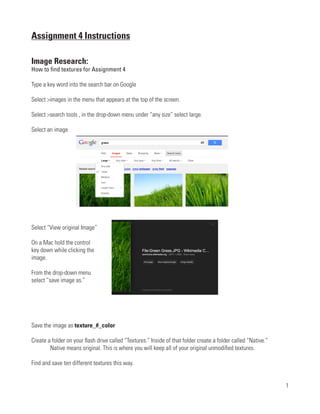
Select >search tools , in the drop-down menu under “any size” select large.
Select an image
Select “View original Image”
On a Mac hold the control
key down while clicking the
image.
From the drop-down menu
select “save image as.”
Save the image as texture_#_color
Create a folder on your flash drive called “Textures.” Inside of that folder create a folder called “Native.”
Native means original. This is where you will keep all of your original unmodified textures.
Find and save ten different textures this way.
1
2. Photoshop Instructions
Creating a New Document:
Open Photoshop
Select >File >New
Change the width to 6 and the height to 6. Make sure the drop-down menu to the right says inches.
Change the resolution to 300 dpi (this will make sure that your collage prints clearly when you print).
Name the file > name_assign4_collage# and save to your flash drive.
2
3. Creating the Black and White Texture Files:
In order to create the black and white texture files you will open each file in Photoshop separately and save them.
First, in your textures file create a new file entitled "Black and White"
Next go to >File >Open
Choose your texture file from the "Native" folder.
Go to >File >Save As > texture_#_BW and save the file in your "Black and White" Folder.
Then go to >Image >Image Size
Deselect "Resample Image" and change the resolution to 300 ppi.
Then go to >Image >Mode and choose >Grayscale. Photoshop will then ask you if you want to discard the color
information. Select yes.
Do this for all of your texture files.
Creating Different Values:
Open each texture file and apply the Curves tool.
Click anywhere on the line in the
curves menu to create a point.
Go to >Window >Adjustments >Curves.
Click and drag to change the value.
3
4. Creating the Collage
Open the collage file that you made.
Go to >File >Place and select one of the black and white textures that you made.
The texture file will appear in your document.
Do this until you have at least 3 texture documents.
The textures will appear as layers in your document.
Select each layer and hold the control key while clicking it.
This will bring up a drop-down menu.
From the drop-down menu select >Rasterize layer.
Now your textures are ready to manipulate into a collage.
You can use the eraser tool, cut tools, or masking tools
to alter the shapes of the images on each layer.
4
5. Photoshop Shortcuts
command z = undo 1 action
option + command + z = undo previous actions
option + click and drag = duplicate
command + click = toggle between layers (so you can select objects that are on top of eachother. You must be
clicked on the move tool).
command + t = transform (this will select your object so you can rotate or resize).
command + D = deselect
E = eraser
V = move tool
L = lasso tool
C = crop tool
I = eyedropper tool
T = type tool
Tutorials
Using the marquee and move tools – http://adobe.ly/yomGCD
Using the selection/masking tools – http://adobe.ly/xJiVBy
More on selection tools – http://adobe.ly/AxTBlq
5