Trimmed bed skirt
•
0 gefällt mir•229 views

Whether you’re punching up an existing bed skirt or a brand new one, using a purchased one is a smart way to go. They come in so many styles and colors that it’s easy to tie them in to your bedroom decor. So strip off that plain old bed skirt and make it nice and pretty! Instead of cutting individual bias strips and sewing them together, I’ll walk you through how to make continuous bias binding.

Empfohlen
Weitere ähnliche Inhalte
Andere mochten auch
Andere mochten auch (14)
Kürzlich hochgeladen
Kürzlich hochgeladen (20)
Trimmed bed skirt
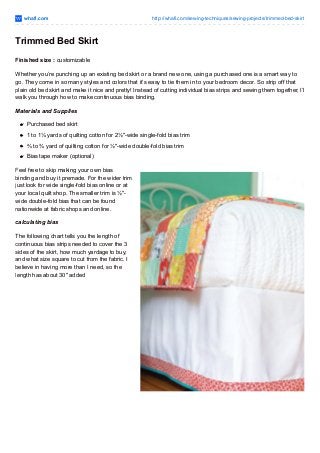
- 1. whafi.com http://whafi.com/sewing-techniques/sewing-projects/trimmed-bed-skirt Trimmed Bed Skirt Finished size : customizable Whether you’re punching up an existing bed skirt or a brand new one, using a purchased one is a smart way to go. They come in so many styles and colors that it’s easy to tie them in to your bedroom decor. So strip off that plain old bed skirt and make it nice and pretty! Instead of cutting individual bias strips and sewing them together, I’ll walk you through how to make continuous bias binding. Materials and Supplies Purchased bed skirt 1 to 1¼ yards of quilting cotton for 2½″-wide single-fold bias trim ⅔ to ¾ yard of quilting cotton for ½″-wide double-fold bias trim Bias tape maker (optional) Feel free to skip making your own bias binding and buy it premade. For the wider trim just look for wide single-fold bias online or at your local quilt shop. The smaller trim is ½″- wide double-fold bias that can be found nationwide at fabric shops and online. calculating bias The following chart tells you the length of continuous bias strips needed to cover the 3 sides of the skirt, how much yardage to buy, and what size square to cut from the fabric. I believe in having more than I need, so the length has about 30″ added
- 2. making continuous bias strips 1). Trim the selvage edges from the fabric and cut a square according to the chart. A large clear ruler will help you make the corners neat and perfectly square. 2). Lay the square flat on the cutting mat, wrong side up, and mark the sides of the fabric with the number 1 near the middle. Then mark the top and bottom with the number 2 near the middle. 3). Fold the fabric in half diagonally, from point to point, and press a crease in the fabric. Unfold the fabric and cut along the 45° crease line. You now have 2 large triangles. 4). Lay the triangles on the table right side up and match up the sides labeled 1. Pin the triangles right sides together. Try to keep the little dog ears at either end even. Sew the seam together with a ¼″ seam allowance and press it open. 5). On the wrong side of the fabric, use a pencil or a fine-tip marker and a clear ruler to draw lines across the length of the fabric to make strips that are 2″ or 5″ wide. The longer the ruler, the quicker the work. Cut a few inches along the first line as shown at point A. 6). Bring the 2 short diagonal sides labeled 2 together, right sides facing. Offset the lines by 1 strip, matching points A and B as shown, and pin them together carefully to match up your drawn lines throughout. 7). Sew another seam as shown, with a ¼″ seam allowance, and press the seam open. 8). Continue cutting along the line as started in Step 5 to make a continuous bias strip. 9). Use a bias tape maker to fold the 2″ bias strip into shape; follow the manufacturer’s instructions and make sure not to stretch the bias when putting it through. If you don’t have a bias tape maker, fold the bias strip in half lengthwise, wrong sides together, and press; fold the edges in to the center and press again. 10). Fold the 5″-wide bias strip in half lengthwise, wrong sides together, and finger-press a crisp crease in it. A little spray starch can help if you have it handy, and it gives the fabric a bit of added body. sewing it up 1). Before you begin, make sure the bed skirt is clean and pressed per the manufacturer’s recommendations. My bed skirt was new, and I chose not to prewash it, but I did give it a good ironing with steam and spray starch. 2). Pin the 5″-wide single-fold bias along the bottom edge of a long side of the bed skirt, leaving a 3″ tail at either end and aligning the raw edges of the bias tape with the bottom of the bed skirt. Edgestitch (in Tips and Tricks) the top of the bias tape to the bed skirt. Baste the lower edge in place.
- 3. 3). Repeat Step 2 on the other side and at the foot of the bed. If your bed skirt doesn’t have split corners, you can trim the skirt with a single long seam. Fold over each 3″ tail back to the edge of the bed skirt and then behind the bed skirt, pressing and pinning in place. Refer to Hand Stitches to slipstitch the tails down. 4). For the ½″-wide double-fold bias, sandwich the bias trim around the trimmed bottom of the bed skirt, leaving a 1″ tail at each end. Wrap the extra 1″ toward the back and tuck it neatly inside the fold of the bias trim. Pin and edgestitch in place, working your way around all sides as in Step 3. Trim the end of the bias to a 1″ tail and finish it off the same way you did at the beginning. Now it’s time to make your bed, grab a book, and enjoy the rest of your day in lovely style. Source : Kelly McCants at home with modern June 27 Sewing Projects for Your Handmade Lifestyle Related post Panel Drapes Color Block Duved Cover Repurposed Bunting Shower Curtain Reversible floor mat Patchwork pot holder Pillow Cover Tags: bed skirt pattern, bed skirts, how to make a bed skirt, how to sew bed skirt, trimmed bed skirt