1. Creating a PowerPoint 2007 Presentation
Created: 28 November 2006
Starting PowerPoint 2007
Double click quickly on the PowerPoint 2007 icon on the Windows desktop
(see image on right), or click the Start button in the lower left corner of the
screen, and then click All Programs, next move your cursor over Microsoft
Office, then click Microsoft PowerPoint 2007.
In this tutorial, whenever we indicate that you need to click a mouse button, it will mean to click
the left mouse button – unless we indicate that you should click the right mouse button. So,
always move the cursor over the “place” we indicate and “click left” unless we tell you otherwise.
If you have been using PowerPoint 97, 2000, XP/2002 or 2007 this will be a wonderful
journey. You will find many exciting new features and enhancements. Almost everything
is “graphical.” When PowerPoint opens, the appearance of the screen will be very
different. Once you get used to the new 2007 features, we think you‟ll find it much easier
to use as you create and edit your PowerPoint slides.
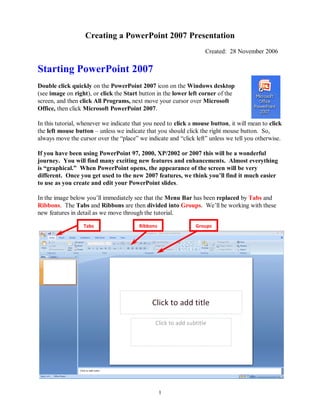
In the image below you’ll immediately see that the Menu Bar has been replaced by Tabs and
Ribbons. The Tabs and Ribbons are then divided into Groups. We’ll be working with these
new features in detail as we move through the tutorial.
Tabs Ribbons Groups
1
2. Notice, in the image on the last page, that the screen is “sort of” divided into three sections.
Across the top are the Microsoft Office Button, the Quick Access Toolbar and the Tabs,
Ribbons and Groups (indicated on the last page).
Microsoft Office Button
Quick Access Toolbar
Microsoft Office Button Quick Access Toolbar
If you refer to the Introduction to Microsoft 2007
Tutorial you’ll find a detailed explanation of how
to use these new features.
On the left side of the PowerPoint screen you’ll see an
area that indicates Outline and Slides at the top. When
you first open PowerPoint 2007 you’ll notice that the
Slides Tab is “white.” This means that you’ll be able to
see a small version of each slide as we create it.
To the lower right-center of the
screen, you’ll see a PowerPoint
Design Template. We’ll be
using these templates to create
our slide show. We’ll come
back to this in more detail later
in the tutorial.
2
3. Beginning the presentation
Slide 1
In PowerPoint 2007 a Slide Layout named Title Slide always appears first. PowerPoint
“thinks” that you want to start your presentation with a title. So, logically, the Title Slide appears
in the main section of the screen.
After you understand PowerPoint a bit more, you can choose any of the layouts you desire. We’ll
show you how to do this as we proceed through the tutorial.
You will notice, in the lower left corner of the screen, Slide 1 of 1 is
indicated.
You will also see that your screen looks like the image below.
Now we‟ll have some fun and create a PowerPoint 2007 presentation on how to make a
Peanut Butter and Jelly sandwich.
Place your cursor in the “Click to add title” box and Click the left mouse button. Your text
box, after you click, will look similar to the one below.
To insert the text in this formatted text box, we simply enter (type-in) the title: How to Make
a Great PBJ – go ahead and type this text in the box.
3
4. Now, Click in the second box “Click to add sub-title” and type:
A Gourmet Recipe (tap the Enter key)
From (tap the Enter key)
Your Name (type in your name like
Janie Schwark or Greg Butler)
New Slide Button
Now it’s time to create the next slide in your
presentation. To do this, we’ll need to find the
New Slide button.
At the top left of the screen, in the Home Tab
you will see a New Slide “button” which looks
like the image on the right.
When you move your cursor arrow over the
button you will see a Microsoft Help Text box
appear that says New Slide.
Now this is a bit tricky….. Look carefully at the lower right
corner of the New Slide button and you will see a down arrow.
Click-on the down arrow to create your next slide.
If you accidentally click the button, and a new slide appears,
don‟t worry, we’ll show you how to change to the
slide format you desire later in the tutorial.
When you click the arrow an image similar to the one
on the right will appear. We’ll use the Title and
Content slide for our second slide. Click this choice.
4
5. Slide 2
Your new Slide 2 should look like the image below – even if you did not click the arrow.
For those who are familiar with previous versions of PowerPoint, you will notice that several
different Slide Layouts have been combined into this smaller number of choices. All of the
Layouts are available, but in new “combinations.”
The Title and Content
slide (on the right)
combines several of the
Text and Content
Layouts. We can choose
to use the Bulleted List,
or the Content choices.
For Slide 2 we’ll use the
Bulleted List. We’ll use
the Content choices later.
Click in the Click to add title box and type: Ingredients.
Click in the Click to add text box and type:
Crunchy peanut butter (tap Enter)
Homemade strawberry jam (tap Enter)
Two slices of white bread (tap Enter)
Milk
Your Slide 2 should
look like the image on
the right.
Notice how each line appears with a “bullet” ( ) in front of it.
As soon as you began typing “Crunchy peanut butter,” you probably noticed that PowerPoint
guessed that you wanted to use this Layout as a Bulleted list – so it took away the Content
choices. This is a new feature in PowerPoint 2007.
5
6. Saving your work
Now would be a good time to save your
work for the first time.
Notice, you have the small save
diskette in the Quick Access Toolbar.
However, there is no longer a Menu
Bar with File - Save. The Microsoft
Office Button is now used for File menu
choices.
Click the Microsoft Office Button and
the menu on the right will appear.
Notice that we purposely moved our
cursor over Save As and it turned
orange. We did this so you can see the
various Save choices on the right side of
the menu screen under Save a copy of
the document.
Notice…………… You now have several new choices for saving your presentation.
PowerPoint Presentation – saves your presentation as a .XML (Extensible Markup
Language) file. This is a new saving format that creates a smaller file size. However, this file
type is not compatible with older versions of PowerPoint. So, if you share your XML
presentation with someone they will have to download a Compatibility Pack. They will see a
message similar to the one below when they try to open this file on an older version.
If they click “Yes” – they should be taken to a Microsoft Compatibility Page site for this
download. The current site is: http://www.microsoft.com/office/preview/beta/converter.mspx.
“The presentation they see may not look exactly like the one you created if it contains features
from PowerPoint 2007 that they don’t have. But they can open, edit, and save it in the format for
PowerPoint 2007.” (2007 Microsoft Office Preview webpage)
6
7. PowerPoint 97-2003 Presentation – as indicated, this choice is totally compatible with
older versions of PowerPoint.
PDF or XPS – You can now save your presentations as PDF Files! Wow!
For this tutorial we are going to save our file as a PowerPoint Presentation.
In the upper left corner, of the Menu Screen that appears, you will see: Save in: (see top
arrow). Click-on the small “ V ” to the right of the area next to Save in: (see arrows) and it
will show you the various disk drives available on which you can save (image below). Point to
the drive you desire, and click-on it. If you choose the 3½ Floppy (A:) – make sure you have a
formatted diskette in the A drive. If you choose the C: drive, choose the folder in which you
want to save, by double clicking quickly on the folder.
Now click in the box to the right of File name: and you will see that How to Make a Great PBJ
has already been entered. PowerPoint assumes you desire to name your presentation with the
name of your first text entry in your first slide. If you do not want this name, delete How to Make
a Great PBJ and type in the file name you desire. Then click Save (see arrows above).
One of the really nice things about Office 2007 and PowerPoint 2007 is an auto-save feature that
will save your file if you forget to – if something causes your computer to “crash.” However, we
still think it’s a good idea to save your PowerPoint presentation after each slide. So we’ll
remind you to do this.
7
8. Other Slide Views
The area running down the left side of the screen, which contained “little” views of your
slides, is called Normal View. This is the “default” view for PowerPoint.
Slide Sorter View Zoom
In the lower right corner
of the screen you will see
some “buttons” that look
like the image on the right:
Normal View Slide Show
This is the PowerPoint View Toolbar.
Slowly point (move) your cursor arrow over each button and pause a moment (don’t click-
on any of them yet). Note what the Text Help boxes indicate. The first box (which looks
“depressed”) indicates: Normal View. The next: Slide Sorter View. Then, Slide Show.
To the right of the buttons, you will see a Zoom area that will allow you to Zoom in or out to
enlarge or decrease the size of your slides.
Each button has its own unique use.
The Normal View gives you a view of the entire slide as well as the “mini-previews” of each
slide in the area on the left. This is the one we have been using so far.
You’ll also notice a Click to add notes section at the bottom of the Normal View screen. In
this area you can type “speaker notes” for each slide in the lower portion of the screen. When we
cover printing, you will see that there is a print selection to print your speaker notes for each
slide. Then, during your presentation, you can refer to your printed notes.
Click-on Slide Sorter View.
In Slide Sorter View you can see small images of each slide. In this view you can left click-on a
slide and, while holding down the left mouse button, drag your slide to any position in your
show that you desire. This view assists you in arranging your slides in the order that you desire
for your presentation. This view is sort of like the old, round 35mm slide show trays where you
pulled-out and stuck-in slides, in the order you desired.
The last button is Slide Show. Anytime you want to view your presentation, click-on this button.
If you click on it now, you will see how the slide, on which you are working, will look. Give it a
try if you desire. When you are finished looking at your slide, tap the Esc button/key in the top-
left part of your Keyboard. This will take you back to the View in which you were working.
8
9. Click Normal View to return to your slide creation area. We’ll work with Slide Sorter View a bit
later.
The Undo Button
One of the really handy “things” about most Microsoft programs is the Undo
Button (it looks like the image on the right). If you make a mistake – no need
to panic – click the Undo button and this will remove your mistake. Then you
can try again. The Undo Button is found in the Quick Access Toolbar on the top
left of the screen. Each time you click the Undo button, PowerPoint will “go back” one change.
If you “click too far, there is a “Redo button” that will “undo the undo.” They are both very
handy when you need them.
Slide 3
Click the down arrow in the lower right corner of the New Slide button once
again.
When the New Slide choices menu screen appears, click
the Two Content Slide.
Your screen should look like the image below.
You may use the two lower
boxes for either Text or
Content.
Left Text or Right Text or
Content Box Content Box
Instructions on how to
complete this slide are found
at the top of the next page.
9
10. Click in the top text box - Click to add title - and type: Tools Needed
Click in the left Text or Content Box - Click to add text and type:
Knife (tap Enter)
Spoon (tap Enter)
Plate (tap Enter)
Glass
Right Text or Content Box
Notice the small images in the right Text or Content Box of
the new slide. There are six “tiny” icons in this area that will
allow you insert a Table, Chart, SmartArt, Picture, Clip Art or Media Clip. For this slide we want
to insert a Clip Art image in this area. So, carefully, move
your cursor over the tiny image in the center of the bottom
row (see arrow above). When you do, the box will be
highlighted and you’ll see a small text help box appear which
indicates – Clip Art.
Click-on the Clip Art image (arrow above). An image
similar to the one on the left will appear.
Since our presentation tells how to make a peanut butter and
jelly sandwich, we typed sandwich in the Search for: box.
Then we clicked the Go button (see left arrows above). A
Microsoft Clip Art Task Pane then appeared as you see on
the left.
Notice that there are a lot of sandwich clip art images
available. You can “run down” the choices by using the
“elevator bar” on the right side of the Clip Art Task Pane.
Move up and down the selections until you find one you like.
Don’t worry that there aren’t many selections that look just
like what you want. We’ll show you how to find a lot more
clip art as we go through this tutorial.
10
11. We moved down the selections until our Clip
Art menu screen looked like the one on the
right. We chose the “sandwich” on the
right. You find an image you like. We then
moved our cursor over the RIGHT EDGE of
the image we chose and a blue selection bar
with a “V” appeared. We clicked the blue
bar and the image and drop down menu you
see on the right appeared. We moved our
cursor over Insert and clicked.
The menu will disappear and you will see the
image you selected on the right side of your
slide.
Note: if your clip art selection does not
appear, and you receive an error message,
please read on below (where an explanation is
given).
Microsoft 2007 Clip Art
As you’ve noticed, Microsoft Clip Art 2007 Selection Screen is different than “old” Microsoft
Clip Art screens that were used in the 97, 2000, XP and 2003 versions. There are a lot more
pictures and some other unique features.
As we continue through this tutorial we’ll be using additional methods to insert images in our
PowerPoint presentation. Once you “get used to” the “2007 way,” you’ll see that the folks who
created this neat feature were trying to assist you by having everything you need on the right side
of the screen.
If you choose a slide and the following message appears:
Insert CD-ROM or other removable volume
This means that when the Microsoft Clip Art Gallery was installed on your computer, not all of
the images were loaded (to save hard disk drive space). So, if you have your installation CD you
can place it in the CD drive and click a Retry button that will also appear. If you don’t have the
CD, then choose another image and try again. We‟ll show you a way to “get around
this” dilemma later in the tutorial.
11
12. Slide 3 should look similar to the image on
the right.
Don‟t forget to save your work!
Closing the Clip Art Task Pane
Before we go to Slide 4, we’ll close the Clip Art Task
Pane on the right side of the screen. This will give us
more room in the center to work on the next slides.
To close the Clip Art Task Pane, click the small “X” in the upper right corner of the Task
Pane (image above on right). You will see the Task Pane disappear.
Slide 4
Click the down arrow in the lower right corner of the New Slide button once
again.
Slide 4 will be another Title and Content
slide. Click the Title and Content image
in the New Slide menu screen.
Click on the top Click to add title box and type: Directions
Click on the bottom Click to add text box and type:
Open jars of peanut butter and jam (tap Enter)
Spread peanut butter on one slice of bread with a knife (tap Enter)
Use a spoon to get jam and spread it on the other slice of bread (tap Enter)
Put two slices together and cut the sandwich in half (tap Enter)
Put the sandwich on a plate (tap Enter)
Pour a glass of milk (tap Enter)
Enjoy
12
13. If your text won‟t fit in the box completely, click the box and a border will
appear around the box. You will notice “little circles” at the four corners, and
in the middle of the top and bottom, and on each side of you text box. Point
to either the center top or center bottom circle. Your cursor will change to a
two headed small arrow like the one on the right. Click-on either circle and
hold down the left mouse button and drag the top circle up, or the bottom
circle down to enlarge the text area so that text fits on the screen. If your
“Directions” are now “mixed-in” with the bulleted text below, click-on
Directions. Then click-on the “edge” of the “box” (a small up-down-left-right
arrow will appear – like the one on the right), hold down the left mouse button,
and drag the box up a bit.
Slide 4 should look similar to the
image on the right.
Time to save your work!
Slide 5
Click the down arrow in the lower right corner of the New Slide button once
again.
For this slide we’ll be creating a bar chart that shows
what type jam/jelly people like the most on their peanut
butter sandwiches. To create this of slide we’ll start by
clicking the same image we did for Slide 3.
When the New Slide menu screen appears, click the
Two Content Slide.
13
14. Your Slide 5 screen should look like the bottom of Page 9.
Click the Click to Add title Text box at the top and type: Why use strawberry jam?
Click the left Click to add text Text or Content box and type:
100 Children and adults were surveyed to find out what goes best with peanut
butter. 33 Selected grape jelly, 11 honey, 46 strawberry jam and 10 sliced
bananas (you don’t have to tap enter, as this is one long statement).
Now we‟ll make a graph to show the survey data.
In the Text or Content box, on the right side of the slide, we’ll
click the center icon in the top row (it looks like a bar chart – see
arrow at right). When you click this icon, the below image will
appear.
We’ll begin with a two-dimension, Column Chart (see top two arrows in the image above).
Click the OK button and all kinds of things will appear!
14
15. When you click the OK button your screen will “split” in two. On the left half of the screen,
you’ll see your PowerPoint presentation – with a Chart in the right side Text or Content box.
On the right of your screen, you’ll see that Microsoft Excel 2007 has opened with a number of
entries. The entries you see on the Excel screen created the chart you see on the left in
PowerPoint. We’ll leave both screens open so you can see, as we alter the text and numbers in
the Excel screen, how the Chart changes in PowerPoint.
PowerPoint Excel
Chart numbers
and text
Chart from
numbers and
text in Excel
For this PowerPoint lesson, we’ll change the sample Excel text and numbers to create our
chart. If you desire additional training in Excel spreadsheets and charts, please see our Excel
2007 tutorial.
To assist you, we’ve enlarged the default PowerPoint
chart on the left and Excel spreadsheet below.
Please take a few moments to look at both and
familiarize yourself with the Series and Categories and
where they are located in both PowerPoint and Excel.
15
16. Notice that the Series are the “ bars” in the chart. We see three Series in both the Excel
spreadsheet and Power Point Chart. We have four “things” that people like with their peanut
butter sandwiches, so we need to add another series. To add another Series to your
spreadsheet carefully move your cursor over the small triangle in the lower right corner of
highlighted area.
When you have your cursor
over the triangle, you will see
the two headed sizing arrow
appear. When you see the
arrow, click and hold down the
left mouse button and slowly
move your mouse to the right.
As you do, you will see
another Series appear (like the
image below).
When you see this image –
with Series 4 – take your
finger off the mouse. We’re
now ready to type in our
peanut butter sandwich data to
replace this data.
Click in cell B1 and replace
Series 1 with Strawberry. Then
do the same in the next three
cells like we’ve done in the
image on the right. Then type
Best in Cell A2.
As you enter the choices, you will see them appear
in the PowerPoint slide on the left side of your
screen.
But we still have a slight problem – Categories 2, 3
and 4 are still there. Let’s now remove them.
If you make a mistake, don‟t
forget the Undo Arrow!
16
17. We need to remove the rows with Categories 2, 3 and 4 – so that these bars will disappear from
the PowerPoint chart – and we’ll only see our data.
This can be tricky, so don’t forget the Undo Arrow works in Excel just like it
does in PowerPoint.
Move your cursor over the 3 (for the
third row in the spreadsheet and you
will see a black arrow appear. When
you see the arrow, click and hold
down the left mouse button and
slowly move your mouse to the down
to highlight rows 3, 4 and 5
(Categories 2, 3 & 4).
When you see the image (on the right
– with rows 3, 4 & 5 highlighted) –
take your finger off the mouse.
We’re now ready to delete these rows.
Move your cursor over the
highlighted area and click the
RIGHT MOUSE BUTTON.
A drop-down menu (like the image
on the left) will appear. Move your
mouse cursor over Delete and click
the LEFT mouse button.
The Excel spreadsheet data area
should look like the image below.
17
18. Your PowerPoint Chart should look like the image
on the right.
If it does not, please try again. Click on Slide 5,
on the left side of your PowerPoint screen, and tap
the Delete key on your keyboard. Then return to
Page 13 and try again.
If everything is OK, go ahead and close the Excel spreadsheet (that is open on the right side of
your screen). Click the Close “X” in the upper right corner of the screen.
When you close the Excel spreadsheet, your PowerPoint presentation should again fill your
screen. If, for some reason it does not, click the Maximize “square” in the upper right corner
of the screen.
If need to edit your chart you can return to Excel at
any time.
To open Excel again, move your cursor over your
chart and DOUBLE CLICK the LEFT MOUSE
BUTTON – TWICE QUICKLY. Your chart should
look like the image on the left.
As soon as you double click the Chart Tools
Tab/Ribbon (image below) will appear.
18
19. To open your Excel spreadsheet
(again), move your cursor over
the Edit Data button in the Chart
Tools Tab/Ribbon and click the
Edit Data button.
Your Excel spreadsheet will open
again on the right side of your
screen.
When you have finished editing your Excel data, and your chart looks OK in PowerPoint, close
the Excel spreadsheet and return to working with PowerPoint.
You may or may not desire to alter the appearance of your graph. It should be OK.
The Excel 2007 tutorial has additional detail on how to edit your Excel charts. These skills work
the same in PowerPoint charts. You may refer to this tutorial as needed.
Slide 5 should look similar to the image
on the right.
Save your work!
Slide 6
Click the down arrow in the lower right corner of the New Slide button once
again.
We’ll use the Title and Content slide again.
Click this slide.
Your Slide 6 screen should look like the top of Page 5.
19
20. Click the Click to Add title Text box at the top and type: Occasions for Eating PBJ‟s
Click the Click to add text Text box at the bottom and type:
School lunches (tap Enter)
Birthday parties (tap Enter)
Picnics (tap Enter)
Visits from persnickety grandchildren (tap Enter)
Late night snacks (tap Enter)
At the pool
Slide 6 should look similar to the image on
the right.
Save your work!
Inserting Animated Images and Sounds into PowerPoint slides
You can insert images that move - called
animated images - into your slides. . You
can insert an animated Clip Art image on
any slide. You’ll then want to move and
resize the image for your slide. To insert
an image, click the Insert Tab, and then
click the Clip Art button in the Insert
Ribbon (image on right).
When you click the Clip Art button a Clip Art Task Pane will open. This is the same Task
Pane that you saw on Page 10 – however, we’re now going to use it in a new way, to find
animated clip art and sounds on the internet. The right side of your Power Point screen should
look like the image at the top of the next page. You can use this Task Pane as you did on Page
10, or the new way we’ll show you now.
20
21. Once again, you’ll notice the area on the right side of the
screen has changed to assist you with the next task –
inserting Clip Art. Notice that the image on the left
indicates Clip Art at the top.
Notice the two selections under Search In: and Results
should be: All collections and All media file types.
Click-on the small down pointing arrows on the right
side of each of these selections (see arrows at left).
When you click on the triangle for All collections you will
see:
When you click on the triangle for All media file types
you will see:
These two areas: Search in: and Results should be:
indicate (by the check marks in ALL the little boxes)
that you desire to search EVERYWHERE – for
EVERYTHING. This makes sense at this point.
Later, as you become more skilled in Clip Art
selection, you can just check the boxes you desire.
21
22. We’ll “get into” sounds later, but now is a good time to
learn about Motion Clips or Animated Clips. First we’ll
do a search to see if we can find a cartoon motion clip
that might fit into our Peanut Butter and Jelly theme.
Look at the upper portion of the right side of the screen
again. First, we’ll do a Clip Art search for cartoons and
“hope” we get a motion/animated image.
Type-in cartoons in the area under Search text:
Then click-on the Go button.
A screen similar to the one on the left will appear on the
right side of your PowerPoint screen – your screen will
probably not look like this one – but you will be able to
follow the sequence below.
Notice in the lower right corner of each image that there is
either no “symbol” or there is a “small yellow star.” The
yellow star indicates that the clip art is animated. If you
don’t see the star, this indicates that the image is not
animated.
If none of your images have a star, not a problem. We’ll
select an image you like, and later show you how to find
animated images.
To “see” more about an image, move your
cursor over the “right edge” of an image.
You will see a light blue bar appear on the
right edge of the image with a small down
pointing arrow. Move your cursor over the
arrow and click on it.
When you click the arrow, an image similar to the one at
the top of the next page will appear.
22
23. From the image on the right you can see that the drop
down menu furnishes you with a number of selections.
Move your cursor over Preview/Properties and click-on
this selection.
This image gives
specifics on the Clip
Art picture you
chose. If this is an
animated image,
you will see the
animation moving
in the left preview
area.
This is a handy
feature where you
can check the many
details of any image
you select.
When you are
finished looking at
Preview/Properties,
click the Close
button in the lower
right corner.
23
24. Microsoft PowerPoint 2007 – Clips Online
Since we may not have found an animated image for this slide, let’s try something else – Clips
Online. Even if you found an animated clip – try this too!
You can go online from the Insert ClipArt Menu Screen and get even more clip art. Not only is
everything in the ClipArt Gallery available – but even more!
If you look at the bottom right of your Clip Art Task Pane area,
you will see the image to the right. Notice that one of the
selections is Clip art on Office Online. Move your cursor over
Clips Online and click-on it.
NOTE: In order to go to the Office Online area, you need to be on the Internet. You will
either need to have your modem active, or be on an active network connection. If you are not
“online” the below procedure will not work.
You may see an information screen similar to the one below, or you may go directly to the
Microsoft Office Online web page.
Normally, the above Microsoft Office Online screen appears the first time that you access this
web page. If this page appears, read the Terms Of Use and then click the Accept button (arrow
above).
24
25. When you click the Accept button, you will be taken to the Microsoft Office Template and
Media Control Screen below. This screen indicates that it would be wise to download this
feature to enhance your work with the Clip Art selection and downloading. When you click the
Continue Button (arrow below), you will see a screen that indicates that this process is
occurring. Please read this screen and then click the Continue button.
It will take a few moments, but the Microsoft Office Online screen will open. Your screen will
look similar to the image below. This image changes everyday with new Clip Art updates.
25
26. Look at this screen carefully - it contains “all kinds of useful information.” On the left there
are links to interesting Microsoft sites. In the middle, you’ll see the “images of the day” and
current clip art collections – they change with the seasons. We frequently “get lost” on this
page as we spend so much time clicking on these links. But for this tutorial, we’ll concentrate on
clip art.
Look at the top left
corner of the
Microsoft Office
Online screen. It will
look like the image to
the right. We’ll use
this portion of the
screen to search for
animated clip art.
Notice - in the image above - there are a lot of arrows pointing to several areas.
The top-right arrow points to a down pointing arrow, click-on this arrow.
This causes a drop down menu screen (lower right arrow) to appear. It indicates that, when
we do a search, we will find all of the images and sounds in the drop-down menu – All Media
Types. Notice the left top arrow points to the “white area” – we typed cartoons in this area –
so that we can search for cartoons again. Go ahead and type anything you would like to search
for in this white area. For this tutorial we’ll stick with cartoons - for now.
Next, notice the Search button (top middle arrow). If you move your cursor
over the Search button, a “small pointy hand” appears indicating that if you
click the Search button, it will begin a search for the clip art choice you typed-in. After you
enter what you want to search for, click the Search button.
A menu screen similar to the one below will appear.
26
27. Notice all the arrows in the image at the bottom of the last page. The left arrow confirms
that we searched for “cartoons.” And the right arrow indicates that there are more images to
be viewed if we click the Next button.
Now look closely at one of your images
(like the one on the left). Notice the
small square below the image. If you
desire to download this image to your
computer, simply click in the little
square
If you move your cursor over the little
magnifying glass at the bottom of the image, and
click on it you will see an enlarged menu screen
like the one below.
You could also, move your cursor over the image
until you see the “little pointy hand” and click the
left mouse button. Both methods will cause the
screen below to appear.
The Properties
Screen on the left
will furnish all of
the details on the
image. When you
have finished
looking at the
image, click the
“red X” in the
upper right corner
of the Properties
screen (see arrow
above).
27
28. A new choice with Office 2007 is the “pages”
icon below the image. If you click this icon, it
will place the image on your Clipboard for
you to paste into your PowerPoint
presentation, Word document, etc.
If you see any image that you desire to save on you computer, simply click-in
the small box below that image.
We clicked-in the small box below the Alarm Clock and two “things” happened immediately.
As soon as the check mark appeared, the two images below changed a bit.
When the check mark
appeared below the hat, the
blue bar at the top of the
screen indicated Download 1
item.
In the Selection Basket area,
on the left side of the screen,
it now indicates that there is
one item to download.
As you select more images, these two areas will change to show the number of images you
have selected.
As you move through the images, by clicking the Next
button in the upper or lower right corners of the screen,
you will notice that animated images “move.”
You’ll also see little speakers indicating sounds.
If you’re like us, we’ve clicked through about ten to fifteen screens, and we don‟t see any of the
image moving – indicating animation. So, let’s take care of this by “refining” our search.
28
29. We’ll continue to search for cartoons, but only “look” for
animated clip art. To do this we’ll need to go back to the
Search area in the upper left corner of the Microsoft Office
Online Clip Art Screen( image on right). Click the down
pointing arrow (see right arrow) to the right of All Media
Types, a drop down menu will appear. Move your cursor
over Animations and click on Animations.
Now click the Search button again to start a new clip art
search.
You should now see only animated clip art. Every clip art image should be moving!
As indicated before, click in the small squares below any image
that you would like to download. Click the Next arrows to see
more clip art. As you click, the number of downloads will
increase to reflect your choices.
We found a “dancing pig” and
“feeding cow” that we liked.
You’ll see that we put check
marks below these two images
so that we can download them.
You search until you find some Clip Art images you like. Check any of the boxes below the
images you select.
We‟ll now download the images you selected to your computer.
If you look at the top of your
Microsoft Office Online Clip Art
screen you will see the number of
Clip Art images that you selected to
download.
29
30. You will also see the same information on the left side of
your screen.
To download the images, move your cursor over either of
the Download 2 items (or however many items you chose)
and click the left mouse button (see arrows on bottom or
last page or to the right).
A Download screen, similar to the one below, will appear. We chose two images, so our
screen indicates “2 items.” Your screen will indicate the number of images you selected for
downloading to your computer.
When you see this screen, follow the instructions in the box on the image below.
When you have read over this screen, click the Download Now button.
A File Download Menu Screen
will appear (image on left). The
Click the Open button.
30
31. Note: If you have never used Microsoft Clip Art Online before, you may see a menu
screen asking if you desire to organize your clips now or later. If this screen appears, go
ahead and select now. Clip Organizer will find ALL of the Clip Art on your computer and
place it in the Clip Art Organizer.
Clip Art Organizer
When the download is complete, a screen similar to the one
on the left will appear. There are several things to notice
here.
First, look at the top of the screen it indicates: Collection
list. This is important – you’ll see why in a few minutes.
Notice that Downloaded Clips has been “expanded” to
show all of the little yellow folders below it.
Next, you see the images that you downloaded on the right
side of your screen. Since these are animated images,
notice the “yellow star” in the lower right corner of the
images. This indicates that the image is animated. This is
not shown here, but we‟ll look at the right side in a
moment.
Notice that the Fantasy folder is highlighted in gray – on
our screen. This is very hard to see, so look carefully.
Another folder, under Downloaded Clips may be highlighted
on your screen. It depends on the clips you download. This
is very important as this is where your downloaded
images are located. Notice there are a lot of folders that can
“hold” clips in the Collection List.
Sometimes, if you’ve forgotten where a clip was downloaded,
you’ll need to click on several of the Downloaded Clips
folders to find the clip you want.
The right side of your Microsoft Clip
Organizer menu screen should look like
the image on the right. You’ll notice
the cow and sun that we downloaded.
You should see the images you
downloaded.
31
32. To insert a clip in your presentation, move your cursor
over the right side of the animated image (you wish to
insert), and click the small down arrow.
A drop down menu will appear, select Copy.
This will place the image on your Clip Board. You are now ready to paste the image into your
slide.
In the upper right corner of your Microsoft Clip Organizer
screen you will notice three small boxes. The one on the left
has a “dash,” the one in the middle a “little square,” and the one
on the right a “X.” These buttons allow you to make your Clip
Organizer screen bigger (the square in the middle) or close
this screen so it “goes away” (the “X”). Click on the dash (see
arrow on right). You’ll notice that the screen seems “to
disappear” into the blue bar at the bottom of the screen. This
Blue bar is called the Task Bar. If you need to use the
Microsoft Clip Organizer again, simply click on the Clip
Organizer in the Blue Bar Task Bar.
You should see Slide 6
again. In PowerPoint
2007 you will have to
click “outside” of the
Text Box to Paste your
image.
Click in the middle
of your Text Box
and you will see the
dashed border
around your Text
Box appear.
Move your cursor to somewhere outside the Text Box. Click the RIGHT mouse button.
When the drop down menu appears, click Paste. You
will now see your animated image in the center of your
slide.
32
33. We’ll move the image to the lower right corner
of the slide. Move your cursor over your image
and you will see the cursor change to a four-
headed arrow (see image on left and above).
When you see the four-headed arrow, click and hold
down the left mouse button, and move your image to
the lower right corner of your slide.
If you desire to make the image larger
or smaller, move your cursor over one
of the little circles on one of the
corners. You’ll see your cursor change to a two-headed
arrow. When you see the two-headed arrow, click and
hold down the left mouse button and move your two-
headed arrow to make the image larger or smaller.
If you “grab” the circles in the middle of the top, bottom, left or right sides of the image,
and move them, you will either make your image “skinny” or “fat.” So, most of the time,
it‟s best to use the corner circles.
The lower right corner of you Slide 6 should
look something like the image on the right.
One more “thing” about Clips Online
If you don‟t want to go through the Clips Online downloading clips process, you can use
the procedure below. This procedure “connects” to Clips Online through the Collection List.
Make sure that you are “on-line” and logged in
through your modem on network cable.
Move to the bottom of the Clip Art Task Pane on the
right side of your screen and click Organize clips…
33
34. At the bottom of the Collection List screen (on
the left), you will see a Web Collections Folder.
Click-on the little plus sign ( + ) to the left of
the Web Collections folder (see arrow on left).
Notice, when you click on the “+” to the left of
Web Collections, a folder named Microsoft
Office Online now appears below Web
Collections (like the image below).
Click-on the small plus sign “+” to the left of Microsoft
Office Online.
The Collection List Task Pane for the entire Microsoft
Office Online will now appear.
We clicked on Animals (see image and arrow below). The Clip Art images to the right of
animals appeared. You can insert these images just like you did on Page 32. In essence, you
are “live-on-line” in Microsoft Office Online. Some folks find this method easier to use when
downloading a specific clip – than the one we just showed you. You choose the one you like.
34
35. After you have clicked Copy, close the Microsoft Clip
Organizer by clicking on the small “X” in the upper
right corner of the Clip Organizer screen.
You may see a Microsoft Clip Organizer information screen appear (like the one below) which
asks if you desire to retain images on your Clipboard.
Answer “Yes” if this screen appears.
You should now be back in the last slide we worked on – Slide 6.
Save your work!
Slide 7
Click the down arrow in the lower right corner of the New Slide button once
again.
Slide 7 will be a Title Only slide. Click the Title
Only image in the New Slide menu screen.
Click on the top Click to add title box and type: Enjoy your sandwich!
35
36. Now, let’s make the letters larger. Highlight your title (Enjoy your sandwich!) Place your
cursor at the beginning of the first word, click and hold down the left mouse button and drag
your cursor across the words, then release the left button. The Title should be highlighted and
look like the image below. Since you are “really” in Microsoft Word when you are working with
text in PowerPoint 2007, you can also place your cursor on Enjoy your sandwich! and quickly
click the left mouse button three times and you will notice that the phrase is highlighted.
First, we’ll change the font for the text.
Click-on the down triangle next to Calibri
in the button bar at the top of the screen.
Use the elevator bar, on the right of the
font screen that appears, and move down
and select Times New Roman (see image
and arrows at right).
Next, place your cursor on the small down triangle next to
the number in the ribbon bar (when your cursor is on the
number, the Text Help box will indicate Font Size – see the
image and arrow on the right). Click on the down triangle
and scroll down to 60 and click on 60. You text should now
be larger than before.
One of the neat new features of PowerPoint 2007 – that you
might have noticed – as you were moving your cursor down
the Fonts, and then the Font Sizes – was that the
highlighted text “changed” to the Font or Font Size over
which your cursor was located.
If you did not see this, repeat the above Font type and size
change again. This time, slowly move your cursor over the
Fonts and watch the change, and then over the size and watch
the change. Awesome!
Another new PowerPoint 2007 feature
36
37. You may also have noticed, once you highlighted “Enjoy your sandwich!,” that as you moved
your cursor arrow over the highlighted text, that a Text Formatting box “hazily” appeared
(like the image below). When you see this hazy image, if you move your cursor over the Text
Formatting Box, you will have all of the formatting features in the box available to you! A
real time saver! You can use this box just as you did the ribbon on the last page.
However, you will not see the different Fonts appear in the highlighted area (like you did on
the last page) as you move you cursor over them and the sizes.
You can do this to any text in your PowerPoint presentation.
Save your work!
AutoShapes
We’re now going to try something new – a
technique for adding clever shapes and a few
“secret” things to our slides!
First, point the cursor away from the Title box and
click the left mouse button in a “white” area. This
is called “clicking away.” This will “turn-off” the
square “box” around the Title.
Click the Insert Tab at the top of your PowerPoint
screen. Next, click the Shapes button in the
Illustrations Group on the Insert Ribbon (see
arrows at top of image on right).
When you click the Shapes button a drop down
menu (like the image on the right) will appear.
Look over the Shape choices in this menu screen.
We will work with a Callout shape. The techniques
we use to place a Callout shape in our slide will
work with all of the other shapes as well.
37
38. Look at the bottom of the Shapes drop down menu and find Callouts. Move your cursor over
the choices and click Cloud Callout.
When you click, your cursor will change to “cross hairs.”
Move the cross hairs to the area below the title. Click and hold down the left mouse button,
and drag down and to the right about two inches. Release the button. A cloud shape should
appear - similar to the one below.
If you don‟t see the cloud shape – try again. If your cloud is very small, use the sizing
techniques on Page 33 to make it larger.
Drag this Cloud callout to the upper right
corner of your screen just under your title
(move your cursor over the Cloud until you see
the four arrow shape, click and hold down the
left mouse button and drag the cloud).
Enhancing the presentation
Not too spectacular? Let’s jazz it up!
Click-in the cloud. Then, type the word WOW! You will see WOW! appear in the cloud.
It’s sort of like a “hidden” text box (this is the secret!). Click the left mouse button in front of
WOW!, hold down the left mouse button, and drag across WOW! to highlight the word. Or,
since you are in Word, triple-click quickly on WOW! and WOW! will be highlighted.
Click the Home Tab at the top of the PowerPoint screen. Now we’ll use the techniques we
learned on Page 36 to change the Font in the Cloud, and make it larger.
Make sure WOW! Is still highlighted. You should see the highlight square around
“WOW!” – like the image below.
38
39. Click on the down triangle to the right of the Calibri font, and a drop down menu of all of the
fonts will appear. Move your cursor slowly down the font selections until you see a font you
like. Notice – as you move your cursor over a font – you will see that font replace the font in
the cloud! When you see a font you like, click the font. We liked Comic Sans MS – as you can
see in the image above. You choose one you like.
Now we’ll “enlarge” our font. “Wow!” should still be
highlighted. Click on the down triangle to the right
of the font sizes, and a drop down menu of all of the
font sizes will appear. Notice again – as you move
your cursor over a font size – you will see that font
size replace the font in the cloud! We decided on font
size 32. You choose a font size that you like.
Now we’ll “Color” our font. “Wow!” should still be highlighted.
Click on the down triangle to the right of the Font Color
button, and a drop down menu of all of the font colors will
appear. Notice again – as you move your cursor over a font
color – you will see that font color replace the font color in the
cloud! We decided on red. You choose a font color that you
like.
Finally, we’ll “Bold” our font. Move your cursor
over the Bold button in the Font Group and click
the “B.” You should see your font get bigger.
Your cloud and font should look similar to the
image on the left.
39
40. From now on you can “change” any of your text using this method.
Save your work!
Click away again in a white area on your slide.
Now that we have a cartoon cloud box (like in the comic funny papers) that says WOW!, we need
to add a animated comic character (clip art) to be saying this phrase. So, back to add clip art.
You’ll need to have the Clip Art Task Pane visible on the right side of your screen. If it is not
there, follow the instructions beginning on Page 20.
Once the Clip Art Task Pane is visible the right side of
your screen, well once again go to Clip art on Office
Online (like we did on Page 24).
We thought we’d search for
animated people, so we typed-in
people then chose Animations
(as you can see in the image on
the right).
We then clicked the Search button.
We then browsed through the pages, as we did before, and chose several images we liked. You
do the same. Choose several images that you like. If you want to search for images other than
people, great - go for it!
We then clicked on Download (so
many) clips (like pictures at the
right), then clicked-on Download
Now. We then clicked-on Open and
were taken to the Microsoft Clip Organizer screen. Please look
at your Clip organizer screen carefully. On the left side it will
indicate the folder in which the clips will be saved (all of this was
40
41. covered on Pages 31 to 35).
Choose a clipart image that you like and click the small
down triangle on the right side of the image. When the
drop down menu appears, click-on Copy.
Then close the Microsoft Clip Organizer by clicking on the small “X” in the upper right
corner of the Microsoft Clip Organizer screen. Don‟t forget to also click the “X” on the
Microsoft Office Online screen if it is also visible.
Move your cursor over the white area in your slide and click the RIGHT mouse button. In
the pop-up menu that appears, select Paste. Your image will now be somewhere on your
screen. You’ll probably have to drag it down and to the left and make it larger (like we did on
Page 33). Go ahead and do that now. When we finished, our slide looked like the one below.
One more
“trick.” Click on your cloud again. Your image
should look similar to the one on the right. Notice
the small yellow diamond at the end of the “tail”
at the bottom of the cloud. This is a special
diamond that will let you move the tail of your
cloud around.
41
42. Move your cursor over the diamond and it will change to an arrow with
“no tail.” When you see this arrow, click and hold down the left mouse
button and drag the diamond toward your animated clip art.
When we finished dragging the yellow
diamond closer to our clip art, our image
looked like the one on the left.
Neat!
Any time you see a yellow diamond with
an object you can get special effects for
the object be “dragging the diamond.”
We’ll work with the yellow diamond again when we show you how to create WordArt in your
slides.
Save your work!
Slide 8
Click the down arrow in the lower
right corner of the New Slide button
once again.
Slide will be a Blank slide. Click the Blank image
in the New Slide menu screen.
WordArt:
Now we’ll add some WordArt to our slide. Click the Insert Tab and the move your cursor
over the WordArt button in the Text Group.
42
43. Click the WordArt button. A drop down menu screen (on the left) will appear.
Move your cursor over one of the WordArt selections you like and click that selection.
We liked the “red A” you see on the left. You choose one you like and click on it.
Several “things” will happen
immediately. First, the center of Slide 8
will show your WordArt selection – similar
to the image on the right.
You’ll also notice a WordArt Drawing Tools Tab – with a WordArt Tools Ribbon – appear.
We could create a tutorial on the new features for enhancing text and WordArt in PowerPoint
2007. However, for this tutorial, we’ll take you through many of these features and let you
explore on your own. From what we show you, you should have no problems exploring further.
Below we’ve enlarged a portion of the Drawing Tools Tab and WordArt Ribbon.
Notice (in the image above) the Shape Styles Group. We’ll use one of these More Arrow
Shape Styles to improve our WordArt selection. To see all of the Shape Styles
click the More Arrow in the lower right corner of the Group.
43
44. When you click the More
Arrow a screen similar to the
one on the right will appear.
As we moved our cursor over
the Shape Style choices we
noticed that a “temporary”
preview of how our text would
look appears on Slide 8. We
liked the Shape Style indicated
by the arrow on the right. So
we clicked that Style. You
browse the Styles and choose
the one you like.
When we clicked our
style the WordArt area
looked like the image
on the right.
Let’s replace the text Your Text Here in our WordArt area with: Enjoy your sandwich.
Highlight the text in your WordArt area by either clicking and holding down the left mouse
button and dragging your cursor over the text. Or click three times quickly to highlight the text.
When the text is highlighted, type Enjoy your sandwich. Your WordArt area should now
look similar to the image below.
Now, let’s see how to use WordArt Styles. Click on your Enjoy your sandwich WordArt and
make sure you can see your WordArt Drawing Tools Ribbon.
In the image below we’ve enlarged the WordArt Styles section of the Ribbon. Move your
cursor over the More arrow and click the More arrow.
44
45. More Arrow
When you click the More arrow an
image similar to the one on the
right will appear. Once again, as
you move your cursor over the
letters you will see your WordArt
area change to that WordArt Style
effect.
Notice that the top portion of the
drop down menu indicates
Applies to Selected Text.” When
your cursor is over one of these
selections you will see that only a
single word is changed.
The lower half of the drop down
menu, indicates “Applies to All
Text in the Shape.”
We chose the orange Style you see
at the bottom of the last page. You
choose a Style you like and click on
it. Our WordArt area now looks
like the image on the right.
Now that you have a “feel” for how the Drawing
tools work for WordArt, look at your Ribbon again.
You’ll see an area similar to the image on the left.
Make sure your WordArt image is “clicked” and
then click the down triangle next to Shape Fill and
move your cursor over the selections. Once again
you’ll see a preview of how your image would look,
if you chose the different Shape fills. Next, try
Shape Outline and Shape Effects.
45
46. Now do the same thing with Text Fill, Text Outline and Text Effects.
For past users of
Microsoft WordArt,
you are probably
wondering where the
neat WordArt Shapes
are located in all of
this.
If you click Text
Effects (as indicated
above – on the right)
and then choose
Transform, you’ll see
the Shapes (now called
Warps) appear. As you
move your cursor over
the Warps, you’ll see
the Warp Effect in your
WordArt area.
Rotation Tool
On Page 33 you learned how to resize and move images. You probably noticed a small green
circle or dot at the top of the images you placed in your slides. This is called the Rotation Tool.
46
47. If you move your arrow cursor over this green circle you’ll notice that the arrow changes to a
curved arrow. This curved arrow indicates that the Rotation Tool is “active.”
If you click and hold down the left mouse button when you see this curved arrow, and move
your mouse a bit to the left or right, you’ll notice that the WordArt image rotates similar to
the image below.
Any time you see the green circle on an image
you can rotate it as you desire. When we
finished our WordArt image looked like the
image on the right.
Save your work!
Text Box
The last “tool” we’ll work with is the Text Box. We’ll add a Text Box to Slide 8. Click the
Insert Tab and the move your cursor over the Text Box button in the Text Group. The Text
Box button will allow you to insert text in your slides if the template you chose does not have the
desired Title and Bullet boxes. To insert text, click-on the Text Box button.
47
48. After you click the Text Box button, move the cursor into an “open” white area on
Slide 8. It will look like a “little sword.”.
When you get to an appropriate place, click the left mouse button and a “text entry
area” will appear (it looks like the image on the right).
Don‟t worry about its size. Just type the following: THE END. Our text
box looked like the image on the right. No problem. Move your cursor over
one of the center sizing squares, click and hold down the left mouse button, and
drag your cursor to the right. You’re THE END should now look similar to
the image below.
Highlight this text, and using the Font formatting methods on Pages 36 & 37 – make the text
larger, change the font, maybe add Shadow, and pick a color that you like.
We enlarged our WordArt and enhanced THE
END and moved them around until our Slide
8 looked like the image on the right. You
enhance your Slide 8 as you desire
Save your work!
Motion Paths
Slide 9
PowerPoint 2007 has some really neat features that you might like to try. You can “trace a
path” for an image to follow around or across the slide. You can have a porpoise jumping in
48
49. and out of the water at the bottom of the slide, or maybe a bat or bat flying around in the top
portion. If you want to do this we‟ll show you how. If not, skip to Page 47.
Click the down arrow in the lower
right corner of the New Slide button
once again.
Slide 9 will be a Blank slide. Click the Blank
image in the New Slide menu screen.
First, following the procedures outlined on Pages 24-33, we went
to ClipArt on Office Online and found a cute bat. We then
downloaded the bat into our Organize Clips.
Then, we copied the bat from Organize Clips and pasted it onto the
blank slide template (Page 32) We made the size of the bat fairly
small and then moved the bat to the lower left corner of the Slide 9
(Page 33). We clicked on the bat to “mark it.”
The bat we chose is already an animated clip
art image. To have it “fly” around Slide 9
we need to add a Motion Path from Custom
Animation. To do this we clicked the
Animations Tab, then clicked the down
triangle to the right of Custom Ani….
When the drop down menu appeared we
clicked Custom Animation… (see images
and arrows on the right).
The image below appeared.
49
50. 1.
2.
3.
4.
When we clicked Custom Animation, a Custom Animation Task Pane appeared on the right
side of our screen. We saw an Add Effect Button ( 1. ). We clicked the Add Effect button ( 1.).
In the menu that appeared, we clicked Motion Paths ( 2. ). In the next menu, we moved down
and clicked Draw Custom Path ( 3. ). In the last menu to appear we clicked Freeform ( 4. ).
After clicking Freeform, we moved our mouse into the template slide
and noticed that our cursor image had changed to “cross hairs.” We
moved the crosshairs over the bat in the lower left corner of the slide.
We then clicked and held down the left mouse button. With the left
button held down, we slowly began to move the cursor to the top of the
template. We noticed that the cursor now looked like a little pencil. As
long as we held down the left mouse button, the pencil traced a path
around the slide. Since we were drawing the Motion Path for a bat, we
drew circles around our slide.
When we finish, we need to turn off the pencil. We clicked the left mouse button
twice – quickly – and the pencil went away. As soon as we clicked twice quickly, we noticed
that our bat “flew” very, very fast around the path we had drawn. The image below is what
our slide looked like when we finished.
50
51. You can see the “flight path” for our bat begins in the lower left corner and goes up, down
around the slide and exits at the right.
We’ll slow our bat down - a lot - and insert a chirping sound as the bat flies around.
On the right side of the screen, in the Custom
Animation Task Pane, we noticed that when
we completed that bat “flight path” that
something new appeared (Picture 2). You
Task Pane may indicate something different, but
don’t worry about it.
We moved our mouse over the small down
arrow on the right of this area and clicked the
small down arrow. A drop down menu,
51
52. similar to the one on the right appeared. We clicked Effect Options and the image below
appeared.
Since we selected Custom Path, to
create our flying bat effect, the
menu screen at the right appeared
when we clicked Effect Options.
Notice, at the top of the menu,
there are two tabs. We are
“clicked” the Timing tab. Our bat
flew very fast and we would like to
slow it down. So, we chose 5
seconds (Very Slow). We also
wanted our bat to wait a few
seconds after we moved to Slide 9
to begin flying. So, we also chose
a delay of three seconds (see
arrows to the right). To complete
this menu screen click OK.
To slow our bat down even more, we chose Effect Options again and typed in 19 (seconds).
This will really slow the path. Experiment and choose a time that you like. You may also desire
to have the “bat fly” when you move to Slide 9. If so, choose After Previous instead of On
Click. Experiment as you like.
To insert a sound with our bat image
(chirping), we went to ClipArt on Office
Online and searched for “bat sounds” and
found a number of chirping sounds. We
downloaded these as we’ve done before.
To add a sound to your image is a bit
tricky. You again click Effect Options
(top of Page 52) as you did before. When
the menu screen appears (like the one to the
left) choose the Effect tab (see top arrow).
52
53. Then click the down arrow to the right of Sound and move down the menu until you see
Other Sound. Click Other Sound. A menu screen, similar to the one below, will appear .
Click the small down arrow to the right of
Look in. When the drop down screen appears,
select My Documents (double-click twice
quickly on My Documents or click-on Open),
then select My Pictures (double-click or
Open) and then select Microsoft Clip
Organizer (double-click or Open).
You should then see a menu screen similar to the
one on the left. The “goofy” numbers you see are
the “names” of the sounds you downloaded! We
said this was tricky.
Click one of the sounds and then click OK. This will take you back to the menu screen at the
top of this page. You will hear your sound play if your volume is set high enough. To complete
your menu screen click OK.
Note: if you are unable to find, or don‟t see the path, the dashed line that you drew for your
image, go to the top of Page 50 and repeat the instructions again. This will cause the path to
reappear and the right side of your screen to again show the Custom Animation Task Pane.
At the bottom of the Custom Animation Task Pane, on
the right side of the screen, you will notice that the area
looks like the image to the right. Anytime you are working
with an animation you will see this image. Notice that you
can Play your animation effects anytime by clicking the
Play button. If you desire to see how this slide will “look”
when you present your PowerPoint slide show, click the
Slide Show.
Viewing your Slide Show
You have just completed the first stage of your presentation. Go back to Slide 1. You
can do this by using the “elevator bar” on the left edge of your screen. If you click at the top
of the elevator bar you will keep moving up until you come to your first slide. Click-on Slide
53
54. 1. It will indicate Slide 1 of 9 in the status area in the lower left corner of your screen. You
should recognize this slide as your first slide on How to make a Great PBJ.
To view how your slide
show will look when you
project it onto a screen
or monitor, click the
View Tab then click the
Slide Show button (like
the image on the right).
Or, you can click the small Slide Show
Screen button in the button bar at the
lower right of the screen.
There are several ways to advance through your slide show. You can tap the space bar, tap
the Enter key, tap the right arrow key, or click the left mouse button to move forward from
one slide to the next (during the show). When you get to the end of the “show” the presentation
will return to your slides. Anytime you want to end the show, simply tap the Esc key in the
upper left corner of the keyboard or click the right mouse button and click on End Show in
the pop up menu that appears. If you end your show “early” you will be on the slide you were
viewing when you tapped Esc or clicked-on End Show.
To “go backward,” to a previous slide in your show, you can tap the Backspace key, or the left
arrow key. If you are using the mouse to “click” through your presentation and desire to go
back, click the RIGHT mouse button and you will see a menu screen appear that allows you to
choose a Previous slide or Go to any slide.
Transitions:
Now we’ll add some pizzazz to our presentation. When you viewed your slide show, a few
moments ago, it was like “flopping down” plastic transparencies on an overhead projector.”
Nothing really fantastic. Now we’ll add some motion, animation, sound, and color and really
make our presentation something to view.
54
55. Go to the Slide Sorter button at the bottom right area of your screen. Click on the button with
four white squares.
You can now see all nine slides (as shown below). Notice that Slide 9 (the one with the flying
bat) does not show the path of the bat. This is because of the motion path – not a big deal.
Lightly, click once on the first slide to highlight the slide (an orange border will surround the
slide – see arrow below). Now point in the MIDDLE of Slide 1 and click on your RIGHT
mouse button.
If you accidentally quick twice on Slide 1, this will take you to the Slide View, again. If this
happens, simply click on the Slide Sorter View button at the bottom of the screen, just like you
did on the last page.
With Slide 1 “marked,” click the Animations Tab. The Animations Ribbon will again open.
For previous PowerPoint users, this is another “totally new” method.
Notice in - the Animations Ribbon a Group – Transition to This Slide.
55
56. Transitions are neat, visual actions, as we move from slide to slide in our show. To get a “feel”
for what Transitions do, click the More Arrow in the lower right corner of the Transition to
This Slide Group.
More Arrow
A Transition
selection screen
similar to the image
on the right will
appear.
So, let’s get started
in creating some movement (transitions) as we enhance our PowerPoint slide show.
Remember that we clicked-on Slide 1 to begin this process.
We have enlarged the Fades and Dissolves and Wipes sections of the Transitions image on the last
page. We moved our cursor over Wipe Up and clicked on it. Immediately our Slide 1
Transitioned with a Wipe Up.
At the bottom of the Transition to This Slide Group there is a
Random area. One of the choices has a Question Mark ( ? ).
We chose this selection and then chose Apply to All Slides. So,
56
57. when we show our slides, each slide will transition with a different effect.
Go ahead and try as many Slide Transitions as you
desire. When you have one you like, look at the
lower left corner of Slide 1. You will see a small
“shooting” star. This means that a transition has
been applied to this slide. If you click the star, you
will see the transition you selected will Play again.
You can repeat the above process by clicking on
each slide and selecting a different transition for
each slide. Or – Notice - on the right side of the
Transition to This Slide Group – you can select
Apply to All. And the transition you choose will be
applied to all of your slides. It’s up to you on how
you want each slide to transition – or not transition.
Also notice that there is a Transition Speed
selection in this same area. You may change your
transition from Fast to Medium or Slow.
You may also add a Sound to your transition. Click
the small down arrow to the right of Transition Sound.
A drop down list of sounds will appear. We chose
Chime for our Slide 1 Transition.
Notice at the bottom of the “list” it indicates Other
Sound…. When we found the bat sound on Microsoft
Office Online, it placed the sound in our Clip Art
Organizer. To use this sound we had to choose Other
Sound. When we did, it was added to our list at the
top.
As you get more comfortable with sounds, you can find
some really neat sounds all over the internet.
57
58. Note: many audiences do not like a lot of “sound” when watching a PowerPoint
presentation. So, you may desire to use sound “sparingly” in your presentation.
Try it out!
Go ahead and run/play your slide show again. See how you like the transitions and sounds.
Adjust as you desire.
Don‟t forget to save your work!
Text Effects - Build:
Building is a term indicating how each line of the text (on a slide) will enter the screen. The
lines, words, letters, pictures and charts can move in or appear from almost any direction. To
Build the text on each slide, follow these directions.
Go back to Normal View. You can do this in Slide Sorter View by double
clicking quickly on the first slide or by Clicking on the Normal View
button on the lower right corner of the screen.
Enhancing Text
When the Slide 1 Normal View screen appears, click on the first line of text. The first Text
Box will appear as below.
When you see the above Text Box, highlight the text. When you do, you will again see the
Drawing Tools Tab appear. Click the Drawing Tools Tab and the Drawing Tools Ribbon will
again appear – just like it did for WordArt.
58
59. Please refer back to Pages 43 – 47 where we showed you how to use this Ribbon to
enhance your WordArt. To enhance your text you’ll do the same things you did with WordArt.
So, click on the Shape Styles and WordArt Styles Groups and change your text as you desire.
You can also use the Text Fill, Text Outline and Text Effects, just like you did before. Be
creative and give your text some zing.
This is new in PowerPoint 2007 – using one Tab and Ribbon for both Text and WordArt!
Animating Text
This will be very similar to what we did on Page 50 with our Motion Path.
Make sure your text is still highlighted.
Click the Animations Tab again, then click
the down triangle to the right of Custom
Ani…. When the drop down menu appears
click Custom Animation… (see images
and arrows on the right).
The following Custom 1.
Animation Task Pane will appear
on the right side of your screen
(very similar to the one we used
for Slide 9). When this screen
appears, first, click Add Effect
2.
( 1. ), then click Entrance
( 2. ), and finally click More
Effects ( 3. ) (because we want
ALL of the effects).
3.
The Add Entrance Effect menu
59
60. screen will appear (like the one on the left).
Move your cursor over the blue Add Entrance Effect “bar” at the top of the menu screen.
Click and hold down the left mouse button and drag the menu screen to the right of your
screen so that you can see the text in the Title text box. After you have moved this box raise
your finger from the left mouse button.
Choose one of the effects by clicking-on it. You will now be able to see the animation effect
in the Text box. You may hear a sound that is “part” of your Slide Transition. We’ll show you
how to add sounds for your text in a moment.
Try a lot of different effects. Notice that there is an elevator bar on the right side of this
menu. As you move down the Add Entrance Effects menu screen you will notice that there are
“groups” of effects – Basic, Subtle, Moderate, and Exciting. Try a “bunch” of these to see
how they work. When you have an effect you like, click the OK button at the bottom of the
Add Entrance Effect
screen.
Now click-on the
lower text box and
repeat the steps we
outlined on Pages
59 and 60.
Notice – on the right side of the screen - under
Custom Animation – that the Titles (on which we
added effects) are shown as a part of this screen (just
like when we created our flying bat on Slide 9).
Also notice, on the right side of our second title there
is a small, down pointing arrow. If you click-on this
arrow it will show you each line of text that you
animated in the lower sub-title box.
Now we’ll enhance our text some more.
Move your cursor over the first title and click the left mouse
button. Next click the small down arrow on the right side of
this box. You will see a menu screen appear that will let you
enhance your title (just like you did in Slide 9). Choose (click)
Effect Options and the menu screen below will appear.
60
61. This screen is similar to the
one in Slide 9, but a little
different. Notice that we
chose Magnify for our text
effect and then chose Laser
for our sound.
We’ll cover Dimming and All
at once when we animate
text in Slide 2.
Go ahead and experiment
with Entrance Effects and
Sounds for your first Slide.
Entrance Effects and
Sounds for Slide 2
The question we receive the most is: “How do you get the text to enter one letter at a time
and have it sound like a typewriter is typing the text?”
We‟ll now show you how to do this.
You should be on Slide 1 in the Normal View screen. We need to
move to Slide 2. Look at left side of the Normal View screen. You
will see that this area looks like the image to the right. Click-on
Slide 2 in this area. A orange border will go around the small slide
and you will see Slide 2 in the center portion of your screen.
You will see your bulleted list of
ingredients in the large Slide 2
area. Move your cursor
anywhere over the list and click
on the list. Your bulleted list
should look like the image on the
right.
61
62. Click the Animations Tab again, then click the down triangle to the right of Custom Ani….
When the drop down menu appears click Custom Animation… (see images and arrows on the
right).
You will see the Custom Animation Task
Pane appear on the right (as you did in
Slide 1).
Select Add Effect, then Entrance and
then More Effects (as you did in Slide 1).
This may not seem like much, but the
choice of the Entrance Effect is very
important here. Notice, in the image to the
right, that we chose Appear. We need the
text to enter, letter-by-letter, very quickly.
Appear will take care of this. Other choices
may “look funny” when the animation is
“running.” When you become more
accomplished with PowerPoint – try all kinds
of effects. Click the OK button when you
have selected Appear.
Look down the Custom Animation Task Pane on the
right side of the screen until you see an area that looks
like the image on the left. Click the small down arrow
on the right edge of the
Content Placeholder and
select Effect Options.
62
63. When you click Effect Options an Appear menu screen (similar to the one on the right) will
become visible. We’ve gone ahead and entered the effects to make our text look and sound like
1.
an “old timey” typewriter typing.
We clicked the down triangles to the right of each feature and did the4.
following:
2.
Sound: We clicked the down arrow to the right of Sound ( 1. ) and chose Typewriter. 3.
63
64. After animation (Dimming):
We noticed that before we clicked the down arrow, that the words “Don‟t Dim” appeared in the
area to the right of After animation. We then clicked on the down arrow and chose the light
blue color that appeared ( 2. ). When you are making your PowerPoint presentation, you might
like to have the bullet, about which you are speaking, be more noticeable than the bullets about
which you’ve already spoken. By choosing the light blue color, as you move through the bulleted
items, you will see the last bullet dim and the new bullet be more noticeable. In a moment, when
we complete this Appear Effect menu, we’ll Play our slide and you’ll see what we mean.
Animate text:
We clicked-on the down arrow and chose By letter ( 3. ).
Seconds delay between letters
We used the small “up and down” arrows to indicate 0.1 seconds between letters ( 4. ).
When you “play” this slide you may desire to slow down or speed up the typing sound. To do so
simply repeat the above and vary the seconds.
When you complete your Appear menu screen it should look like the one at the bottom of
Page 63. Click OK.
Now, click-on Play at the bottom right of your screen.
You will see the text enter like it’s being typed, hear the
typewriter sound, and see the bullets dim as you proceed
on to the next bullet.
Sound
Be Careful with Sound
Be careful when using sound for transitions and text animation. Sometimes, too many effects
can overwhelm and detract from a presentation. As you become more experienced with sounds,
and PowerPoint slides, you will find many web pages devoted to sounds and clip art. In the Front
Page tutorials, there is a section on WAV sounds. If you desire a copy of any of these tutorials,
simply e-mail the addresses at the end of this tutorial. You may want to experiment with some
other sounds you “download and save” form the internet.
Don‟t forget to keep saving your presentation as you enhance it with these
effects.
64
65. Adding Color
There are a several methods you can use to add color and other effects to your slides. We’ll begin
with Color Schemes and then move to Themes.
Slide Color Schemes
For those of you who have used PowerPoint Color Schemes in the past,
Color Schemes takes on a whole new look in PowerPoint 2007. You’ll
be able to do all of the schemes you used previously - and a lot more.
Click the small Slide 1 image on the left side of your screen.
Next, click the Design Tab.
The Slide Design Tab/Ribbon will appear.
Notice the Themes Group takes up much of this ribbon.
Once again, as you move your cursor over these
Themes, you’ll notice that the Themes become visible on
Slide 1.
Since many PowerPoint users like Color Schemes, this is
where we’ll to begin our slide coloring process.
Look at the arrows on the right side of this page. To
color your slide, using a Color Scheme, you’ll need to
click the small down arrow to the right of Colors.
When you click Colors, the image above on the right will
appear. These are the default (Built-In) Color Schemes.
You can choose them as you desire. We’ll click the Create
New Theme Colors selection at the bottom of this menu to
create our own Color Scheme.
65
66. When you click Create New Theme
Colors, the image on the right will appear.
When you click the small down arrows to
the right of several Theme colors
selections, the Sample area, on the right
side of this menu screen, changes with each
selection.
Below is an image of the Theme Colors
drop down menu for Text/Background –
Dark 1. As you choose colors – you will
see the result in the Sample area.
When we finished our color selection, our
Create New Them Colors selection, our
Color Scheme looked like the one on the
right.
We named our new theme – Your New
Theme Color. You can name your Themes
anything you desire.
A huge CAUTION – but not a
problem! As soon as we clicked the
Save button, our ENTIRE slide
show changed to the new Color
Scheme.
66
67. Our slides all changed to the new Color Scheme you see on the
right.
If you like the Color Scheme you created, this is
not a problem. If you do not like your scheme,
you can click the Undo Arrow at the top of the
screen. When you click, your slide show will
return to the slides you created previously.
Notice that your new
color scheme has been
added to the Themes
in the Design
Tab/Ribbon.
You have a lot of flexibility in
PowerPoint 2007. You can apply any
of the Themes to specific slides, or to
all slides. When you RIGHT click on
a theme, a pop-up menu will appear.
You can choose to Apply to All Slides
or to Apply to Selected Slides.
We liked our new Color Scheme for Slide 1. But, we wanted
another theme for Slide 2. We clicked on Slide 2. Then, we
RIGHT clicked on one of the white themes and chose
Apply to Selected Slides. When we did, our Slide 2 changed
to the white theme. Our Slides 1 and 2 look like the image on
the left.
As you become more comfortable with PowerPoint 2007 you’ll be able to create Color Schemes
and Themes that you can change, mix and apply to your slides. So, experiment as you like.
Don‟t forget to Save your work every now and then!
67
68. Changing Colors in Color Schemes
If you desire to change the colors in
your Custom Color Scheme, click the
down arrow to the right of Colors, and
move your cursor over your Color
Scheme and click the RIGHT mouse
button. An image similar to the one on
the right will appear. Move your cursor
over Edit and click. Your Create a
New Theme Color menu (image in
middle of Page 66) will appear.
When your Create a New Theme Color menu appears, follow the instructions on Page 66 to make
additional changes.
Note of Caution: Be very careful when you are working with background colors. Many
times color changes will make the text on the slide hard to read against a background. All of
the templates in PowerPoint are OK with color and text, but when you start changing either the
background or text color, you may create a slide where the text is hard to see. So, again be
careful – and remember the Undo Arrow.
Backgrounds
Click Slide 2.
We’ll use some other
features in PowerPoint
2007 to enhance the
backgrounds of our
slides.
On the right side of the Design Tab/Ribbon you’ll
see a Background Styles choice. Click the down
arrow to the right of Background Styles. The
menu screen on the right will appear.
Click the Format Background selection.
68