50 gallon whiskey barrel motorcycle trailer
•
1 gefällt mir•2,085 views

How to build a a Pull Behind Motorcycle trailer from an old 50 gallon wooden whiskey barrel.

Empfohlen
Weitere ähnliche Inhalte
Ähnlich wie 50 gallon whiskey barrel motorcycle trailer
Ähnlich wie 50 gallon whiskey barrel motorcycle trailer (20)
Mehr von Karl Steinmeyer
Mehr von Karl Steinmeyer (13)
Kürzlich hochgeladen
Kürzlich hochgeladen (20)
50 gallon whiskey barrel motorcycle trailer
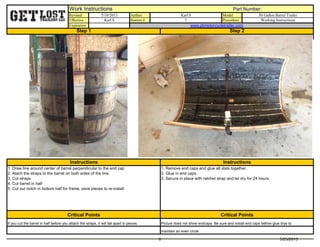
- 1. Work Instructions Part Number: Revised Author Model Effective Station # Procedure Expiration www.pbmotorcycletrailer.com Picture does not show endcaps. Be sure and install end caps before glue drys to 1. Remove end caps and glue all slats together. 2. Glue in end caps. 3. Secure in place with ratchet strap and let dry for 24 hours. 1. Draw line around center of barrel perpendicular to the end cap maintain an even circle. If you cut the barrel in half before you attach the straps, it will fall apart in pieces. Karl S 1 50 Gallon Barrel Trailer Working Instructions 5/10/2013 Karl S Critical Points Critical Points 2. Atach the straps to the barrel on both sides of the line 3. Cut straps 4. Cut barrel in half 5. Cut out notch in bottom half for frame, save pieces to re-install Step 1 Step 2 Instructions Instructions Work Instructions Part Number: 8 5/25/2013
- 2. Work Instructions Part Number: Revised Author Model Effective Station # Procedure Expiration Step 1 Step 2 Instructions Instructions Karl S Critical Points Critical Points 2. Fill gap between end cap and barrel slats with wood filler (as needed) 2a. Gap is referred to with green arrow in both building pics above. 3. Fill any large divits or gaps in wood slats with wood filler as needed 1. After glue is dry, remove the inner straps and sand any rough surfaces Do not remove straps until glue has dried for 24 hours Karl S 1 50 Gallon Barrel Trailer Working Instructions 5/10/2013 www.pbmotorcycletrailer.com Remove end cap straps to seal wood and immediately re-install 1. Seal wood using Waterlox Original Wood sealer. - Top Half Work Instructions Part Number: 8 5/25/2013
- 3. Work Instructions Part Number: Revised Author Model Effective Station # Procedure Expiration Step 1 Step 2 Instructions Instructions Karl S Critical Points Critical Points 1. Cut steel and assemble according to drawing above Instructions Triple weld tongue corners - Blue arrows Tires are shown for reference only Frame must be square within 1/16" Karl S 1 50 Gallon Barrel Trailer Working Instructions 5/10/2013 www.pbmotorcycletrailer.com Axles must be square with each other and frame within 1/8" 1. Drill flat plates and attach half torsion axles. Instructions Work Instructions Part Number: 8 5/25/2013
- 4. Work Instructions Part Number: Revised Author Model Rev By: Station # Procedure Top of frame is even with the top of barrel. Critical Points Critical Points Karl S 1 50 Gallon Barrel Trailer Working Instructions 5/10/2013 Karl S 2. Use 1/4 20 pan head screws on straps on left and right side. 3. Use 1/4 20 counter sunk screws on front and back under hinge and tailight 1. Install frame in lower half of wood barrel Blue arrows www.pbmotorcycletrailer.com Step 1 Step 2 Instructions Instructions Work Instructions Part Number: 8 5/25/2013
- 5. Work Instructions Part Number: Revised Author Model Rev By: Station # Procedure Hinge Dimensions are 16" wide x 6" tall. (top and bottom are 3" each) Instructions Karl S Critical Points Critical Points Step 1 Step 2 Instructions Seal up the inside. 3 Coats with minimum of 4hrs of dry time between each coat Hinge .25" thick May use 3-4 cans. Karl S 1 50 Gallon Barrel Trailer Working Instructions 5/10/2013 www.pbmotorcycletrailer.com Attach with 1/2" Wood screws Work Instructions Part Number: 8 5/25/2013
- 6. Work Instructions Part Number: Revised Author Model Rev By: Station # Procedure Step 1 Step 2 Instructions Instructions Use 1/2" coarse thread 316 Stainless Steel (SS) counter sink wood screws Critical Points Critical Points Side Marker Lights Rear Tail Light License Plate Bottle Opener Attach: Karl S 1 50 Gallon Barrel Trailer Working Instructions 5/10/2013 Karl S www.pbmotorcycletrailer.com Drop Test: Unhook coupler from ball and drop to the ground. If the tongue can touch the grou Attach Chains with 3/8 bolts. Use Stainless Steel or Chrome chains to eliminate rust Work Instructions Part Number: 8 5/25/2013
- 7. Work Instructions Part Number: Revised Author Model Rev By: Station # Procedure Step 1 Step 2 Instructions Instructions Critical Points Critical Points 5-wire flat connection White - Ground Yellow - Left Green - Right Black - Running Red - Brake Wiring: Karl S 1 50 Gallon Barrel Trailer Working Instructions 5/10/2013 Karl S www.pbmotorcycletrailer.com Pack, Hook it up, and Get Lost. Work Instructions Part Number: 8 5/25/2013
- 8. Work Instructions Part Number: Revised Author Model Rev By: Station # Procedure Products used in this build Products used in this build For more information and Custom build trailers ideas/plans visit: Critical Points Critical Points Axles and hubs Light - Brake and running bar Lights - Blinkers Latches Wiring Sealer - Exterior wood sealer Wheels www.pbmotorcycletrailer.com www.pbmotorcycletrailer.com Karl S 1 50 Gallon Barrel Trailer Working Instructions 5/10/2013 Karl S www.pbmotorcycletrailer.com Full product details and disclaimers at: Sealer - Interior water Sealent Update - Swivel Hitch Chains Coupler License Plate Frame Bottle Opener 8 5/25/2013