

Empfohlen
Empfohlen
Weitere ähnliche Inhalte
Ähnlich wie Ariba Knowledge Nuggets: Managing Dashboards
Ähnlich wie Ariba Knowledge Nuggets: Managing Dashboards (20)
Mehr von SAP Ariba
Mehr von SAP Ariba (20)
Kürzlich hochgeladen
Kürzlich hochgeladen (20)
Ariba Knowledge Nuggets: Managing Dashboards
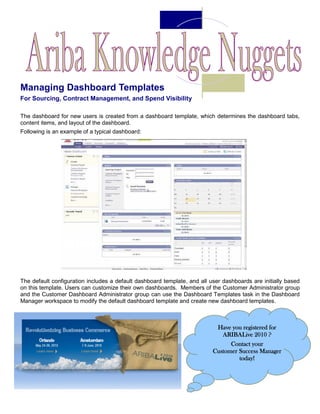
- 1. Managing Dashboard Templates For Sourcing, Contract Management, and Spend Visibility The dashboard for new users is created from a dashboard template, which determines the dashboard tabs, content items, and layout of the dashboard. Following is an example of a typical dashboard: The default configuration includes a default dashboard template, and all user dashboards are initially based on this template. Users can customize their own dashboards. Members of the Customer Administrator group and the Customer Dashboard Administrator group can use the Dashboard Templates task in the Dashboard Manager workspace to modify the default dashboard template and create new dashboard templates. Have you registered for ARIBALive 2010 ? Contact your Customer Success Manager today!
- 2. Dashboard Template Rankings Each dashboard template has an associated rank. New users get the dashboard template with the highest rank. Rank determines which dashboard template a new user gets when: • A template is associated with the user’s group and the user belongs to multiple groups • More than one dashboard template is associated with the same group Column Description Rank The dashboard template’s rank. New users get the dashboard template with the highest rank. Rank determines which dashboard template a new user gets when a template is associated with the user’s group and the user belongs to multiple groups, and when more than one dashboard template is associated with the same group. Name The name of the dashboard template. Creator The name of the user who created the dashboard template. Group The user group associated with the dashboard template or None (which indicates no group association). When a new user belongs to a group that has an associated dashboard template, the user’s dashboard is created from that dashboard template. State The state of the dashboard template. The possible states are: Published—the template is available to users at your site Editing—the template creator is editing the template Version The version number of the dashboard template. The default version number for a new template is 0. Actions This column contains the buttons you use to perform actions on dashboard templates: Configure—Lets you add content to and edit properties for the current dashboard tab, add new dashboard tabs, compare your dashboard template to the default settings, and revert your dashboard template to the default settings. Delete—Deletes the dashboard template. Publish—Publishes the dashboard template. The Publish button is available only when the dashboard template is in the Editing state. The Dashboard Templates page also contains the following buttons: • New Template—Creates a new dashboard template. • Update Rank—Updates dashboard template rankings.
- 3. Personalization —- Did you know you can customize your dashboard templates? To add or modify a dashboard template: To add content items to the current dashboard tab: 1 Choose Dashboard Manager > Dashboard Templates and click New Template to create a new template, or find the tem- 1 Choose Configure Tabs > Add Content. plate you want to modify and click Configure. 2 You can click Configure Tabs to: 2 In the Add Content menu, drag and drop an item to any loca- • Add content to the current dashboard tab tion on the dashboard tab. Use the blue line that appears when • Edit properties for the current dashboard tab you start dragging the item to position it before you drop it. You can also click an item to add it to the right column of your • Add new dashboard tabs dashboard tab. • Compare your dashboard template to the default settings 3 Click Done when you have finished adding content items. • Revert your dashboard template to the default set- tings 4 Click Return to Administration page to return to the 3 Click Return to Administration page to return to the Dashboard Templates page. Dashboard Templates page. To edit properties for the current dashboard tab: To add a new dashboard tab: 1 Choose Configure Tabs > Edit Properties. 1 Choose Configure Tabs > Add New Tab. 2 To change the title of the dashboard tab, enter a new title the 2 Enter a title for the new dashboard tab in the Title field. Title field. 3 Click Display all document types on this tab if you want all 3 Click Display all document types on this tab if you want all approvable document types to be visible on the dashboard tab, approvable document types to be visible on the or click Restrict this tab for use with specific document types dashboard tab, or click Restrict this tab for use with specific if you want to select the document types that will be visible on document types if you want to select the the dashboard tab. document types that will be visible on the dashboard tab. 4 If you selected Restrict this tab for use with specific docu- ment types, specify the approvable document types 4 If you selected Restrict this tab for use with specific docu- ment types, specify the approvable document types you want to you want to be visible on the dashboard tab: be visible on the dashboard tab: • Select Available to make a document type visible on • Select Available to make a document type visible on the dashboard tab. the dashboard tab. • Select Primary to make this dashboard tab the main • Select Primary to make this dashboard tab the main tab for documents of a certain type. tab for documents of a certain type. 5 Click OK to add the dashboard tab. 5 Click OK to save your changes, or Cancel to return to the pre- vious page without saving your changes. 6 Click Return to Administration page to return to the Dashboard Templates page. The new dashboard tab appears on the command bar and the Add Content menu opens.
- 4. Publishing Your Template Is Easy…. Publishing a dashboard template makes the template available to users at your site. If a newly published template replaces the existing default template, new users will get the new template when they log in. Existing users will not get the new template unless they reset their dashboards to the default settings (Configure Tabs > Revert Tab Set to Default Settings command). To publish a dashboard template: 1 Choose Dashboard Manager > Dashboard Templates. 2 Find the dashboard template you want to publish and click Publish. 3 Enter a message to announce the publication of the template. 4 Click Translations to enter translations in one or more of the languages sup- ported at your site. 5 Click OK to publish the template, or Cancel to return to the previous page without publishing the template. Reverting a Dashboard Template to the Default Settings Use the following procedure if you want to reset your dashboard template to the default settings. All dashboard template customizations will be lost, including any new dashboard tabs that you added. To revert a dashboard template to the default settings: 1 Choose Configure Tabs > Revert Tab Set to Default Settings. 2 Click OK to revert to the default settings, or Cancel to return to the previous page without reverting to the default settings. Ariba Customer Success Lunch and Learn On June 8th, mark your calendars to join the Ariba Customer Success Team at this month’s informative session on Managing Your Dashboard Templates. Date: June 8, 2010 @ 11 AM EST Duration: 30 to 45 minutes Topic: Managing Dashboard Templates Host: Dan Schunk, Senior Solutions Consultant Outlook Invite Attached