
Recommended
More Related Content
Recently uploaded
Recently uploaded (20)
Featured
Featured (20)
Best Teeth Whitening
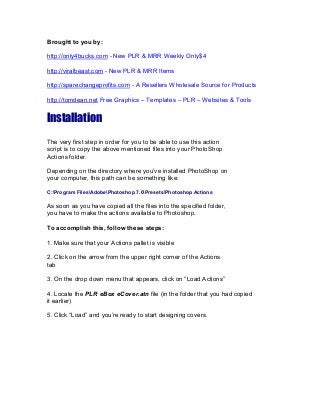
- 1. Brought to you by: http://only4bucks.com - New PLR & MRR Weekly Only$4 http://viralbeast.com - New PLR & MRR Items http://sparechangeprofits.com - A Resellers Wholesale Source for Products http://tomdean.net Free Graphics – Templates – PLR – Websites & Tools Installation The very first step in order for you to be able to use this action script is to copy the above mentioned files into your PhotoShop Actions folder. Depending on the directory where you’ve installed PhotoShop on your computer, this path can be something like: C:Program FilesAdobePhotoshop 7.0PresetsPhotoshop Actions As soon as you have copied all the files into the specified folder, you have to make the actions available to Photoshop. To accomplish this, follow these steps: 1. Make sure that your Actions pallet is visible 2. Click on the arrow from the upper right corner of the Actions tab 3. On the drop down menu that appears, click on “Load Actions” 4. Locate the PLR eBox eCover.atn file (in the folder that you had copied it earlier) 5. Click “Load” and you’re ready to start designing covers.
- 2. Using the Scripts 1. You’ll see that there are two actions in every actions folder you’ve installed: StepOne and StepTwo. 2. Click on StepOne and then on the Play Selection button. Wait until Photoshop plays the whole action. This step will create a basic layout of your flat cover. Wait for Photoshop to stop playing the action. When everything is ready, you should see one the following images (depending on the action you’ll run): 3. Now, you’ll have to add your own text, insert additional images and complete the design of your cover. Here are some hints: • To type your own text, select the text layer you want to modify from the Layers palette, hit the T key and click on the text. Now enter your own text. When you’re done, either hit the ENTER key from the numeric keyboard, either click once on the arrow tool from the tools palette. • Another thing you can do now is to change the color of different layers. You can do that by choosing a different color and then pressing ALT+Backspace. • To import a background image simply select the Background layer from the layers palette. Then open the desired image, hit CTRL+A to select the whole image and then CTRL+C to copy it into clipboard. Select the cover image and then hit CTRL+V to paste the clipboard content. You can do this with any image you have on your computer. If you’re graphically challenged and you need help in completing this step, I provide a professional custom cover creation service
- 3. 4. When you’re done with all this work and you really like what you see, just click once on the StepTwo action from the actions tab and then on the Play Selection button once more and your cover should be ready by now. 5. The final touches are simply a matter of making various layers visible or not. When your cover is ready, do not forget to resize it to your desired dimensions (press ALT+I then I again), save it as a jpg or as a gif file (do this by pressing CTRL+ALT+SHIFT+S) and you’re ready to upload it to your server. No part of this instruction book can be copied in any way without the written consent of the author. Thanks